If you want to learn how shoe outsole tooling is made you are in the right place! All new outsole tooling starts with a designer’s drawing. The designer should have followed the last bottom outline to get the shape close to the final design. The shoe factory outsole technician will create a 2-D drawing for the designer to review. The shoe factory’s technician has a lasted upper so that he can draw a top net that fits the shoe correctly. Once the 2-D drawings are confirmed by the designer, mold factory will make a 3-D CAD drawing that will be used to cut a prototype part.
Before any metal is cut, high density REN foam is cut so the designer and shoe factory can check all the details. The REN foam is soft when compared to metal and can be cut very quickly. The REN cutting machine running at high speed can cut the top, sides, and bottom of a new outsole design in just a few hours. Shoe tooling for midsoles and outsoles is made the same way.
The Ultimate Shoe Material Guide Book
Start with In-depth study of material types available in modern shoemaking. Learn the Technical details of shoe material specification. 195 pages or 300 color photos.
Buy Now
on sale $39.99
A small factory for cutting outsole tooling
a high speed machine cuts one side at a time
Sneaker rubber outsole tooling being made
Fine detail can be cut
The REN outsole model may need some hand work, you also see a midsole
The tiny tool creates fine detail
The REN outsole model may need some hand work
Old REN models for outsoles and midsoles in storage
The REN model may be painted and sent to the designer for study. The REN model can also be joined with the lasted upper to get the idea of what the final completed shoe will look like.
After the REN is approved, the design is sent to the metal shop. Depending on design, the metal may be cast, burned by high voltage electric discharge, or CNC cut by a computer controlled milling machine. The molds are made from steel and aluminum. The flat rubber mold will be made from steel and cut by a CNC machine. A midsole mold with high sidewalls and undercuts will be made from cast aluminum. If the mold is made by casting process a REN must be made of each size, left and right. CNC cut molds don’t require every size to be cut.
Shoe outsole mold factory
El molde de la suela se parece a un molde para gofres.
Adjusting the top net with a metal grinder, the outsole and midsoles must fit together tight.
Footwear mold parts rough cut
The mold surface is made square to fit into the hot press molding machine
After test pressing the rubber outsole mold will be adjusted
The shoe mold is being cleaned up by hand
A high heel rubber outsole mold is hand finished
The top surface of the mold is the parting line
Assembled mold waits for pick up
While most of the footwear mold is created by machine, hand work is still required to make sure everything fits correctly. Outsole and midsole parts must fit together tightly for good bonding. After a test pressing the outsole molds are returned to the shop for some rework. This mold shop will also repair an outsole mold that has been damaged or worn out during production. While the mold factory may be a loud and dirty place to visit, if you want to see how Shoe Outsole Tooling is made it’s worth a visit! You will see many types of molding equipment for shoe soles.
How are shoes made in factories? The manufacturing process for shoes is basically the same for all types of shoes. The sports shoe manufacturing process used to make a kids sneaker, Air Jordan™, or women’s high heel fashion shoe are very similar. Shoe factories around the world follow the basic steps to make a shoe.
The basic shoemaking steps are: #1. Cutting upper parts #2. Stitching shoe uppers #3. Lasting and assembly
In this article, we will look at each of these factory processes for shoes. Of course, the number of operations is not 3. The number of operations is more like 30,000 depending on how you are counting.
Cutting Shoe Parts
The shoe production process starts with cutting the materials. Shoe parts are generally cut by steel dies in a hydraulic press. The cutting dies for shoe parts look like simple cookie cutters but they are very sharp. Every shoe part requires it’s own cutting die. Every part for every size needs its own die. These shoe parts are called the shoe pattern. To support the production of high volume shoes in popular sizes, often many die sets are required. The cutting dies are placed on the leather or fabric materials by hand, then the press closes to make the cuts.
After the parts are cut a worker will carefully organize and stack the shoe parts. The parts will then be moved on to be processed before stitching. The parts will be marked for alignment or have logos added by the embroidery or printing departments.
Once the parts are prepared, the shoe factory workers will organize the parts into kits for the stitching department.
Once the shoe parts are processed and organized, the shoe factory stitching department takes over. In the stitching department, the operations are divided into simple steps. Each worker is given one task to complete. For example, one worker will sew the vamp parts to the mudguard then pass the shoe onto the next worker to attach the eyestay parts. With each operation assigned to one worker, the QC staff can quickly track any problems. The division of the operations also allows the worker to quickly master their operation. In the stitching department, the upper parts are assembled, the lining attached, and the foam for collars and tongues are inserted.
The upper is completely assembled with the reinforcing parts added and heat molded into shape. Toe caps and heel counters are formed and ready for the final assembly operations.
New Course! Shoemaking for Designers & Brand Builders
Created for footwear beginners and career changers alike, this course delivers the basic shoemaking knowledge you need to get you career in the shoe trades started.
Learn more
On sale $99
Shoe lasting and assembly Process
With the stitching complete, the upper is ready to be bonded to the outsole. Before the outsole can be attached, the upper must be “lasted.” Lasting is the operation that gives the shoe its’ final shape. The plastic, metal, or wood foot form (the “last”) is inserted into the upper. The upper is pulled tight, this sets the shape.
With the upper tight to the last, the outsole unit can be permanently cemented to the upper. During this process, the shoe travels inside a heat tunnel to dry the glue before the final bonding process. The last steps are QC and packing.
The Shoe Assembly Line Chapter 12
The process of making shoes is covered in great detail in the book How Shoes are Made. Inside How Shoes are Made you will find chapters on the cold cement process, vulcanized shoemaking processes, stitching, and outsole fabrication.
Start Building Your Shoe Business
A must-have for anyone serious about launching a footwear company. 4 text books, shoe business documents and downloadable content not available anywhere else! The Shoe Company Start-Up Pro Pack is all you need to get your shoe business off the ground.
Learn more
Download Today
Almost every modern shoe design project will require some sort of molded component. From hidden heel counters, to outsoles, to fancy chrome plated logos you will need make some molds. While some shoe factories will have limited molding equipment, very few will have the capability to make the molds. To make molds for your footwear projects you will need the help of a footwear mold making specialist.
Located in the town of Humen in the heart of the South China shoe making trade, Dongguan Shi Desheng Mold Co. LTD is a typical footwear mold making factory. This factory is well suited to make the plastic injection and compression tooling you may need for your new shoe designs. When you visit a footwear tooling factory you are looking to see a team of CAD designers. They should be busy at work designing the molds. Often the factory technicians will suggest modifications to make your parts stronger or easier to mass produce.
You will also be looking to see CNC machines, EDM machines and milling machines.
The CNC or Computer Numerical Controlled milling machine is the work horse in the footwear tooling business. You should see CNC machines busy cutting steel molds or copper electrodes. At Dongguan Shi Desheng Mold Company you will see 10 CNC machines cutting. Why 10 machines? When a shoe factory orders molds they will often need the size run opened quickly.
Why are the machines used to cut copper electrodes? Tooling steel is very hard and it can be very time consuming to cut fine details. Also, some details are difficult to cut in the negative required for molding. To make these fine details, a soft copper electrode is cut then used to EDM (Electrical Discharge Machining). The copper electrode is charged with high voltage then slowly lowered onto the steel. An electrical spark will arc from the copper to the steel, burning away a tiny piece of metal. As the electrode moves, the spark will jump to the next highest spot burning away more metal.
To learn more about the Dongguan Shi Desheng’s mold making capabilities you can contact William Wang the Business manager here on Linkedin Dongguan Shi Desheng Mold Company
There are many shoe construction methods from which a shoe designer can choose. Depending on the function and style of your shoe design, you have many options for connecting the upper to the outsole unit. The classic Goodyear welt, the heavy-duty Norwegian welt, and the modern cold cemented Strobel construction, to name a few.
Whether you are designing running shoes, Alpine mountaineering boots, or posh office shoes, you will need an understanding of shoe construction methods. Here we will review these common forms of footwear construction including board-lasted construction, Strobel construction, Blake Construction (also called McKay Welt), Blake/Rapid Construction, Goodyear welt construction, Norwegian Storm Construction, Stitch down Construction, and Bologna Constructions.
Need to know Footwear Construction Terms:
Welt: A welt is a strip of leather, rubber, or plastic that runs along the perimeter of a shoe outsole. The machinery used for this process was invented in 1869 by Charles Goodyear Jr., the son of Charles Goodyear. Outsole: Can be made of rubber or leather. Midsole: Can be made of leather, cork, or foam.
Board Lasted Construction: A very common shoe construction technique that can be made by machine or by hand. The upper is pulled tight and bonded to a fiber board. The outsole unit is firmly cemented to the upper, securing the upper to the sole. Board lasting construction can be used on almost any style of shoe, being suitable for many upper material types and outsole styles. Strobel Construction: Used for most athletic shoes, Strobel requires the upper material to be sewn to a fabric bottom creating a “sock.” The upper and bottom are joined by a Strobel stitch, using a Strobel machine.
With the upper sock tightly lasted, the upper is cemented to the outsole completing the shoe. Blake Construction: Used to make flexible leather shoes, the Blake construction starts with a board-lasted upper. Glue the sole in place then with the last removed, sew the upper directly through the outsole unit. The outsole may be leather or rubber and have a groove molded into its surface to guide the Blake stitch. You will find Blake construction on weltless leather dress shoes, moccasins, and boat shoes. Blake construction is not waterproof. Blake/Rapid Construction: Similar to the standard Blake construction, but with a “rapid” perimeter stitch attaching the outsole. The outsole covers the Blake stitching. This allows for a thicker sole and is easier to resole. The extra layer can be rubber, making the shoe more durable. Goodyear Welt Construction: The Goodyear welt is often used to make waterproof soles, the stitch that attaches the sole to the shoe runs around the outside edge and does not make stitch holes in the upper. The upper is sewn to the welts that attach to the insole and the outsole. During assembly, the welts are attached first by a horizontal “Goodyear” stitch, named for the inventor of the stitching machine, Charles Goodyear Jr. (also the son of the famous rubber inventor, Charles Goodyear Sr.). The Goodyear welt construction method is ideal for heavy-duty boots for hiking or service. Norwegian Storm Welt Construction: Similar to the Goodyear welt construction method but the upper is turned outside and is sandwiched between the outer welt and the outsole. Used to make the heaviest waterproof boots, the Norwegian Storm Welt is difficult to make and is found almost exclusively in the workshops of Italian bootmakers. Stitch down Veldtschoen welt Construction: Again, the Veldtschoen welt is related to the Goodyear and Norwegian welt constructions. In this case, an inner welt or rapid stitch line sewn through the midsole is paired with a second rapid stitch that attaches the outsole. The outsole is attached after the first welt, the bottom stitch is protected by the outsole. Bologna Construction: Developed in Italy and used primarily for dress or fashion shoes, the Bologna construction creates a smooth, comfortable shoe. The shoe lining is joined into a sock fitting the last tightly. The leather upper is then attached to the sole via the Blake stitching method. The Bologna shoe construction method is ideal for making very clean looking and flexible shoes.
New Course! Shoemaking for Designers & Brand Builders
Created for footwear beginners and career changers alike, this course delivers the basic shoemaking knowledge you need to get you career in the shoe trades started.
Learn more
On sale $99
Start Building Your Shoe Business
A must-have for anyone serious about launching a footwear company. 4 text books, shoe business documents and downloadable content not available anywhere else! The Shoe Company Start-Up Pro Pack is all you need to get your shoe business off the ground.
Learn more
Download Today
What is the Process of Making New Balance Classic Shoes? Most New Balance shoes are made by Cold Cement Construction process. The New Balance classic trainer styles have a Sheet Cut EVA midsole. This Midsole is attached by the Cold cement process. Cold cement is the modern updated style of shoe construction. Cold cement is the opposite of the classic high heat vulcanized shoe construction, as found in Vans and Converse shoes. Cold Cement shoe construction allows the use of modern lightweight plastic, foam and mesh materials due to the low temperatures required for bonding the upper to the shoe sole. Every modern high performance athletic shoe manufactured by New Balance for Running, Basketball etc… is made by this cold cement process.
Cold Cement / Sheet CUT EVA Shoe Assembly Process:
New Balance Classic with a sheet cut EVA Midsole the shoe upper must be prepared by board lasting. For this running shoe the outsole will not cover the edge upper so it must be tucked under. This is called “board lasting”. The lasting board is made of treated fabric or paper board.
The shoe upper is steamed to soften the materials and the last is inserted and pulled tight. A lasting machine is used to pull the upper tight. The Lasting machine pulls the upper tight, while securely bonding the upper to the lasting board. The lasting board remain inside the shoe, you can see it under the footbed.
The shoe may have a plastic or fabric part installed on top of the tongue to protect the surface from damage and drift during the lasting operations.
Sheet but EVA sole – Cut and Buffed and ready
While the upper is being lasted the sole unit being prepared. In this case a the rubber sheet sole is combined with the EVA foam cushioning component cemented to the underside. This is done in a separate process that’s called stock fitting.
The sheet cut EVA material is cut into a profile then machined to follow the outside bottom shape. A shaped grinding stone buffs the edge profile.
Now that the upper is lasted tightly and the outside unit is compete, the two pieces come together. The rubber sole unit will receive a coating of primer and cement. The outsole will get it’s own special primer designed for EVA and rubber. The shoe upper is also prepared with its own special primer and cement.
After the contact cement and primer has been completely dried in the heating tunnels the two pieces are joined together by hand. The skilled worked aligns the upper and outsole together then places the shoe is a hydraulic press.
The toe tip will get extra pressing[/caption]
The shoe will have some pressing operations, usually all done with one machine. A vertical press, toe and heel press and Side presses. This insures there is full contact between the upper and outsole. Once the shoe is pressed together it’s often put in the cooling tunnel to set the glue.
After the cooling tunnel a shoe de-lasting machine is used to push the last out of the shoe without wrinkling the upper.
Now the sneaker is complete at this point you can insert the foot bed. The footbed may be molded EVA with a fabric cover or flat sheet cut foam. The flat die-cut footed is usually cemented inside the shoe, while molded footbeds are most often removable.
The new sneaker is ready for a final QC inspection, a quick check for any loose threads, cleaning and packing.
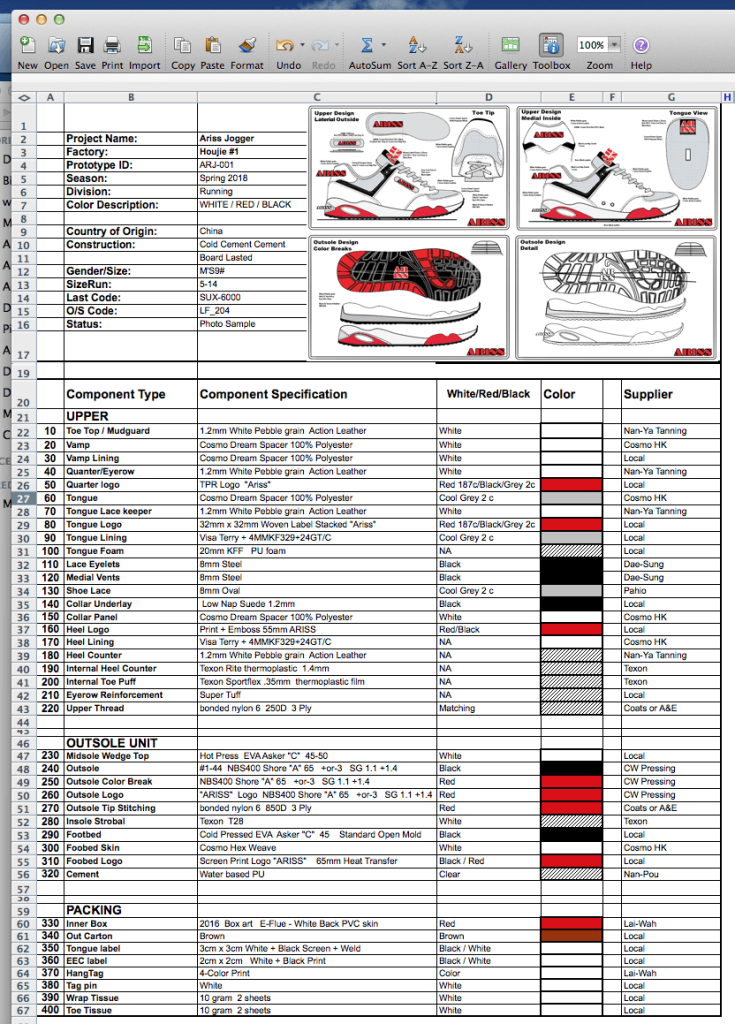
Once a new shoe design has been approved for development the shoe designer and developer will work together to create a detailed set of specification drawings or “tech pack” or “specs”. The shoe technical drawings may be done by the designer alone but often a developer will fill in the technical details. These drawings and documents detail every part of the sneaker from the upper to the outsole bottom. The line item specifications include the name of each part, the material, material vendor, thickness, and color reference. The Spec includes the shoe last information, logo art, design details, emboss effects, etc. The spec may also include sample shoes, material swatches, photos, or any other notes to help build the samples. All of these items together make a complete footwear design tech pack. You can see a complete line item shoe specification here.
Spec sheet for Ariss Trainer .xls format download
The Spec drawings and line item spec may be e-mailed, sent by courier service, or hand-carried by the developer to the factory. At this point in the process, the shoe developer is responsible for getting the sample sneakers built.
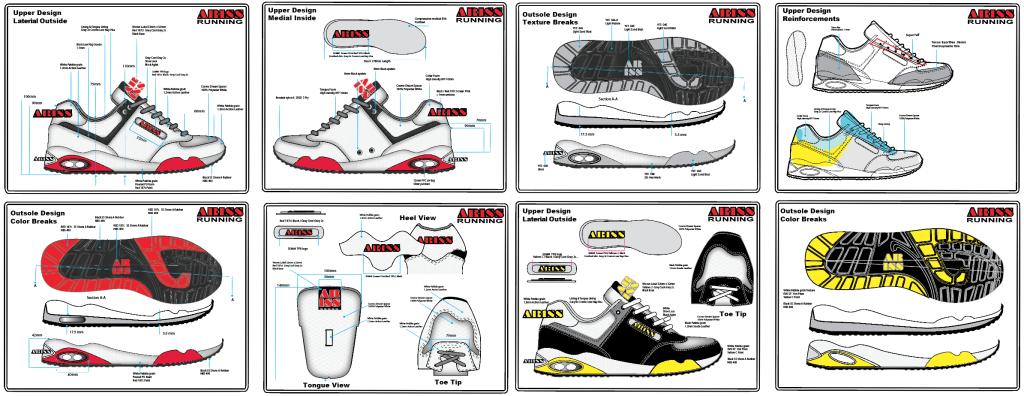
A complete shoe specification drawing will contain the following items:
Shoe Design Tech Pack
Lateral view (outside of the Shoe) Medial View (inside of the shoe) Heel View (view from the back) Tongue View (showing any logo art) Vamp View (looking down on the toe) Detail views of any small plastic parts Material Map of the upper Color map of the first sample colorway to be made. Outsole Side Profile Outsole Bottom View Outsole Top net View Detailed view of injection parts Cross-section view of the sole Diagram of Internal parts Diagram of Internal reinforcements Color map showing future plans for color breaks
Shoe Specification Pack Download
This shoe specification drawing pack is all you need to get started detailing your own shoe designs. This footwear spec pack contains a technical specification drawing for a fully detailed shoe design, ready for your creative touch. Upper views, outsole designs, material specs, colors. This is how a pro prepares a shoe design for the factory. This 8 page drawing set is in Adobe .pdf format and Adobe Illustrator .ai live vector file. $9.99 Download
Yes! You are in the right place. The Sneaker Factory offers options to suit your level. Self-paced online learning for free, supplemental books and shoemaking materials, live virtual classes, and private consulting with the Shoe Dog. Free shoe school is outlined below. Please send us an email for more information on the live classes and consulting with The Shoe Dog.
Shoe school – Free and Self-Paced: We have pulled together an online curriculum of shoemaking articles in a sequence that will take you from the basics of shoe design and shoemaking to advanced material selection topics. Step-by-step you will learn how to design shoes. This collection of articles teaches shoe making for beginner students of the trade.
Learn how to make shoes with this short online course where you study the basics of shoe design and techniques for mass production. Get a firm grasp of shoemaking terminology, shoe patterns, and construction. Our shoe making tutorial takes just a few hours to read. Of course, we also offer additional books and instruction for shoe designers.
Welcome to the Sneaker Factory Online shoe school, let’s get started! We have taken great care to make learning easy! Throughout our articles you will see many shoemaking terms like “last” and “eyestay,” are highlighted in blue. Simply move your mouse over the highlighted terms to see the definitions. So easy! You can also see all the shoemaking terms together in our Shoe Terms Dictionary.
Our shoe school course is free! If want to learn how to make shoes you are in the right place! This short online course will cover the basics of shoe design and techniques for mass production and give you a firm grasp of shoemaking terminology, shoe patterns, and construction. Our shoe making tutorial takes just a few hours to read. Of course, we have books for shoe designers.
Welcome to the Sneaker Factory Online shoe school, let’s get started! We have taken great care to make learning easy! Throughout our articles you will see many shoemaking terms like “last” and “eyestay,” are highlighted in blue. Simply move your mouse over the highlighted terms to see the definitions. So easy! You can also see all the shoemaking terms together in our Shoe Terms Dictionary.
Part 1: Learn The Basics of Shoemaking
In this part of our shoemaking course, you will learn the basics of shoemaking and construction step-by-step. You will learn what a shoe last is and how it determines the shape of your shoe. More importantly, you will learn the parts of a shoe. If you want to learn how to make shoes…you are in the right place!
With your new design drawn up, let’s dig deeper and learn how to make a real factory ready shoe specification. A detailed shoe specification, (or Spec sheet,) will allow the shoe factory to create just what you are looking for. This section of the shoemaking course will teach you the language and give you the tools to create a proper and professional shoe design specification.
There is always more to learn in the field of shoemaking! In this section of the course, we have a few more articles that will help you on your way to becoming a real shoe pro!
If you want to learn more we have written three books that every young shoe designer should read.
How Shoes are Made: Covers the basics of shoe design and manufacturing. Everything you need to know if you are starting in a shoe design office. This is a shoe design handbook for footwear designers.
Shoe Material Design Guide: This will complete your shoe design book library. This book is a master class dedicated entirely to the selection and sourcing of shoe materials. An ideal handbook for footwear designers and manufacturers.
How To Start Your Own Shoe Company: This book is written for shoe entrepreneurs young and old. Not just for shoe designers, How To Start Your Own Shoe Company is a perfect training aid for footwear product line managers and shoe company brand managers.
Shoe Agents: What to expect in a shoe development contract
Question: Do I really need a shoe sourcing agent to start my own shoe business? If you are new to the shoe trades you are going to need some help! The answer is YES!
Question: What will it really cost to develop my shoe ideas and get them into production?
Read on! This is the question we will be answering.
A trusted Shoe Agent will be your partner:
Have you heard horror stories of a factory in China shipping a load of rocks instead of shoes? YES, so have we,but we have friends on the ground in China so that can’t happen to us!!
If you are ready to start a shoe company but don’t have shoe design, development, or manufacturing experience, you are going to need a footwear sourcing agent. The shoe manufacturing agent can help you make contact with a shoe factory suitable for your project and help you manage your shoe development projects. Footwear buying agents will have relationships with several shoe factories, sample rooms, and outsole mold suppliers. A qualified shoe sourcing agent will have technicians that help develop your design and make your ideas into a real shoe.
Finding a shoe manufacturer is very hard but you are lucky! Having been in the shoe trade for many years, I have worked with many fine people inside the major shoe brands. Some of my friends now have their own shoe sourcing businesses in China. I’m happy to make introductions. But only if you are ready.
Footwear Development contracts:
Here are the terms of a typical footwear development agreement or contract. You need to remember, footwear production setup charges are high and MOQ (minimum order quantities) will be required by the factories. These charges are:
Outsole Molds
Shoe Outsole Molds, 1 set (per size) $1500-2000 for rubber, $2000-2500 for EVA compression molds. You will need a minimum of 10 molds to cover the standard shoe sizes. During development, a samples mold will be needed to confirm the design before the set of production molds is opened. Prototype parts may be made from cast rubber or foam before a steel mold is made.
Factories may offer “open” molds but please note there are very few suitable for quality shoes. To ensure your shoes fit and function correctly we will not work with these “open” molds.
Footwear Sample Development
Sample development charges paid to the factory: To make your design come to life, plan on 3 samples stages, 45 pairs of samples, the total cost of $5000. This includes factory time and the shoemaking sample materials. The shoemaking expertise of pattern makers and mold technicians does not come for free.
Project Management Fees
Product Management time will be around $2000 per month for the project. This covers the agent’s development team following up with the shoe factory, last factories, material vendors, and outsole suppliers. This puts your representative in the factories working for you. A standard development project is expected to be around 6 months. This is enough time to make the pullover, samples, and tooling. Very complicated projects may require more time.
Basic terms you need to expect:
Confidentiality agreements will be signed. Your agent will protect your project from the eyes of competitors.
Sample delivery charges will be your responsibility. Fed-ex and UPS bills are not cheap for shoes shipping from Asia to the USA or Europe. Plan accordingly.
Costs for shoe outsole or upper molds must be paid in advance of tool cutting.
Costs for samples paid before each shipment.
Product Management Fees will be paid at the beginning of the month of development
Once you place your Production Orders a 9-month retainer fee of US$5,000 will apply.
This will see your shoes through pre-production and provide you QC and logistics support once your shoe production order is complete. The Project management time fee of US$2,000 will be waved for development from this time.
Production, MOQ 6000 per style, 1200 pairs per colorway.
Production lead time, 120 days. Then add time for shipping.
For any new customer, the shoes must be paid for in-full before shipping.
You will need a Letter of Credit or a Wire transfer.
So are you ready?
If you have made it this far you are one step closer to starting your own shoe company! Before I introduce you to an agent, we need to make one more cost calculation.
What is the purchase price of 6000 pairs of shoes?
This is the hard part! You are going to need some capital to bring your shoes home from the factory. Friends, family, kick starter- you are going to need some money. The shoe factory and agent will not give you delayed terms. You will need to pay the entire amount to get your shoes shipping. Roughly, your shoes will cost about 25% of the selling price to import from Asia. So, if your shoes will cost $100 in the store, plan on $25 for the shoe with shipping and import duty included. So….$25.00 X 6000 pairs = $150,000!!!!!
Do you want a job at a shoe factory? Probably not in a shoe factory. More likely you want a job at a shoe company or shoe brand that designs, markets and sell shoes! You want to work for a brand like Nike, Adidas, Puma, Vans or DC shoes. You want to be a sneaker designer not a sneaker sewer!
So, what kinds of jobs can you get at a shoe company and what do you need to know?
There are many shoe making jobs which do not require sitting in front of a sewing machine in Asia. I’m going to list a few of the common jobs you would find in a typical shoe development office at Nike or Vans.
Shoe Designers: Someone has to draw the shoes. Depending on who you ask, this is the easiest part or the hardest. The shoe designer has to draw what people want on their feet.
To be a shoe designer, art school would be a great help. There are many great design schools with ID, merchandising and fashion design. A degree in Industrial or Product design is a great place to start. But that said, if you can draw shoes like a bandit who needs higher education? The designers draw the shoes, then works with the developers to make the prototypes just right. Picking color trends and knowing what is cool are critical skills.
Shoe Design Manager: A successful shoe designer with best sellers in his or her portfolio will soon be asked to lead a team of designers. If you are a great shoe designer and have a talent for organization and leadership, you to can be a design manager. The footwear design manager is responsible for the training and guidance of younger designers and may also work to allocate projects, arrange inspiration trips and work to motivate your team. The Shoe Design Manager must also work closely with sales and marketing departments to review design briefs and schedules.
Shoe Developers: Not a designer but critical to getting the shoes made. It’s the developers job to take a nice drawing and make it into a real shoe you can wear on your feet. The developer is the guy that writes the technical specifications, checks the blue prints, and communicates with the shoe factory.
The developers job is to get the shoe made and keep the free thinking designers from making a beautiful shoe that is cruel to wear. Developers are the shoe prototype engineers and schedule keepers. To be a developer you may start as a designer, an intern or assistant. Be ready to travel!
Landing a job as an assistant shoe developer is a great way to get started. You don’t need any experience to started so if you are willing to learn, travel and work late calling Asia this is an awesome jumping off point!
Footwear Development Manager: With a few years of experience as a shoe developer you may be asked to take on more responsibilities. The Development manager will be responsible for allocating projects to developers, selecting factories for projects, schedule development operations, solve technical shoemaking problems, Design tooling, manage advanced technical projects, source new materials and handle price negotiations.
Advanced Technology Developer/Design: Shoe designers and developers with talent for technical details and a special imagination may join a team working on advanced technology projects. These projects may not be on any production schedule but will allow the shoe company to create new and unique designs. The Advanced Technology team will do patent research, visit new suppliers and trouble shoot new production processes.
Footwear CAD Technician: The shoe design department will need some Computer Aided Design support. All the tooling will need to be modeled to make molds. The shoe designers usually do not create the 3D CAD models, but instead will provide 2D and or hand drawings to the Footwear CAD Technician. Depending on the focus of your company you may have CAD Technicians in your office or rely on your factory partners to create the CAD models.
Footwear Product Managers / Product Line Managers: The Product Manager or “PM” is the person that sets designers and developers in motion. It’s the PM’s job to figure out what shoes to make. The PM will tell the designer what kind of shoe to make. PM’s responsibility is to work with the sales team and customers to find out what they need. The PM is also tasked with looking forward. What will people need next year? What color shoes will be trending? Experience in retail or sales is a big help. Shoes Designers and developers are often promoted to this position. A marketing degree will help.
SMU Product manager / SMU Developer The SMU (Special Make Up) or MTO (Made To Order) manager works with salesmen and big customers to make special production runs. Most often the SMO or MTO is a new color or logo treatment, Not a new shoe design. If the orders big of course the SMU Product manager will pull in a designer to help make a new shoe. SMU projects are a great way for designers and developers to get started on as product managers.
Start Building Your Brand. Get the Start-Up Pro Pack.
Sample Coordinator: A busy development office will have hundreds of shoes coming and going. The Sample Coordinator is the traffic cop that tracks where the shoes are. Are the samples still in China? When is the factory going to ship them? Does Fed-Ex need more paperwork to manage the import? Did the new sample get to the designer for study? When is the SMU customer going to see their samples. The sample coordinator position is a great entry level position for learning the operations of shoe development.
Sales Representative and Sub Rep: Selling shoes is great way to get involved. The sales force is exposed to many aspects of the shoe trade. An active sales rep can help shape the product line. On the front line selling the shoes, the salesmen know first hand what customers are looking for. A salesmen can get promoted into a Product Line Manager position.
Working at a shoe store: Believe it or not, working in a shoe store is a great place to start for a high school or college student. Learn about shoes, meet the local sales reps and sit in with the buyers when they review the new shoe lines.
Footwear Retail Buyer: Working you way up in shoe retailer you could move from selling shoes on the retail floor to buyer that fills the store. The retail buyer is responsible for making sure the store has the right assortment of the right shoes at the right price and right time! The footwear buyer for a sporting goods store will plan to have sandals and water shoes in summer, Boots in winter and fresh deliveries of shoes for the start of Baseball in the spring and Football in the fall. The buyer must study sales figures, have a eye for trends and skills to negotiate discounts. Buyers start out as assistants responsible for small categories then move up if the shoes sell through fast with no closeout sales.
Footwear Import Duty Classification Specialist: Any firm that imports shoes will need someone to help the development team and designers with product HTS duty classification. Without a classification specialist on hand, a shoe design could be 37.5% duty instead of 9% or 0% duty. The Classification Specialist works with the development team so they understand the rules to avoid high duty classes if possible.
Footwear QC Inspector: A proper footwear inspection program will have QC Inspectors reviewing the shoe making process from the beginning to end. While 90% of the inspections should be done in the factory, Inbound QC is done when the shoes arrive. This QC inspection will insure there has been no damage during shipping and catch any problems that may have slipped through in the factory. Usually a trusted warehouse worker is given some basic training, then works with the development staff if there are any questions. These inbound inspectors quickly learn what a makes a quality shoe and will develop a knowledge of shoe construction. From this position it’s just a small step to become an assistant developer.
New Online Course!
Shoemaking for Designers & Brand Builders
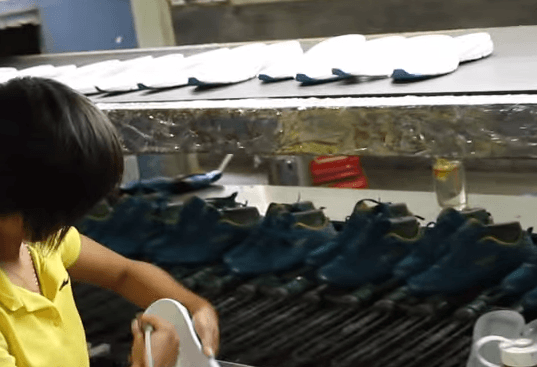
I found this video on YouTube. It’s a quick walk down a typical shoe assembly line. This is a very small, one-line factory, which is not the typical size of a modern shoe factory. The shoes being made in the video are for a local Asian footwear brand. The process they use is exactly the same as Nike uses to manufacture their shoes. In the video, it is difficult to see what’s going on so I have detailed a few of the steps in the process for you here. The video picks up at the start of the shoe assembly line, the uppers are already stitched and stacked waiting for final assembly.
The Start of the Shoe Assembly Line Video:
This video does not clearly show the lasts being inserted but you can see the shoe coming out of the first “shrinking” heat tunnel. The heat helps dry the steamed shoe uppers. Once out of the tunnel, the lasting machine operator gives the shoe a quick squeeze. This machine is the same type used for board lasting and can be set up to stretch a shoe upper down tight onto the shoe last. A heel lasting machine can be used on the back of the shoe. I don’t see this heel lasting machine on this shoe assembly line.
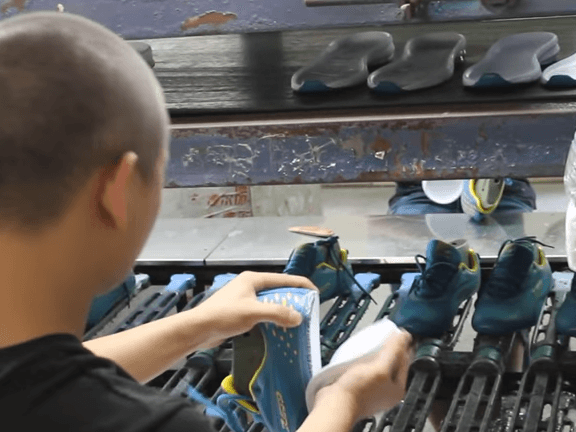
The next operation happens fast. The worker pulls a shoe off the line and matches it to the correct size outsole. A foot-activated press holds the shoe down while she marks the top edge of the molded EVA midsole with a pen. This mark is called the glue line. In this case, the line is a guide for the workers at the cementing work station. If this shoe required roughing, the workers with the buffing tools would follow the same line before the primer and glue are applied.
Next, you see the workers apply the primer and cement to the uppers and the shoe outsoles. The outsoles and uppers are on opposite sides of the assembly line. This allows the workers to apply different compounds of primer and glue to each part. The outsole requires a different primer for a strong bond.
At the next station, the outsoles are moved to a different conveyor belt. This allows the glue to be dried at a different temperature.
Outsole Assembly:
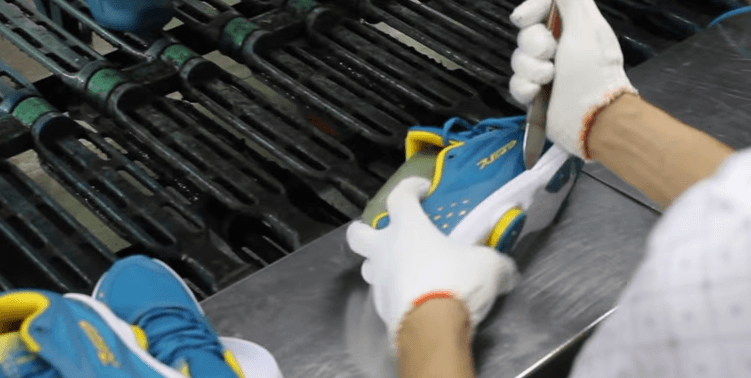
Once the primer and cement are dry, the parts can be assembled. The worker matches the correct size outsole with the upper and then presses them together by hand. He carefully but quickly aligns them, starting at the toe to make sure it’s centered. Next, the worker will flip the shoe and set the heel into position. The cement is dry but tacky so it can be repositioned without affecting the final bonding strength.
A metal or plastic tool is used to make sure the midsole follows the glue line and confirm the edges are straight. This tool can also be used to remove air bubbles or unroll any tucked edges on the midsole.
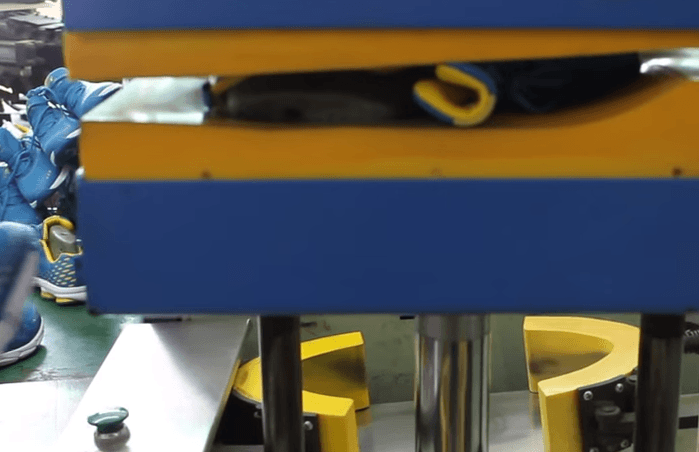
To speed set the glue bond the shoe is cooled in a chilling tunnel. To ensure the outsole and upper have complete contact, the shoe will go through three pressing operations. The downward press, the side press, and the toe and heel press. These pressing surfaces must be clean and smooth so as not to damage or soil the assembled shoe. The bottom press should be made with a matching negative casting of the outsole or a contoured pressing plate to ensure the arch area is fully pressed.
After pressing, it’s time to remove the shoe last and insert the footbed.
Quick Inspection
Inserting Footbeds
Burning Off Threads
Packing
That’s it! If you are interested in learning more please check out our book “How Shoes are Made” and browse our other titles and accessories in our bookstore.


 After the parts are cut a worker will carefully organize and stack the shoe parts. The parts will then be moved on to be processed before stitching. The parts will be marked for alignment or have logos added by the embroidery or printing departments.
 Once the shoe parts are processed and organized, the shoe factory stitching department takes over. In the stitching department, the operations are divided into simple steps. Each worker is given one task to complete. For example, one worker will sew the vamp parts to the mudguard then pass the shoe onto the next worker to attach the eyestay parts. With each operation assigned to one worker, the QC staff can quickly track any problems. The division of the operations also allows the worker to quickly master their operation.
 In the stitching department, the upper parts are assembled, the lining attached, and the foam for collars and tongues are inserted.
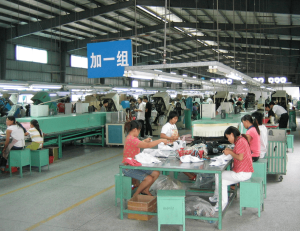 With the stitching complete, the upper is ready to be bonded to the outsole. Before the outsole can be attached, the upper must be “lasted.” Lasting is the operation that gives the shoe its’ final shape. The plastic, metal, or wood foot form (the “last”) is inserted into the upper. The upper is pulled tight, this sets the shape.
 The Shoe Assembly Line Chapter 12
 Almost every modern shoe design project will require some sort of molded component. From hidden heel counters, to outsoles, to fancy chrome plated logos you will need make some molds. While some shoe factories will have limited molding equipment, very few will have the capability to make the molds. To make molds for your footwear projects you will need the help of a footwear mold making specialist.
 The CNC or Computer Numerical Controlled milling machine is the work horse in the footwear tooling business. You should see CNC machines busy cutting steel molds or copper electrodes. At Dongguan Shi Desheng Mold Company you will see 10 CNC machines cutting. Why 10 machines? When a shoe factory orders molds they will often need the size run opened quickly.


 Board Lasted Construction: A very common shoe construction technique that can be made by machine or by hand. The upper is pulled tight and bonded to a fiber board. The outsole unit is firmly cemented to the upper, securing the upper to the sole. Board lasting construction can be used on almost any style of shoe, being suitable for many upper material types and outsole styles.
 Blake Construction: Used to make flexible leather shoes, the Blake construction starts with a board-lasted upper. Glue the sole in place then with the last removed, sew the upper directly through the outsole unit. The outsole may be leather or rubber and have a groove molded into its surface to guide the Blake stitch. You will find Blake construction on weltless leather dress shoes, moccasins, and boat shoes. Blake construction is not waterproof.
 Goodyear Welt Construction: The Goodyear welt is often used to make waterproof soles, the stitch that attaches the sole to the shoe runs around the outside edge and does not make stitch holes in the upper. The upper is sewn to the welts that attach to the insole and the outsole. During assembly, the welts are attached first by a horizontal “Goodyear” stitch, named for the inventor of the stitching machine, Charles Goodyear Jr. (also the son of the famous rubber inventor, Charles Goodyear Sr.). The Goodyear welt construction method is ideal for heavy-duty boots for hiking or service.
 Norwegian Storm Welt Construction: Similar to the Goodyear welt construction method but the upper is turned outside and is sandwiched between the outer welt and the outsole. Used to make the heaviest waterproof boots, the Norwegian Storm Welt is difficult to make and is found almost exclusively in the workshops of Italian bootmakers.
 Stitch down Veldtschoen welt Construction: Again, the Veldtschoen welt is related to the Goodyear and Norwegian welt constructions. In this case, an inner welt or rapid stitch line sewn through the midsole is paired with a second rapid stitch that attaches the outsole. The outsole is attached after the first welt, the bottom stitch is protected by the outsole.

 Cold Cement / Sheet CUT EVA Shoe Assembly Process:
 The toe tip will get extra pressing[/caption]


 If you want to learn more we have written three books that every young shoe designer should read.
 This is the hard part! You are going to need some capital to bring your shoes home from the factory. Friends, family, kick starter- you are going to need some money. The shoe factory and agent will not give you delayed terms. You will need to pay the entire amount to get your shoes shipping. Roughly, your shoes will cost about 25% of the selling price to import from Asia. So, if your shoes will cost $100 in the store, plan on $25 for the shoe with shipping and import duty included. So….$25.00 X 6000 pairs = $150,000!!!!!