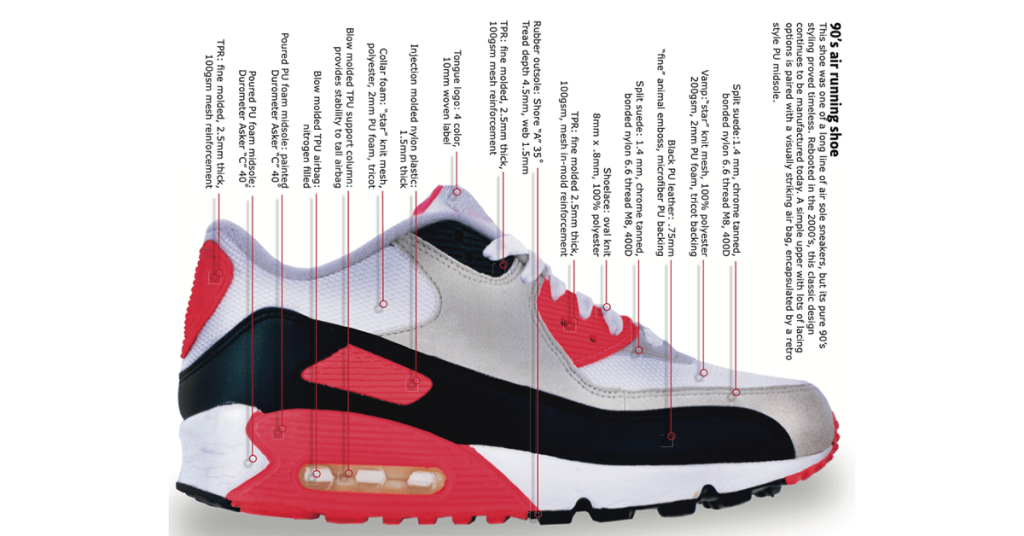
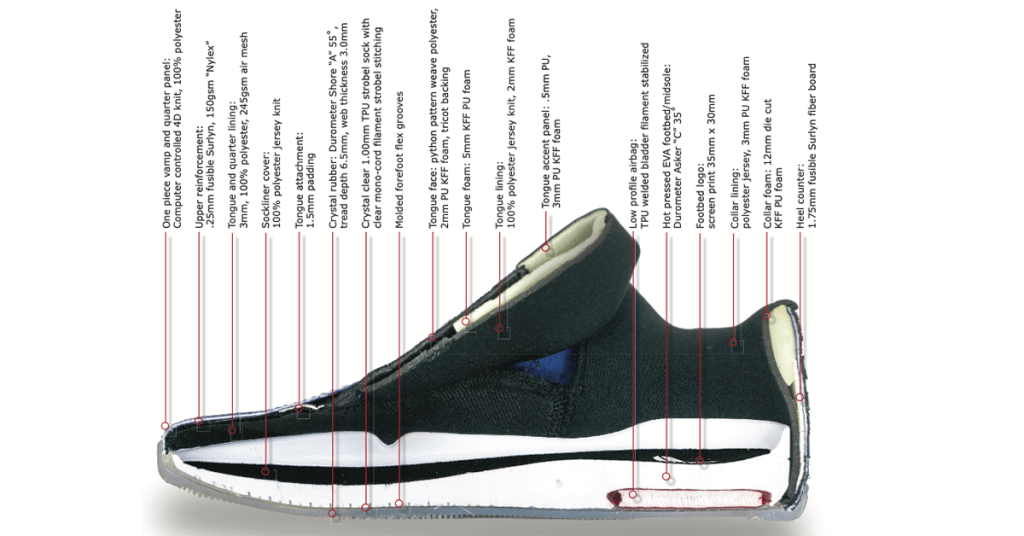
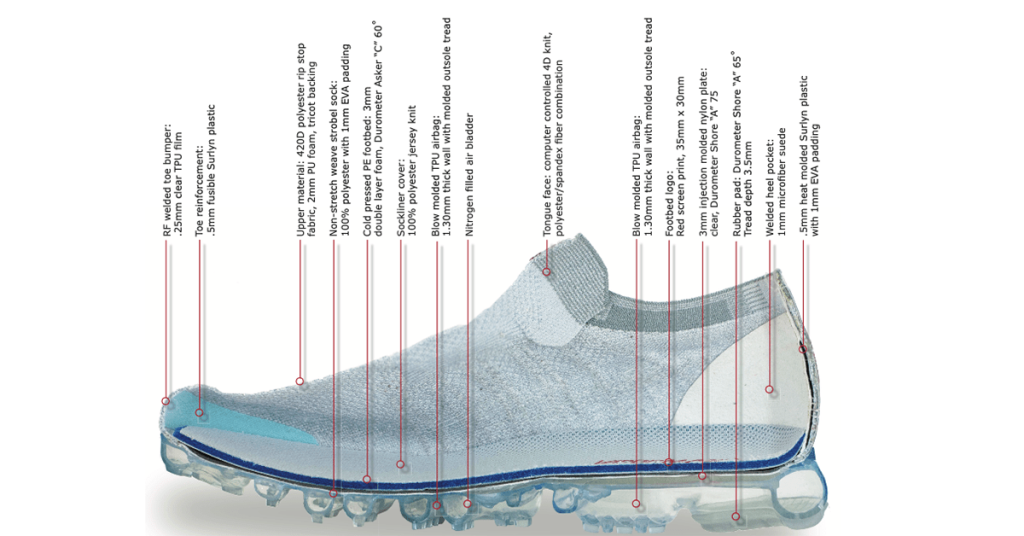
What raw materials does Nike use to make shoes? Here at the Sneaker Factory, we have examined many Nike shoe styles to find out exactly what is inside. We have sectioned The Air Jordan 1, the Nike Vapor Fly, Nike ZoomX Vaporfly Next%, the Air Max 90, Kobe 4, and other popular Nike models to see what is inside. So, what materials will you find inside a Nike shoe?
Nike Shoe Materials
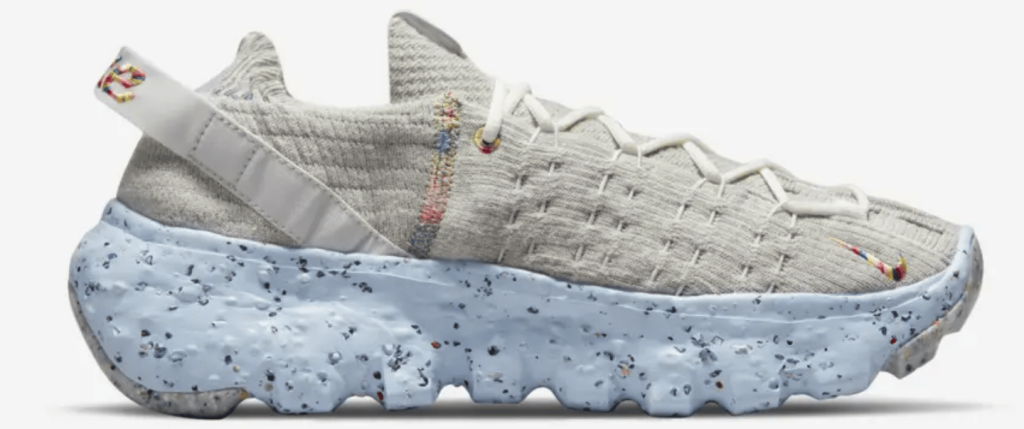
Most Nike shoes use a mix of leather, fabric, foam, and rubber. The Nike classics and deluxe model basketball shoes will have real leather parts. Nike running shoes and modern performance baseball shoes are generally made with lightweight fabric uppers in place of heavier leather.
By weight, rubber is the main component; by volume, foam is the main component.
Does Nike use special shoe materials?
Nike builds their shoes with very high-quality materials, but they are not exactly “special.” Yes, some Nike models, such as the Nike ZoomX Vaporfly Next%, have unique weaves of upper mesh, but any shoe brand can purchase the Pe-bax™ foam midsole material in the Next%.
Start with an in-depth study of material types available for modern shoemaking. Learn the technical details of material specifications. 195 pages and 300 color photos.
Buy Now
on sale $39.99
Are shoes made of plastic?
Are Nike shoes made of plastic? The answer is yes. Almost every part of a Nike shoe is plastic. The EVA (Ethylene Vinyl Acetate) foam inside Nike shoes is soft, flexible plastic filled with air bubbles. Additionally, the nylon and polyester fabrics in Nike shoes are composed of fine plastic fiber threads woven together. The PU foam inside the Nike shoe is plastic, and even the thread used to hold the shoe together is plastic!
The rubber inside the shoe is a mix of real rubber and “synthetic rubber.” Synthetic rubber is an artificial elastomer synthesized from petroleum byproducts. So yes, the rubber inside a Nike shoe is made of plastic.
Yes, this shoe is made of 100% plastic.
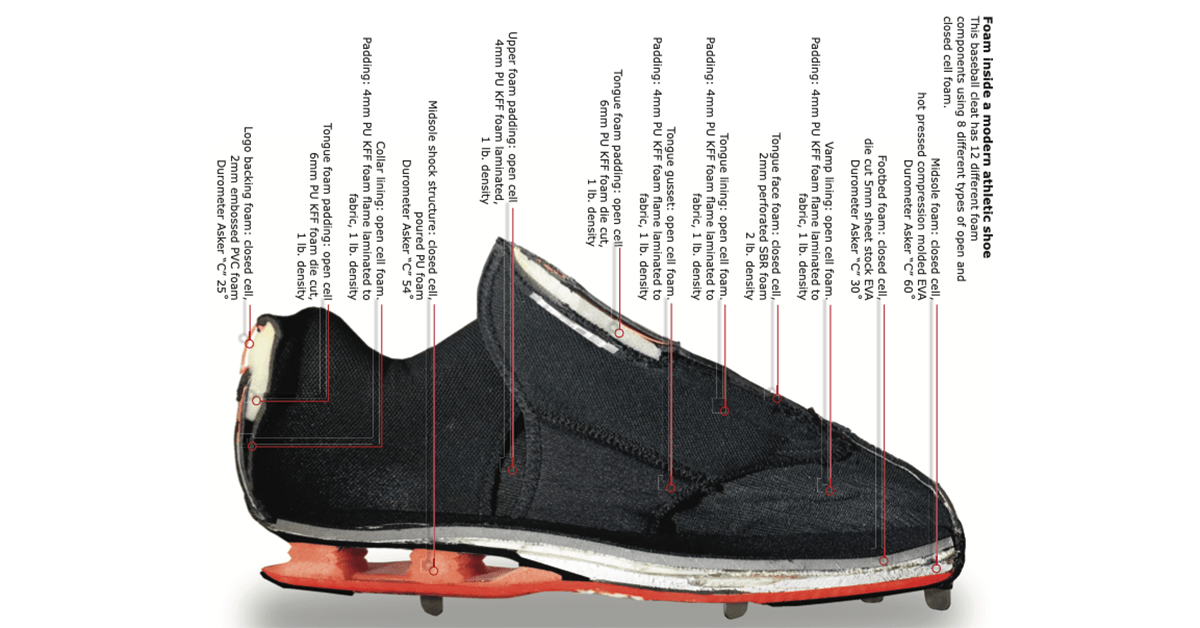
Foam in Nike shoes
Inside every Nike shoe, you will find several foam types. Both open and closed cell foams provide comfort, cushioning, and structure to a shoe. Nike midsoles are made with closed-cell EVA foam, closed-cell PU foam, and closed-cell Pe-Bax foam. Some outsole bottoms of lightweight Nike shoes are made from closed-cell “blown” rubber foam. Nike sneaker footbeds are made from closed-cell EVA foam and “crystalized” PU foam.
This Nike shoes has six different types of foam inside!
Inside the uppers of most Nike shoes, you will find open-cell PU “sponge” foam. The soft collars and plush tongues of Nike running and basketball shoes are nearly all constructed with open-cell PU foam.
Creating sustainable products is a challenge for everyone on the footwear product team. Footwear designers, developers, marketing managers, and product managers all play a role in creating more sustainable products. Everyone must work together to ensure the product meets sustainability goals.
1. Don’t become trapped by unrealistic sustainability goals
Creating sustainable footwear is a huge challenge. Aim high but remember that sustainability is a process, and every little bit helps. Not every part of a shoe has a workable “green” alternative. If your team can add one sustainable feature, material, technology, or process per season, you are doing great!
2. Don’t tackle product sustainability alone
Creating more sustainable footwear is a team effort. The shoe designer must balance the shoe’s aesthetic quality with sustainable material choices while the product developer examines the hidden materials and processes. For example, it’s the footwear developer’s responsibility to find a water-based glue that will work. Meanwhile, the shoe designer’s challenge is to combine the limited material choices into a pleasing and saleable design.
The footwear product manager needs to make sure the sustainable choices do not break the product budget. There is a limit to the price premium customers will pay for sustainable alternatives. Roughly 80% of people will pay 5% more for the sustainable choice. When that choice costs 15% more, only 40% of customers are willing to purchase the more sustainable option.
The Ultimate Shoe Material Textbook
Start with an in-depth study of material types available for modern shoemaking. Learn the technical details of material specifications. 195 pages and 300 color photos.
Buy Now
on sale $39.99
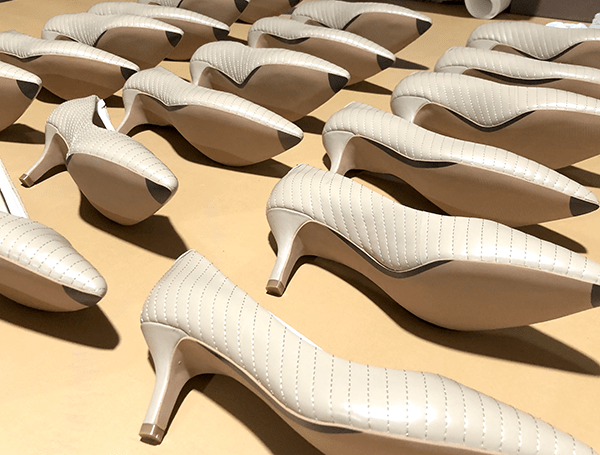
3. Don’t get stuck on a sustainable “LOOK”
While improved sustainability should be a goal for every shoe company, that does not mean the product aesthetic must tell the sustainable story. Yes, a sexy and sleek high-heel shoe can (and should) have sustainable components, but, most likely, you will not achieve this elegant look with a chopped-up, recycled rubber outsole and organic cotton upper.
High-performance sport or luxury shoes may have sustainable features and internal components, which the product marketing team completely ignores. If it’s not part of your brand image, it’s okay to avoid sustainability in your marketing.
4. Don’t compromise safety or performance for sustainability
Do not compromise the integrity of high-performance products to meet sustainability goals. What does that mean? High-performance products have demanding material specifications for both product function and product safety. There may not be an alternative “green” material that does the job.
5. Don’t forget to read between the lines on your sustainability choices
Be careful, Some “sustainable materials” are not all they seem to be or may have unintended consequences when used. For example, organic cotton production and its high water requirements may not be a great choice for footwear when compared to standard, non-organic cotton growing. Studies suggest it takes twice the amount of water to grow organic cotton. With clean water in short supply, we need to look at close loop water usage.
Ocean plastic or “near ocean plastic” production sounds like a great idea, but…read the material descriptions carefully. Plastic removed from the ocean is a hash of many different plastic compounds. This mixed plastic material is reground and remelted, then remixed with virgin plastic to make a material suitable for reuse. The catch here is the final amount of actual ocean plastic may measure only 2% of the finished product by weight. Yes, 2% is great, but add in the extra energy inputs needed to make the “recycled” material, and it may not be so great anymore. So, what is “near ocean plastic?” Near ocean can mean plastic recovered within a few miles of the ocean. Think of coastal cities like New York, Houston, Miami, and Los Angeles. Everything recycled in these cities would be “near” the ocean. Does this really help keep the oceans clean?….maybe.
As you can see, making your shoes more sustainable is a goal you should keep working toward. But, you need to approach sustainability carefully to ensure your efforts are indeed beneficial and not counterproductive to protecting the environment. Maybe your product can not be sustainably manufactured? This does not mean your company must sit on the sustainable sidelines. Use your sustainability budget to plant trees, install solar, buy green power, or purchase carbon offsets.
How much does it cost to make a sneaker? How much money do you need to start a shoe business? How much does it cost to start a shoe company? How much money do I need if I want a shoe factory to build my dream sneaker?
Your shoe development cost questions are answered here!
Costs of Footwear Design & Development
Costs for building your sneaker are from $5000 to $15000
Let’s review the phases to build a sneaker and what it costs per phase: Sneaker Design $0 to $5000 Sneaker Development $2000 to $3000 Sneaker Pre-Production Tooling $3500 to $7500 Sneaker Production Equipment $20,000 to $50,000
Cost of the shoe design: $0 to $5000
Are you ready to start your own brand-building journey? Do your shoe business dream seems unattainable?
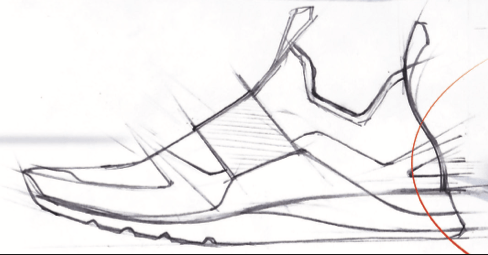
To build a sneaker, you will need a design. How much does it cost to design a sneaker? If it is your design, then great the answer is $0!
If you need to hire a designer, the cost can run from $500 to $5,000. The cost is dependant upon the experience of your designer and if you need an upper design and an outsole design. Some shoe designers charge a flat fee for an entire shoe, some charge you piece by piece for the outsole and uppers. A great design is critical to your success as a new brand, so take your time and work hard to get this phase right. (Be aware, you may need to pay more if you want to get that Hot Shot Designer with shoemaking experience .)
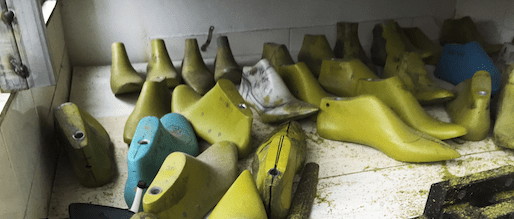
Cost to develop a shoe last: $0 to $750
If you select a shoe last that is “off the shelf” and available in the factory, the cost will be $0.
If you send the factory a shoe and ask them to create a similar last, the development fee may be $100 to $200. For example, a copy Nike Air Force One last will most likely cost about $200. If you want a full custom last based on a casting of your foot you can expect to pay closer to $750.
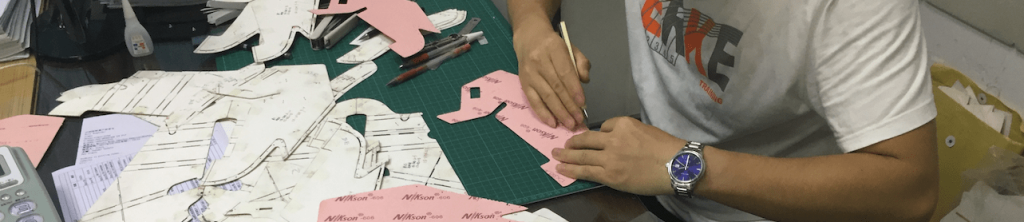
Costs to create a pattern from your shoe drawing:$250 to $500
Depending on the complexity of your design, the shoe factory will ask for up to $500 to create your shoe pattern. For your money, you will get two or three sample rounds which are often necessary to get the pattern just right. You will use these pattern trials as your fitting samples. The cost of air shipping the sample goods from the factory is extra. In many cases, once you place a production order, the shoe pattern cost will be refunded to you.
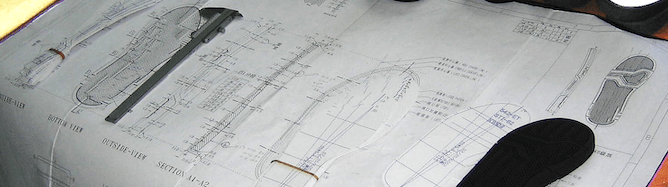
Cost to create an outsole blue print: $150 to $600
Creating the outsole drawings is a highly technical skill. The cost will vary. Once you place a production order the cost will be refunded to you.
The factory will transfer your design drawings into their CAD system and make a 2D drawing for you to approve. After you approve the 2D drawing, the CAD technician builds the 3D CAD model and makes sure it fits your upper pattern design. The outsole factory will laser scan the upper to create the top net of the outsole.
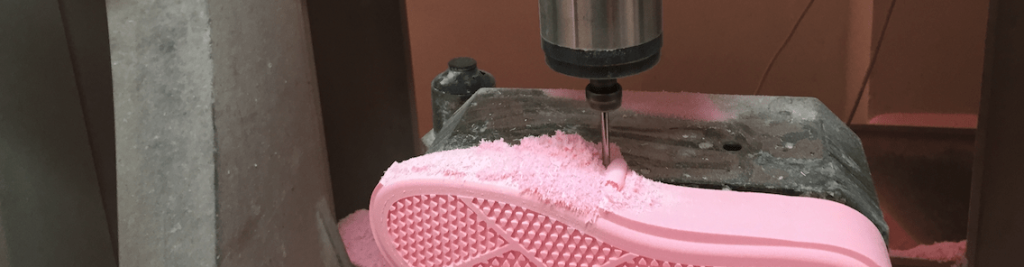
Cost to build a solid model of your outsole design: $100 to $400
Once you have the drawing approved, the factory will CNC cut or 3D print a full-size model for your study. This is called a woodcut or a REN. You can paint this and attach your upper to give you a real idea of what your dream sneaker will look like. Once you approve the model, the factory can make a “temporary” mold. With the temporary mold, you can make up to 10 pairs of poured foam outsoles for fitting tests, or marketing videos. These parts are great for photoshoots but will not last very long.
Tooling cost to build a cast metal foam midsole mold: $1475 one pair Tooling cost to build a cast metal rubber pressing outsole mold: $1475 one pair Custom logo EVA footbed mold: $475 Injection molds for plastic or rubber upper parts: $500 to $5000 depending on your design Upper material cutting dies: $150 Pre-production samples: $50 to $100 per pair.
Phase Three: Sneaker Production tooling
Depending on your design and size run Midsole mold: $1475 Per size : 7 to 14 per your requirement Outsole mold: $1475 Per size : 7 to 14 per your requirement Custom logo EVA footbed mold: $475 : 3 to cover a size run Injection molds:$500 to $5000 Per size: 1 to 4 to cover a size run
This is roughly the cost to make your dream sneaker into a real production-ready shoe.
Can the Shoemakers Academy help me get started making my dream shoe?
Yes, we can! If you are ready to get started, the team at ShoemakersAcademy.com can be your shoemaking guide. We can help you find a footwear designer or development manager and put you in touch with a factory suited to your project. We also offer small group classes virtually to help you launch your brand and troubleshoot issues that may affect your production.
How to Inspect and Authenticate Air Jordan, Nike, Adidas, and Vans Sneakers.
How To Spot Fake Jordan’s
Do you want to learn how to spot fake Jordan’s? Can you tell if a pair of Yeezys are real or counterfeit? Are you looking to become a sneaker authenticator? Interested in growing your footwear construction and material knowledge?
How To Spot Fake Sneakers is your complete guide to sneaker authentication and inspection. If you follow Step-by-step inspection checklist you will quickly master the sneaker authentication process. You will learn how to run a complete shoe inspection before you buy.
As a shoe authenticator, you won’t get ripped off.
Sneaker Authentication Basics
You will start with sneaker authentication basics then advance to study sneaker construction and professional footwear inspection techniques. How To Spot Fake Sneakers includesauthentication basics, product provenance, footwear construction, and sneaker inspection details. Complete information and photographs on how to inspect the Nike Air Jordan 1 and Vans Old Skool.
Is this Fake?
Is this a real Aj 1
Air Jordan Inspection
Part 2 of How To Spot Fake Sneakers contains six chapters dedicated to the in-depth study of six iconic sneakers. Each chapter details what to look for when authenticating the shoes. See the real and fake shoes side-by-side. After a study of the outside, the knives come out so you can see what’s going on inside the shoes.
Both the authentic and fake shoes are sliced so you can see just how bad counterfeit shoes are with your own eyes. Chapters include, How To Spot A Fake Nike Air Jordan, How To Spot A Fake Nike ZoomX Vaporfly, How To Spot A Fake Vans Old Skool, How To Spot A Fake Nike Air Max 90, How To Spot A Fake Nike Day Break, How To Spot A Fake Adidas Yeezy 500.
Can you spot the counterfeit Yeezy.
See inside the counterfeit Yeezy.
Kanye will be angry!
SELF-PACED online learning for FREE: Scroll down to see “Unit 1: Learning the Basics of Shoemaking,” and start now.
HANDS-ON learning with our SHOEMAKING TEXTBOOKS: Softcover and PDF Ebook textbooks for all levels plus shoemaking lasts, outsoles, and other hard-to-find materials. Visit our SHOEMAKING SUPPLY STORE.
CORPORATE TRAININGfor teams and individuals: Customizable for your team at your level. High-School, University, Individual, Start-Ups, Large or Small Corporate teams. We got you covered.
PRIVATE CONSULTING with “The Shoe Dog”: Personal, 1-on-1 sessions to get you there faster.
https://vimeo.com/862961982
The Shoe Dog would like to give you a free lesson. Check out the starter course Shoemaking for Brand Builders & Designers.
Welcome to the online shoe school
We have pulled together an online curriculum of shoemaking articles in a sequence that will take you from the basics of shoe design and shoemaking to advanced material selection topics. Step-by-step you will learn how to design shoes. This collection of articles teaches shoemaking for beginner students of the trade.
Learn how to make shoes with our free online course. You study the basics of shoe design and techniques for mass production. Get a firm grasp of shoemaking terminology, shoe patterns, and construction. Our shoe-making tutorials take just a few hours to read. Supplement your learning with our shoemaking books, materials, and virtual classes for aspiring shoe designers, material managers, brand managers, beginner patternmakers, and at-home shoemakers.
We have taken great care to make learning easy. Throughout our articles you will see shoemaking terms like “last” and “eyestay” highlighted in blue. Simply move your mouse over the highlighted terms to see the definitions. So easy! You can also see all the shoemaking terms together in our Shoe Terms Dictionary.
This course will cover the basics of shoe design and mass production techniques and give you a firm grasp of shoemaking terminology, shoe patterns, and construction. We cover how to design a sneaker tech pack like a professional. The second half is a footwear development class.
Jumpstart your career now. Let’s begin
New Online Course! Shoemaking for Designers & Brand Builders
Created for footwear newcomers and professionals alike, this course delivers the basic shoemaking knowledge you need to get your career and brand started faster and with fewer costly mistakes.
Course Details
Enroll Now $99
How To Make Shoes DIY Kits Complete!
We put it all together for you. DIY Build Kits include your choice of material, size, color, step-by-step written instructions. Learn how to assemble shoes
Check It Out!
you can do it!
Unit 1: Learning the Basics of Shoemaking
In Unit 1 of our shoemaking course, you learn the step-by-step basics of shoemaking and construction. What shoe lasts are and how they determine the shape of your shoe. You will also learn about the parts of a shoe. If you want to learn how to make shoes…you are in the right place!
With your new design drawn up, let’s dig deeper and learn how to make a real factory-ready shoe specification sheet. A detailed shoe specification (called a spec sheet) will allow the shoe factory to create just what you are looking for. This footwear development class will teach you how to make your design “production” ready. This section of the shoemaking course will teach you the language and give you the tools to create a proper and professional shoe design specification sheet. You will learn how to design a sneaker tech pack.
Are you ready to start your own shoe business? Now it is time to dig deeper into the shoe business. We will help you answer these critical questions! Is shoemaking profitable? How much does it cost to start a shoe company? How do I manufacture my own sneakers? What is the profit margin on shoes? How much money do you need to start a shoe business? How much should I charge for my shoes?
There is always more to learn in the field of shoemaking. In this section of the course, we have a few more articles that will help you on your journey to becoming a real shoe pro.
We put it all together for you. DIY Build Kits include your choice of material, size, color, step-by-step written instructions. Learn shoe making techniques
Check It Out!
you can do it!
Textbooks for Shoemakers
Every aspiring shoe designer and start-up brand should read this series. Available in full-color, printed softcover format or instant delivery with the PDF ebook format.
How Shoes are Made: Covers the basics of shoemaking, shoe design, and manufacturing. Everything you need to know if you are starting in a shoe design office. This is a shoe design handbook for footwear designers and also applicable for beginner shoemakers. Available in softcover or ebook / PDF format.
Footwear Pattern Making and Last Design: This book covers the craft of footwear pattern making, including a step-by-step guide to patternmaking for beginners. This book will show you how lasts are made, the shoe last design process, hidden geometry, special features, functions, and size grading principles.
Shoe Material Design Guide: This will complete your shoe design book library. This book is a masterclass dedicated entirely to the selection and sourcing of shoe materials—an ideal handbook for shoemakers, footwear designers, footwear developers, and shoe manufacturers.
How To Start Your Own Shoe Company: This book is written for shoe entrepreneurs new and old. Not just for shoe designers, How To Start Your Own Shoe Company is a perfect training aid for footwear product line managers and shoe company brand managersh
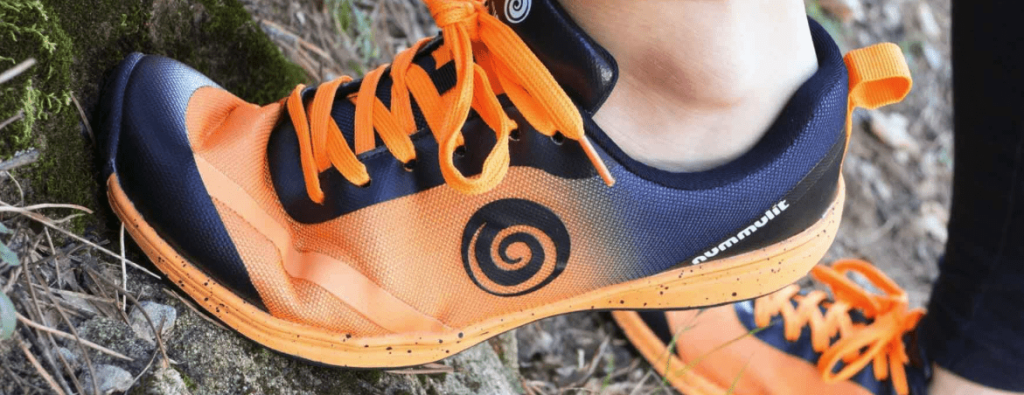
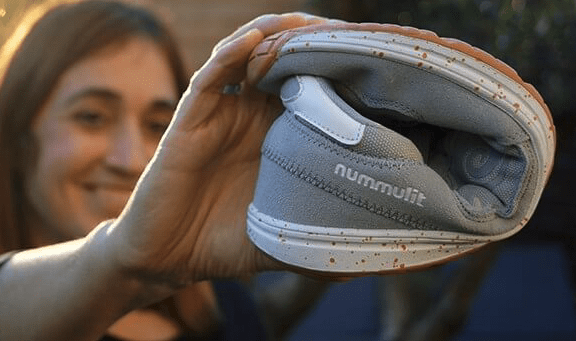
Today we interview Josep Puig, owner of Nummulit Urban Shoes, and reveal his challenges and solutions in starting his niche barefoot shoe brand. Enjoy!
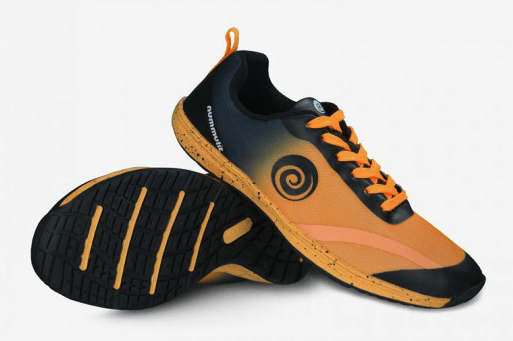
The barefoot sport shoe Nummulit Ignis provides lightness, flexibility and stability for every workout, walk or run.
The Shoe Dog: Hey Josep, thank you for speaking with me and sharing your story with our shoemaking community.
Josep: Hi Wade. The pleasure is mine. It is a great honor for me to share this time with you. Without the help of your books, Nummulit shoes would not have been the same. (go to www.nummulit.com/gb/ for more information)
The Shoe Dog: Please tell us about yourself and how you got interested in shoes.
Josep: I’m a big foot, I have a size 47EU. I am 41 years old and an engineer. I live with my wife and our 3 little children in Girona, Spain. Girona is a very beautiful city and well known by runners, cyclists, triathletes, and others for its quality of life and it is a quiet area with a fantastic environment for outdoor sports due to the proximity to the mountains, the sea, the lake, etc. We also have excellent facilities for indoor and track sports.
I have competed in various sports since I was little (soccer, basketball, mountain biking, running), but always as an amateur. To give you an idea of my level: my time in a half marathon is 1h40m. Due to my knee injuries, I became interested in footwear, orthotics, rehab, functional exercises, footprint studies, and posture very early in life.
Looking for solutions, I went from conventional, cushioned footwear with pronation control to orthopedic insoles and all the rest. In 2010, thanks to my brother-in-law who introduced me to the bestselling book, Born to Run, I discovered an opposite approach – barefoot or minimalist footwear.
So, I started going barefoot most of the time and bought my first minimalist shoes, a pair of Vibram FiveFingers KSO. And for me, there is no turning back.
I haven’t studied at an official shoe school, but I’ve been training on my own for years. I’ve attended fairs and seminars, read books. I’m in touch with various manufacturers, developers, and designers from whom I have learned a lot about footwear. I have also received advice on biomechanics and foot health from my wife, who is a physiotherapist.
Josep: Nummulit shoes are a chameleonic way to wear minimalist shoes. Just like nummulite fossils are camouflaged among the stones of Girona, Nummulit shoes go unnoticed among conventional footwear. In this way, the brand aims to be able to wear minimalist sneakers discreetly.
We offer footwear that is comfortable from the first moment and throughout the day, respects the nature of our walking, and has a casual look.
The Shoe Dog: What a great niche for a shoe brand. Can you tell us more about the concept of barefoot shoes? Nummulit designs look more conventional than other barefoot shoes? Why do your shoes look the way they do?
Josep: Yes, the main feature of minimalist footwear is to protect the feet and not restrict movement or change the way we step.
To be minimalist, a shoe has to be very flexible, without interfering with the foot’s natural movements or limiting the feet in any direction. The sole must be thin, without any cushioning. The think sole increases sensitivity and favors a close connection between the foot and the ground, improving stability and proprioceptive sense. The last on which they are built has to be wide, so there is no pressure on the toes. Conventional footwear usually has a difference of several centimeters between the heel and the metatarsal, while in minimalist shoes, the inclination of the sole is practically zero. This is known as “zero-drop.” This helps one’s posture when walking or running and encourages the natural movement of other parts of the body such as the knees, hips, or back. In addition, minimalist footwear is very lightweight to make the most of our energy.
In general terms, it is a shoe that improves foot mobility.
To achieve this, each barefoot footwear brand offers its particular point of view. For example, some have removed internal insoles. At Nummulit, we considered that it is an element that can give comfort, be hygienic, and at the same time allow a natural walk or run. Some brands have shoes with toes, which are great, and I wear them from time to time, but I don’t feel comfortable going to the office wearing these types of shoes. All of these pros and cons have been considered and have contributed to making Nummulit shoes the way they are.
The Shoe Dog: Many of our aspiring shoemakers worry about the costs of launching a new shoe brand. Can you share your experience organizing the money to get started?
Super Flexible!
Josep: The product cost and sale price are basic to creating any business and deciding where to position your brand in the market. I started with your book, How to Start Your Own Shoe Company, and worked through every step necessary to move the company forward (tax consulting, web costs, shipping to customers … everything).
I built spreadsheets for every item and considered the best solution for each. For example, what taxes and customs will I pay in Europe? What online payment gateway will I use to calculate commissions? How much will the outsole molds cost? Doing this took a lot of work and time, including contacting manufacturers and service providers asking for different quotes, and so on.
New shoemakers need to consider the minimum volumes required by the manufacturer and the costs you can afford. Also, most importantly, you must be very clear about the costs of marketing and advertising. Even if it’s simple, you need to have a marketing plan!
Once I struck a balance between the spreadsheet numbers and my available budget, it was time to start the next challenge.
The Shoe Dog: Josep, can you take us through a normal working day for you?
Josep: In the mornings, I work as a computer scientist, and in the afternoons, I dedicate my time to Nummulit:
I always start by handling new orders, then incidents (size changes, returns, customer replies). I divide my time between marketing and social media, and I continually look for solutions to delegate these tasks or to cut down on the time they take.
Other jobs need regular dedication too, like long-term strategy, company management, etc.
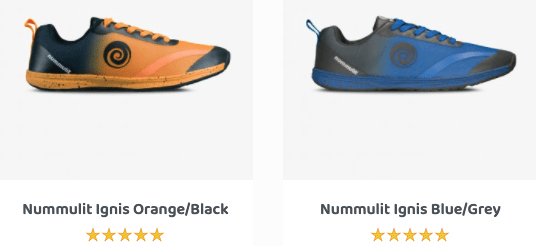
The barefoot sport shoe Nummulit Ignis provides lightness, flexibility and stability for every workout, walk or run.
Minimal interference in the natural movements of the foot.
Maximum energy use in each step.
The Shoe Dog: What do you have in mind for your next steps?
Josep: I am clear that the next step is to increase the sizes we offer. I would also like to expand the color range and restyle our current models.
In the short term, I would like to create new models of sneakers and sportswear in the line of minimalist footwear, which are very versatile and keep with conventional aesthetics
I’ve been asked to create children’s shoes, trail shoes, and to add particular features such as waterproofing, etc. These suggestions are great and give me very good ideas, but I have to think carefully about using my limited resources.
The Shoe Dog: Can you share with us your biggest challenge and how you overcame it?
Josep: Minimalist footwear is not very popular among manufacturers. Thus, the first thing I set out to do was to create a clear and precise design brief to communicate my ideas. This also helped me to be taken seriously despite not having a track record in the business. Once you have secured a manufacturer, you have to know how to express yourself very well because every sample you request and every mistake you make costs money. Therefore, you have to work smart to stay within budget. In addition, minimalist footwear is performance footwear, and functionality is paramount: a millimeter or so of material in one place or another completely changes the function of the shoe.
The Shoe Dog: Thank you for taking the time to talk to us. Any final advice to share with others thinking about launching a shoe brand?
Josep: Thank you so much for the opportunity to share about myself and Nummulit running shoes. Also, thank you for guiding me through the journey with your books. Final advice: Be eager and keep up your energy! These are the main ingredients needed to solve the different problems that may arise when creating your footwear company. But, without a doubt, it’s a great experience.
Do I need to run a fitting trial for my new shoes?
A shoe fitting trial or fit trial is a footwear brand’s process to confirm a new shoe fits correctly and feels good on the user’s feet. The goal of a fitting trial is to evaluate the entire size run and determine if a shoe fits correctly and is true to its size.
A fit trial is complementary to a wear test. In wear testing, the shoe brand will focus on the function and durability of a shoe. (Learn more about fit testing, wear testing, and other pre-production procedures in our books How to Start Your Own Shoe Company How Shoes Are Made books and ebooks.)
Big brands like Nike, Adidas, and Jordan have entire departments responsible for running fitting trials. For example, every new Nike shoe must pass a fit trial before being approved for mass production.
Proper fitting shoes will keep your return rate down and your profit margin up.
The average return rate for mail-order shoes with poor fitting is 30%!
Yes! You need a fit trial.
A shoe fit trial must be part of your production quality assurance program. A great-looking shoe that does not fit the size mark or does not fit proportionally is not high-quality. A new last, a new outsole, or a new upper design will require a fitting trial. A proper fitting trial during the pre-production process allows the brand time to adjust the size and fit of the shoe before wear testing, size grading, marketing, and selling.
When developing your shoe, the first size made is called the “model” size. The model size is usually USA 9 for men’s and USA 7 for women’s shoes. The shoe brand or the shoe manufacturing factory will have someone on staff who is the fit model. The fit model’s feet measure close to the ideal standards for an M9 or W7. You need to complete the fitting work on the sample size before the size grading and the full-size run fitting trial can begin.
Before the fitting trial: Inspect your samples.
Do you see any loose spots or wrinkles on the upper? First, remove any shoe stuffing and check that your samples are not crushed or twisted from shipping. Next, run your hand inside the shoe to feel for any rough stitching or wrinkles in the footbed. Finally, properly lace each shoe and then take the time to loosen the laces, so it’s easy for your test subjects to get their foot in the shoe and adjust it.
Running a proper fitting trial? Needs:
1. A full-size run of the test shoes.
2. A measuring tape.
3. A Brannock™ device for measuring feet.
(Learn more about the Brannock™ device and other shoe tools in How Shoes Are Made.)
4. A questionnaire to record the stated foot size, measured foot size,
sample shoe size preference, and any footwear fitting comments.
5. As many people as you can get to try on your shoes!
6. It is a good idea to have socks available in a standard thickness for your test subjects.
How to run a fitting trial
Find a place and time to gather your shoes and test subjects together. Ideally, you will test one person at a time without the other test subjects listening in on the test. When your test subject arrives, record the size of the shoes they are wearing. It’s a good idea also to record the brand of shoe they are wearing as some brands are known to fit larger or smaller.
Next, measure your test subject’s feet yourself with a Brannock™ device. Make sure to note the length and width. Also, try to record the ball girth of their feet. You will need this information to help you qualify the subjective feedback when fitting the shoe. You will also need to screen your test subjects for abnormal foot shape or physical issues affecting the fitting.
Finally, select a shoe for your subject to try. Once the tester has the shoe on, ask them to stand up and give their first reaction before flexing or walking in the shoe.
If you have a soft shoe, you can press on the toe box to feel if the subject’s toes are touching the end of the shoe. When standing, the toe tips should not be touching the inside end of the shoe.
If the shoe feels good, instruct the subject to walk and get a feel for the shoes as they flex in motion. Your test subjects may run if you are fitting a sports shoe.
You can ask the test subject to record their feedback on a questionnaire or interview the subject. Your goal is to understand if the length, width, and volume feel right. During a fitting trial, you should be studying the shoe as the test subject flexes. Look for the following:
1. Does the shoe gap open or pinch?
2. Do you see loose spots or wrinkles?
3. Does the test subject’s heel lift out of the shoe?
4. Does the subject feel the pressure points or stitching inside the shoe.
5. Make any comments on the length, width, and height.
6. Does the top line feel comfortable around the ankle bones and Achilles tendon?
The result of your fitting trail
If the shoes fit great and look great for every test subject, fantastic! If you see any issues, now is the time to record the faults and work with the factory technicians and pattern makers to correct them. In the end, a properly run fitting trial will give you the confidence to move ahead in your shoe production or give you the information needed to make adjustments.
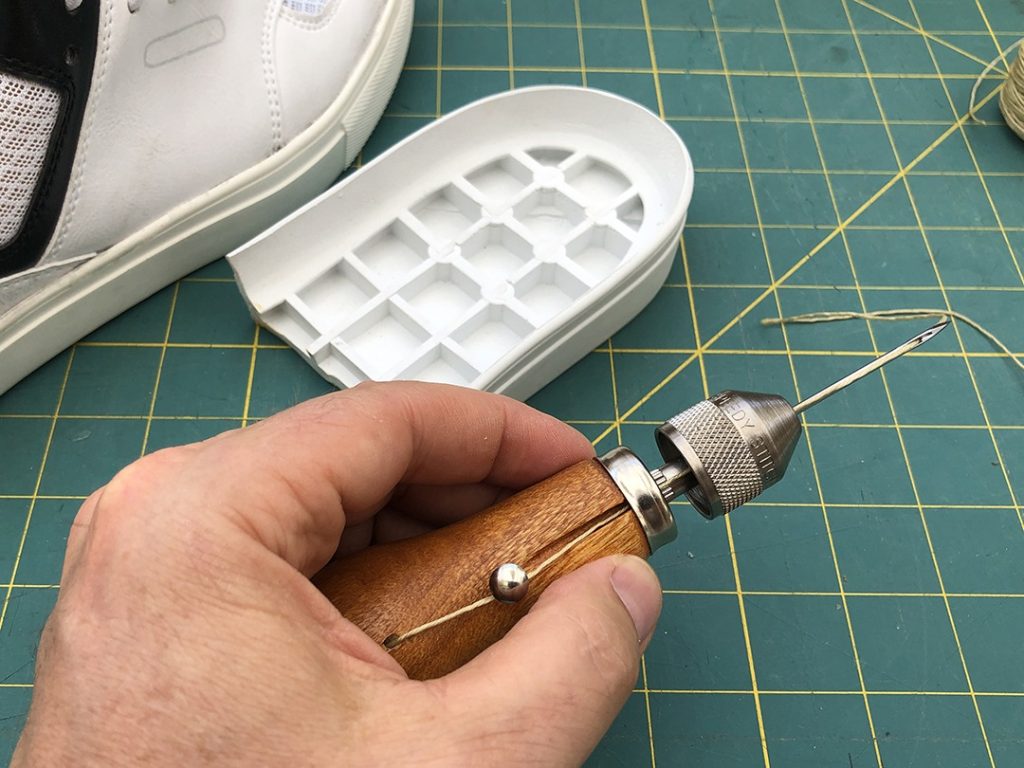
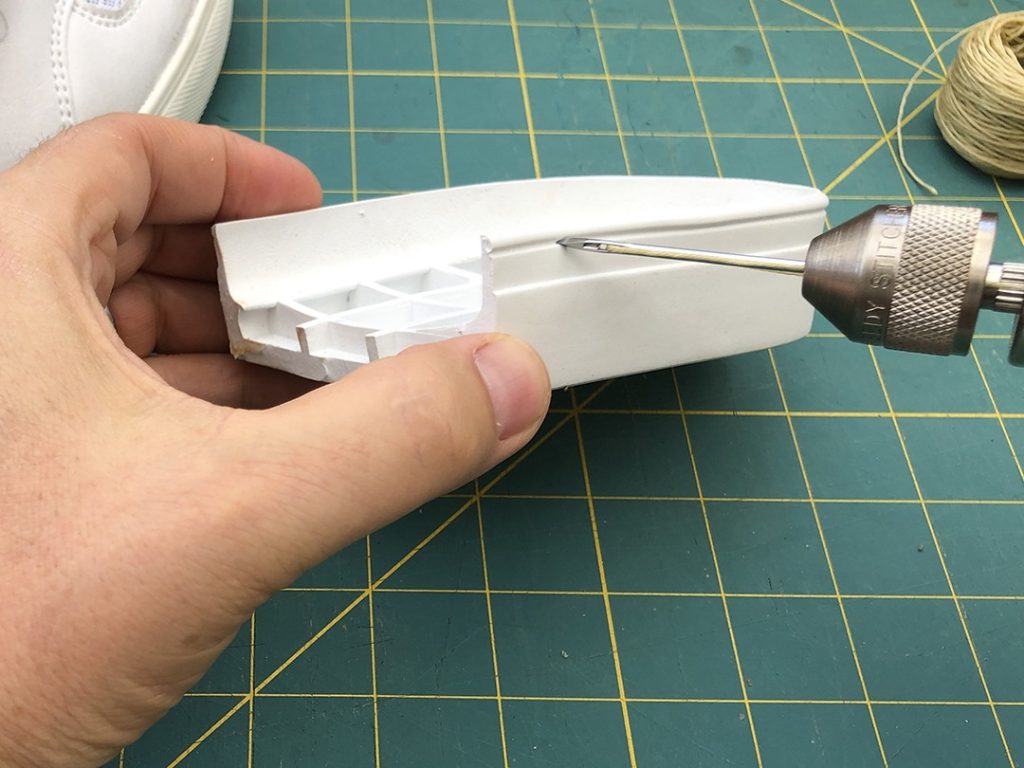
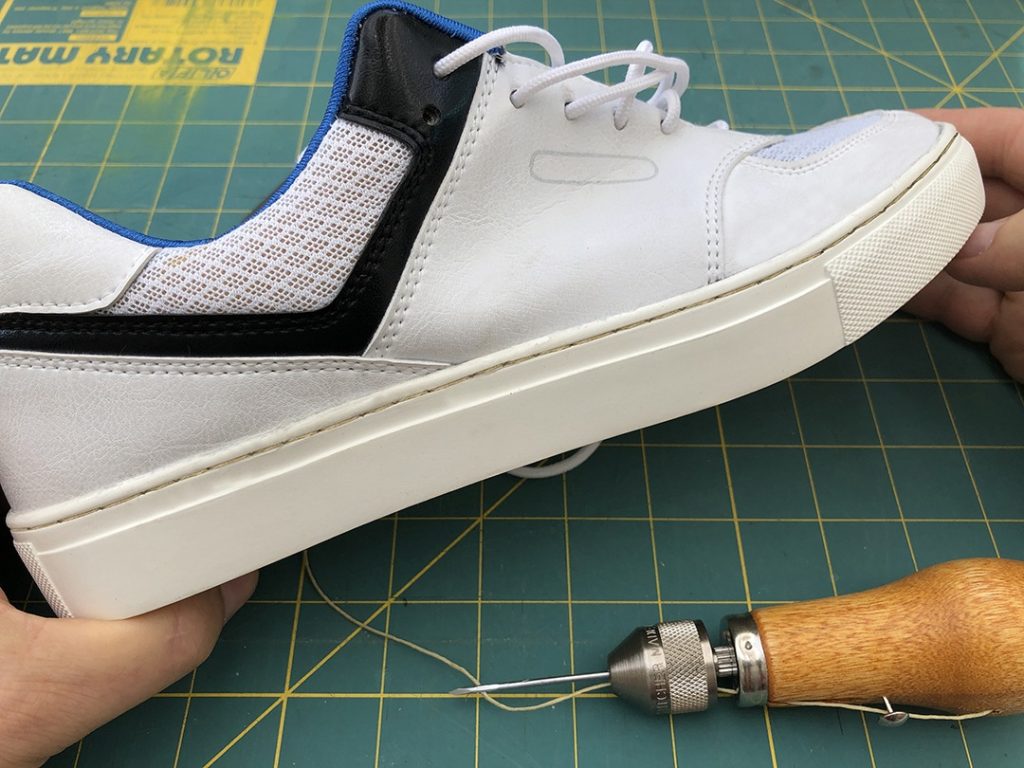
For a DIY sneaker project, it’s a good idea to reinforce the cement bonding with outsole channel stitching. You can stitch the toe, heel, or the entire perimeter. In the shoe factory, the workers will use a purpose-built channel stitching machine. The skilled worker can stitch a pair of shoes in less than a minute. Unfortunately, we don’t have this special equipment in our DIY workshop so we will use the Speedy Stitcher. You can find the Speedy Stitcher on Amazon.
Using the Speedy Stitcher
The Speedy Stitcher is a heavy-duty sewing awl with a built-in supply of thread. Follow the instructions on the package to assemble the stitcher with the straight needle and the thread running from inside.
Getting started with the Speedy Stitcher
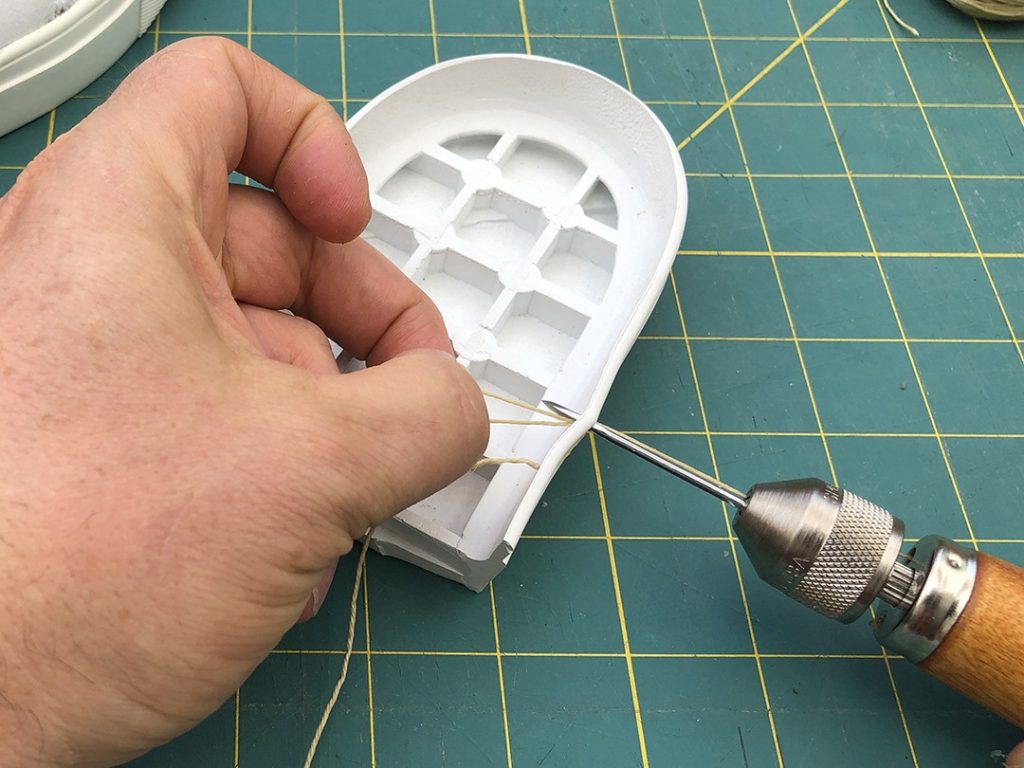
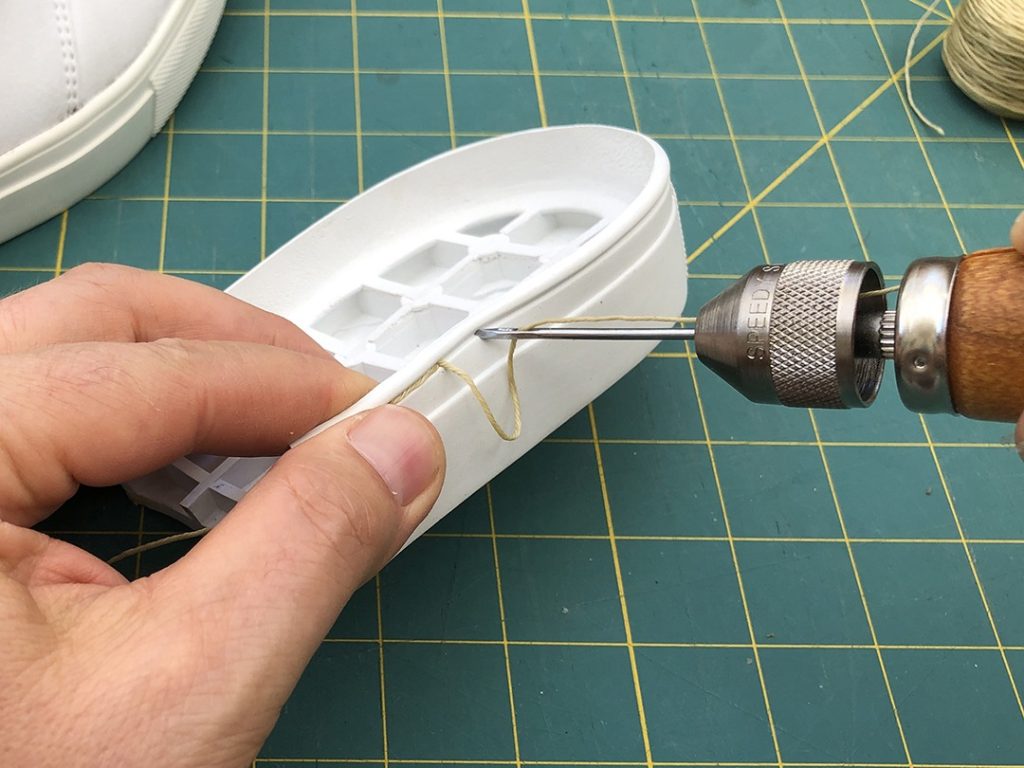
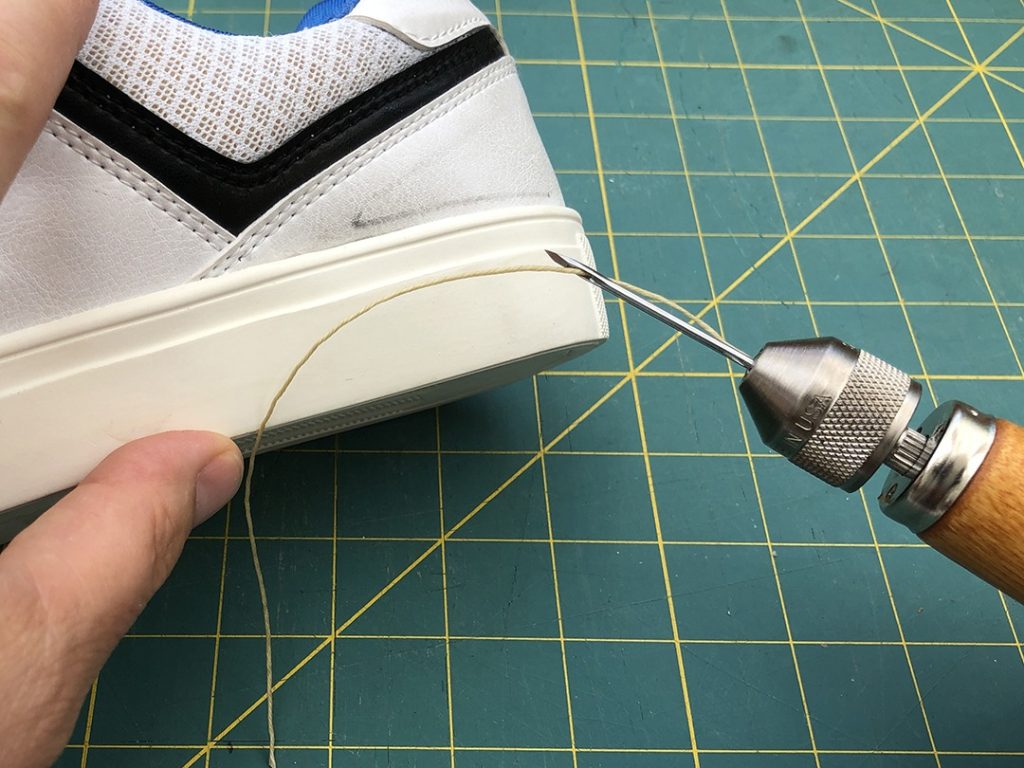
Here, you can see step-by-step stitching operations with the Speedy Stitcher. I am using a rubber sole without the upper attached for teaching purposes.
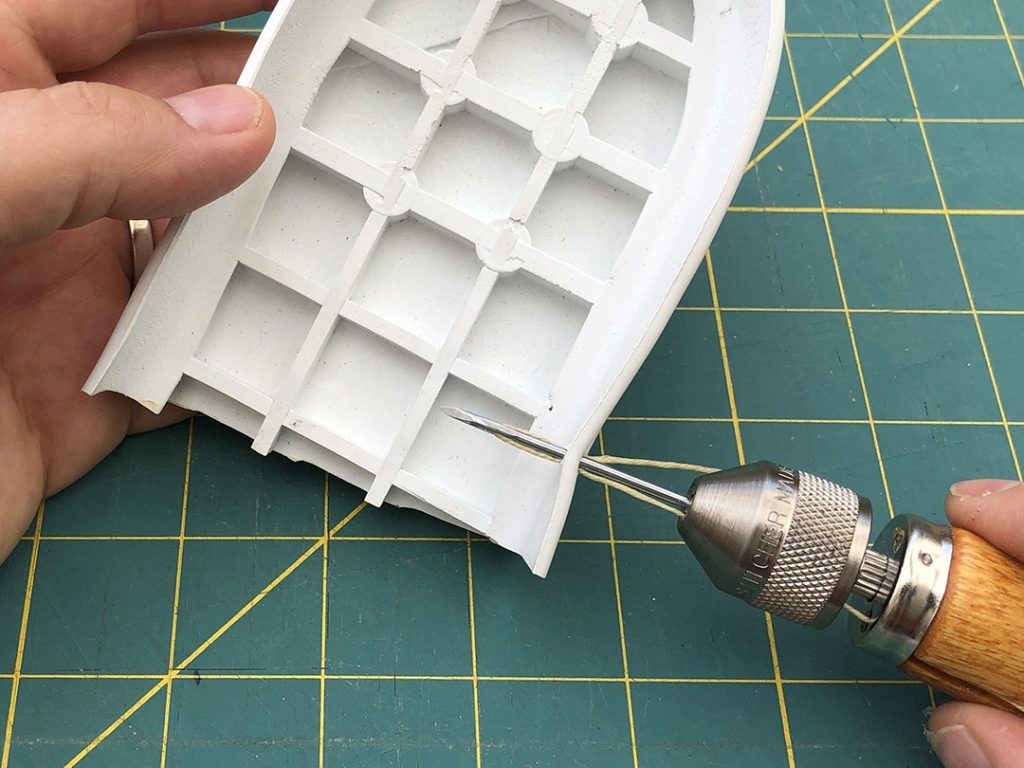
First, push the threaded need into the groove. Next, with the needle inside the shoe, pull the loose end of the thread through the hole. While holding the loose end of the thread inside the shoe, withdraw the needle. You will need the loose end to hold the stitches inside the shoe, so pull enough thread into the shoe to wrap the entire perimeter of the sole. This will be 80 cm to sew a size 11 or 44 shoe! This thread will be your bobbin thread as you sew.
You will use the entire length as you work around the inside perimeter of the shoe. Don’t worry if you run short, you can knot off the end and start a new thread line.
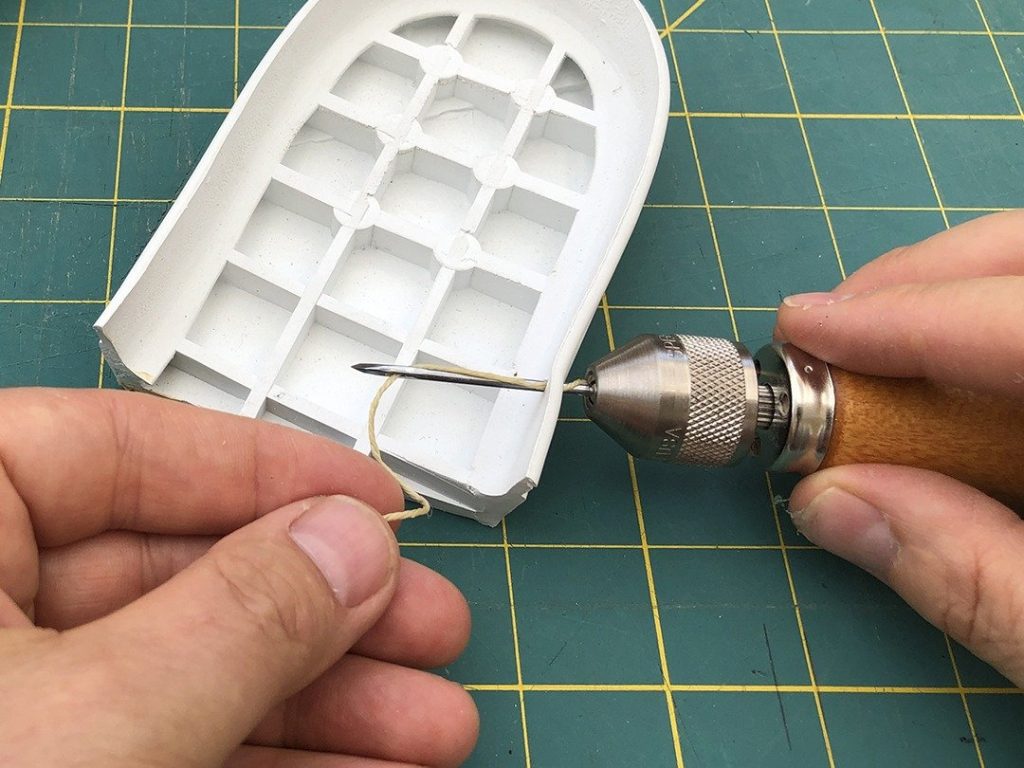
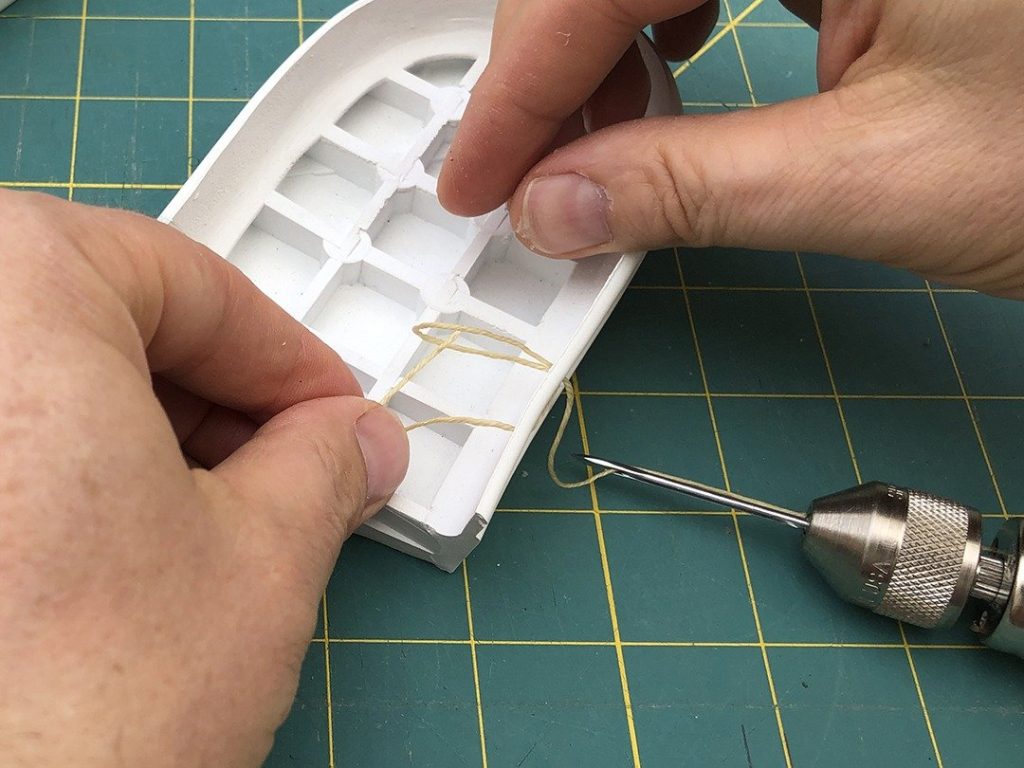
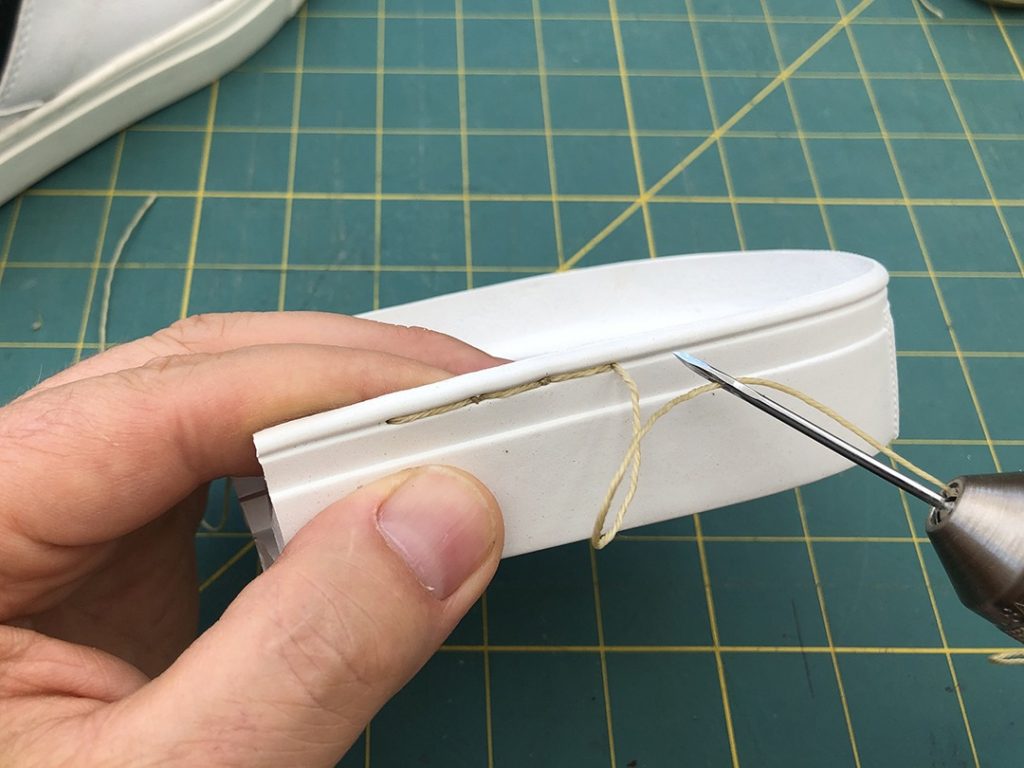
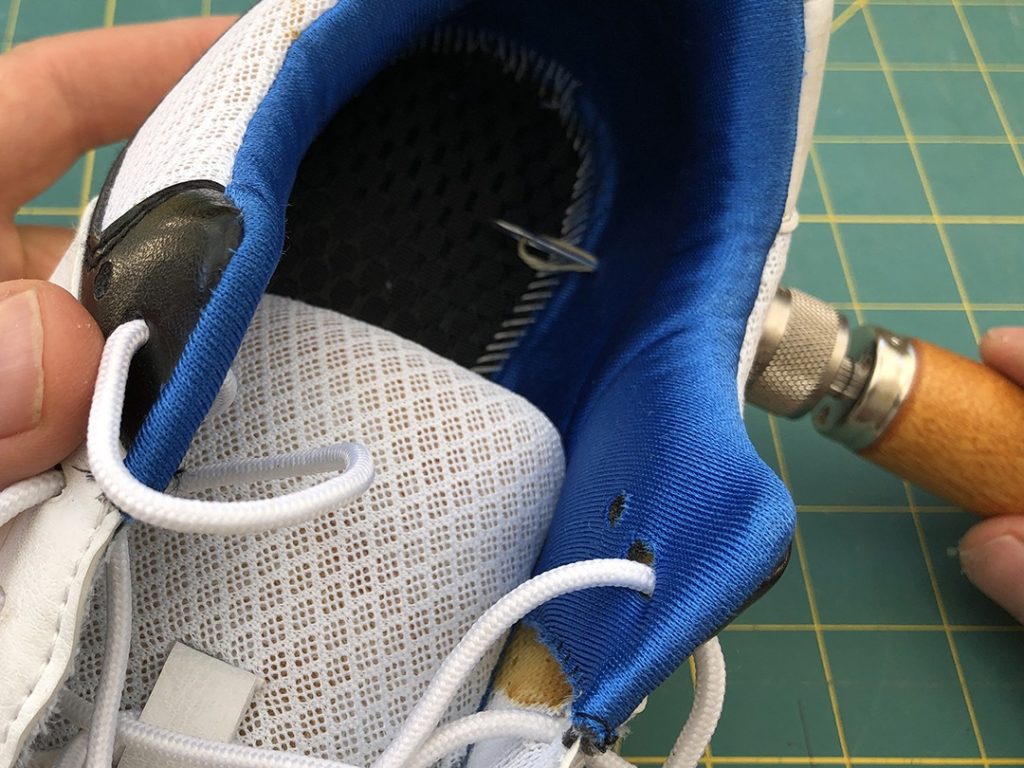
To complete your first stitch, push the needle back into the sole 10mm beyond your first hole. With the needle inside, pull the thread away from the needle, making a loop. While holding the loop in place inside the shoe, withdraw the needle. Next, feed the inside bobbin thread through the loop. You can add a hooked needle to the inner thread to make this operation easier. Now, tension the outside thread and the inside thread to secure the stitch. You have made your first stitch!
When you are working inside the toe of your shoe, pull the inner loop 2 or 3 inches long so you can see the loop and easily feed in the bobbin thread.
Here is the step-by-step sole stitching process
Insert the awl into the groove
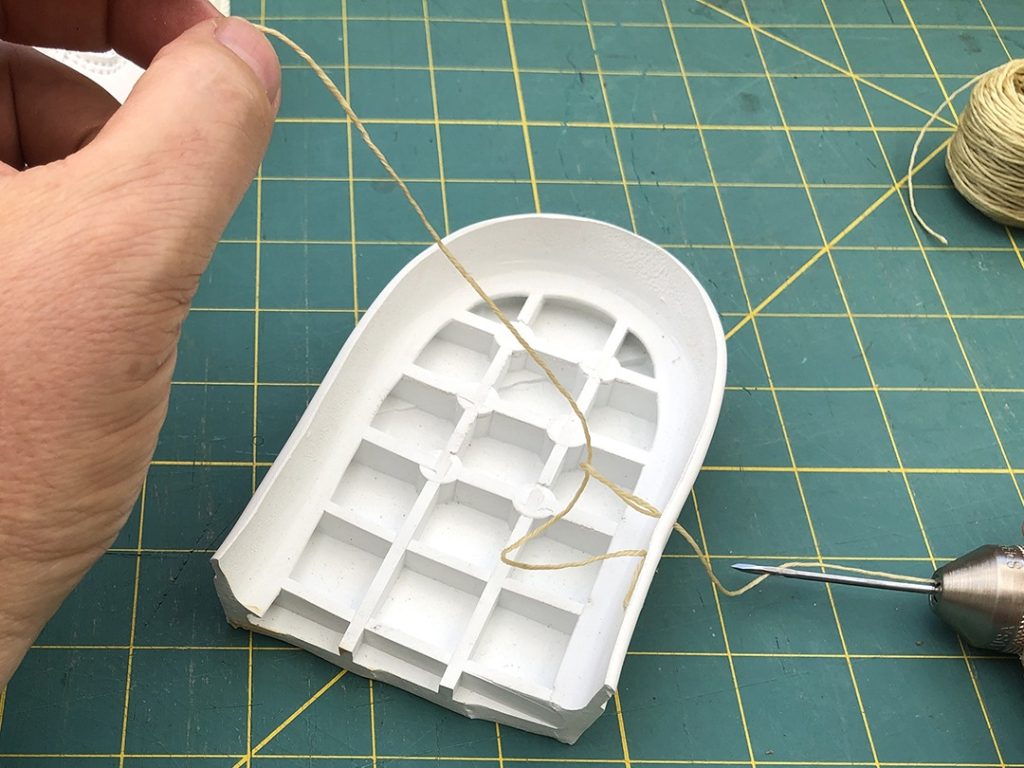
A loop of thread is now inside the outsole.
Pull the loose end of the tread into the shoe – this will be the 80cm long “bobbin” thread.
Create a loop, withdraw the needle, feed the bobbin thread, tighten.
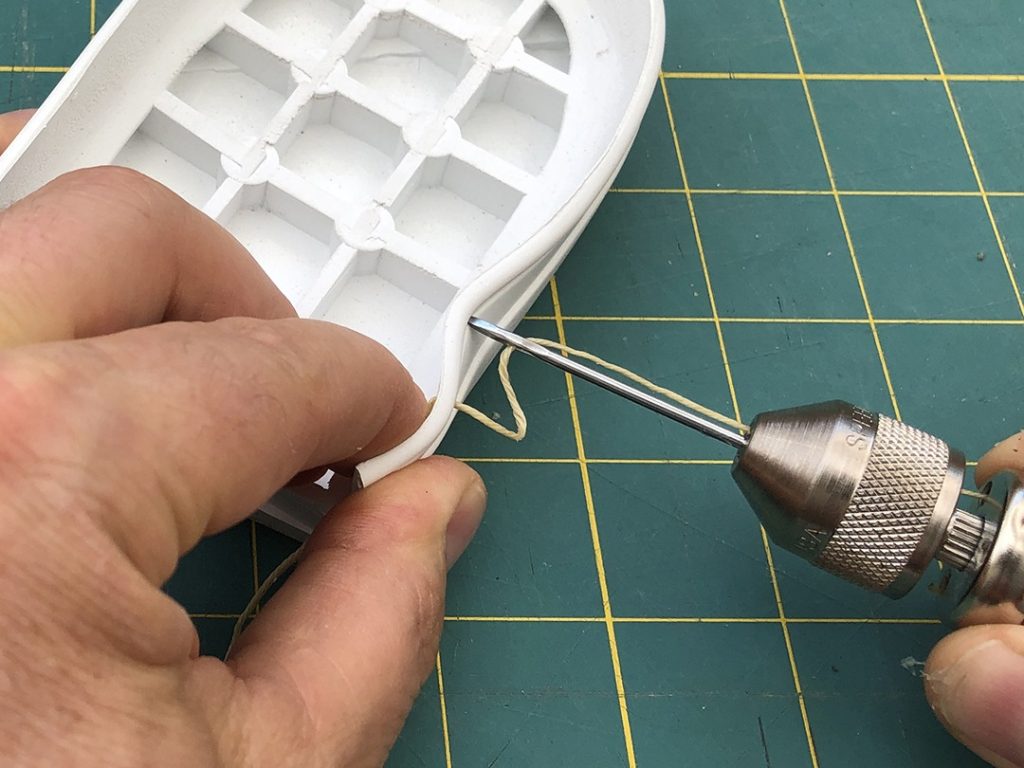
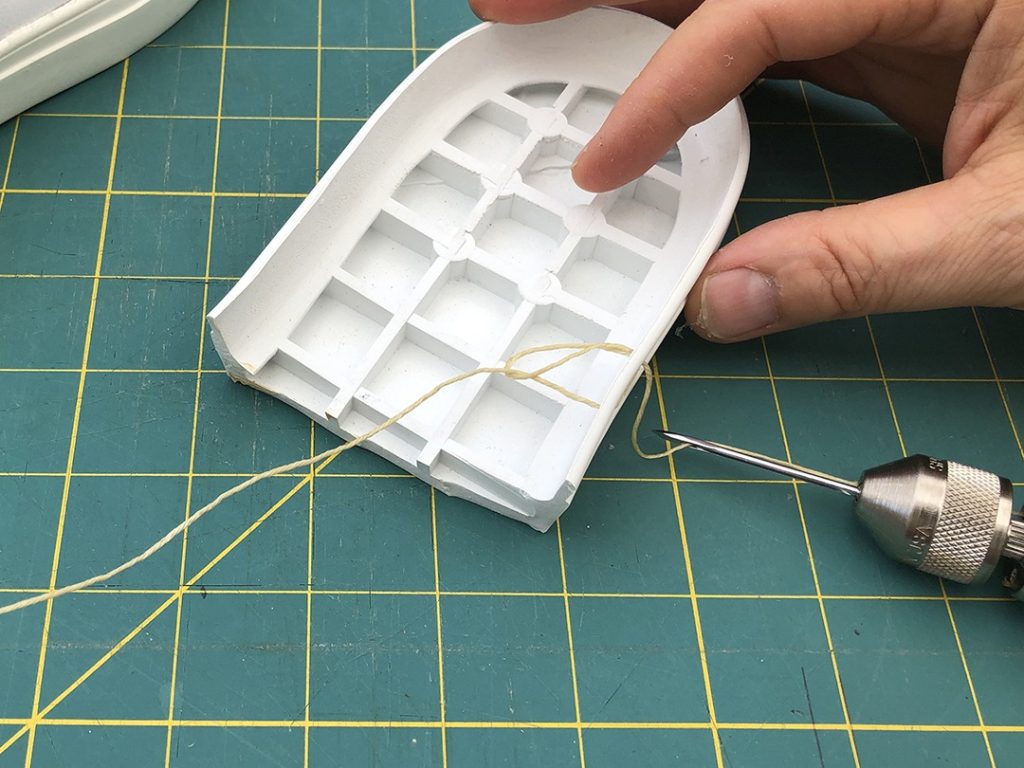
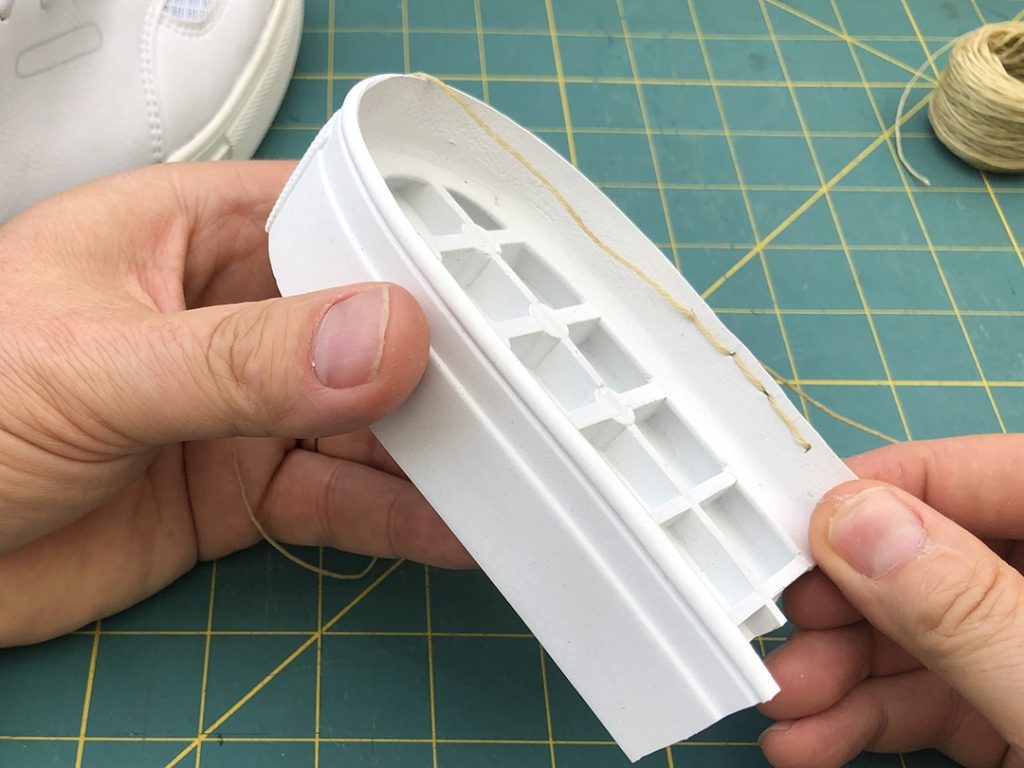
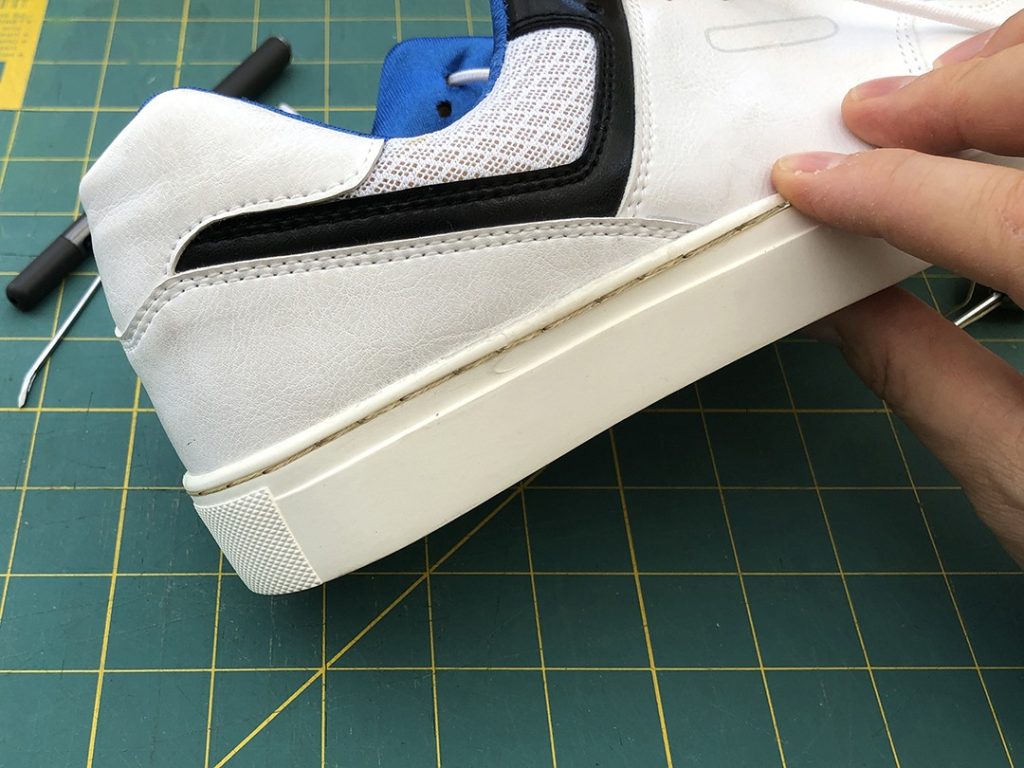
The inside will look like this, the bobbin or inside thread will be flat and tight.
The outside thread is also held down tight into the groove. The little knot between the stitches is the bobbin thread showing.
Stitching your shoe sole
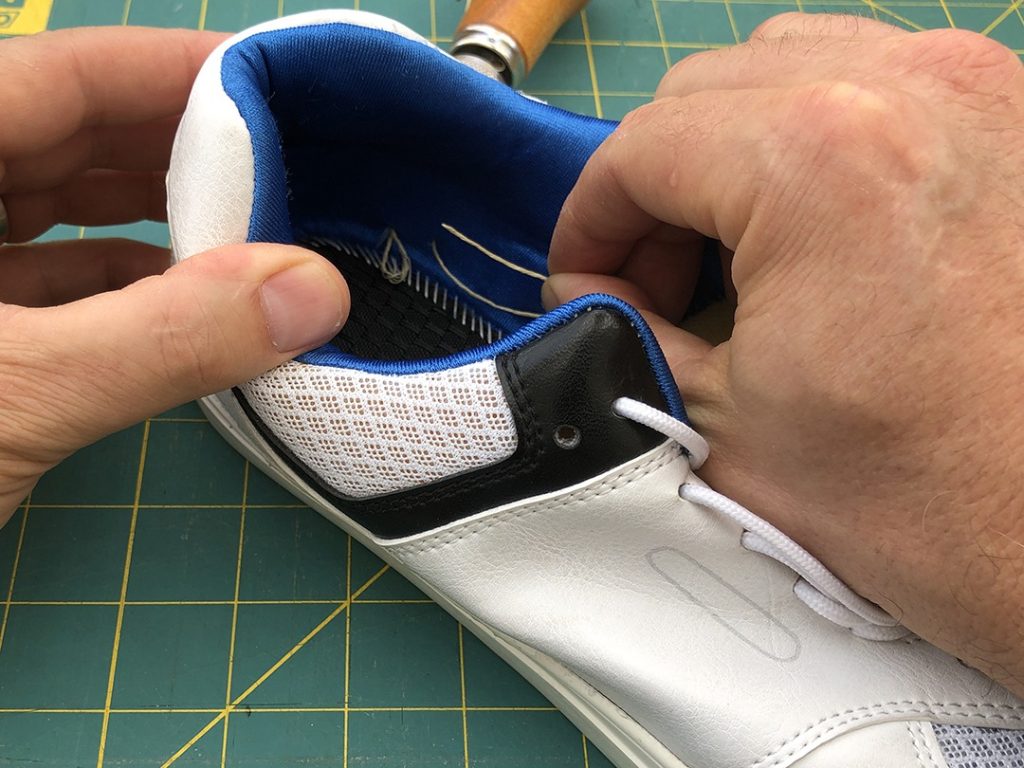
Your first stitch may take a few minutes to get right. Be patient. With a little practice, you will move faster. Hand stitching your outsole may take you an hour or more. Relax, play some music. You will build muscle memory and a rhythm. Inside the toe of the shoe can be a challenge; make sure you have a well-lit workspace, and it’s okay to pull the inner loop out long enough so you can see when to feed the bobbin thread.
When you get to the end, knot the threads together and trim them off. Now, run your hand along the inside to check for any loose threads or rough spots. Jobe done!
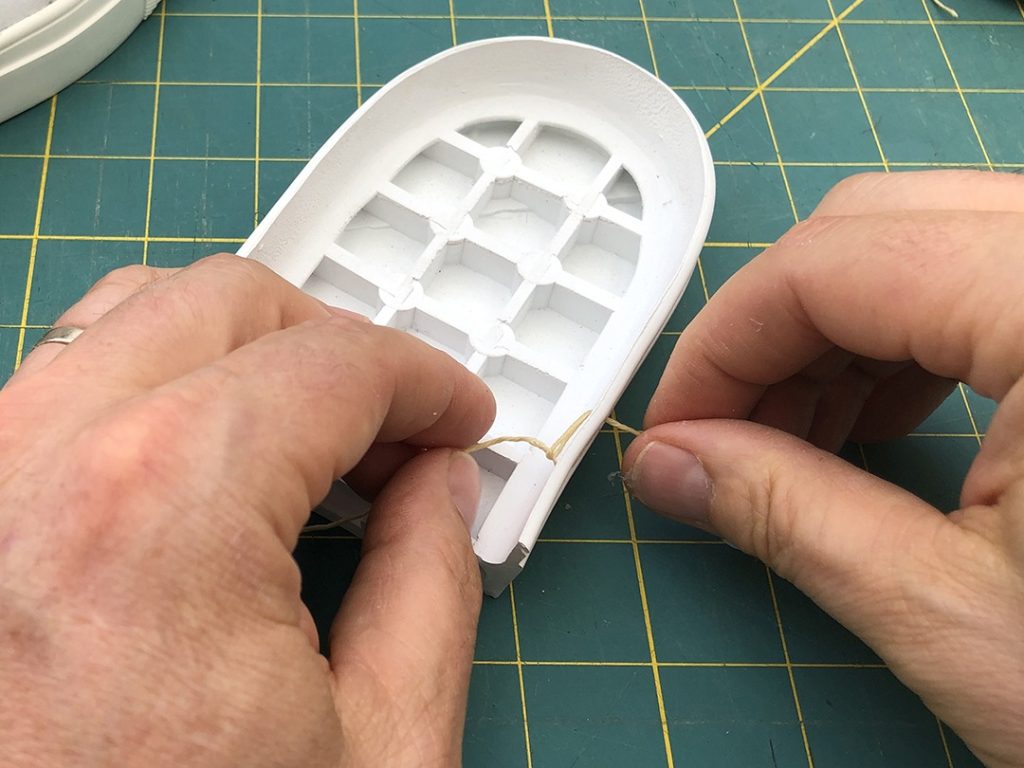
I like to start inside the heel
Make your first loop and pull the bobbin thread inside the shoe
You will need 80cm to stitch the entire perimeter of the shoe
Today in the workshop, we are finishing the assembly of our sneaker test pattern. Here, we will cover the step-by-step process of preparing the outsole units and uppers for cold cementing and sole stitching. We don’t have a shoe factory with presses and heat tunnels so we are going to adapt the cold cement process for the home workshop and DIY shoemaker.
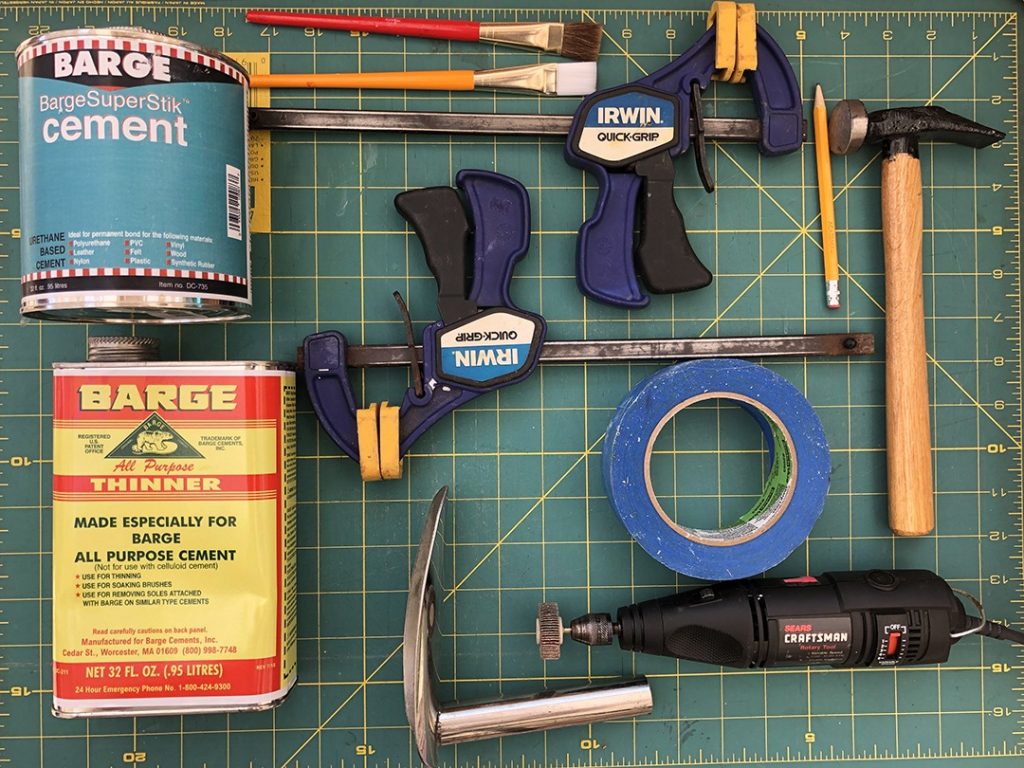
Sneaker sole cementing tools
Before we cement together our sneaker, we will need to collect some tools. For this process, we are going to use as many common household tools as possible.
Sneaker Sole Cementing Tools
Cement (I like Barge)
Cement thinner (Make sure you have the correct thinner for your cement!)
Brushes
Shoehorn (if you are making a Strobel shoe)
Sandpaper or rotary buffing tool
Pencil
Flat-faced hammer
Clamps
Non-staining tape
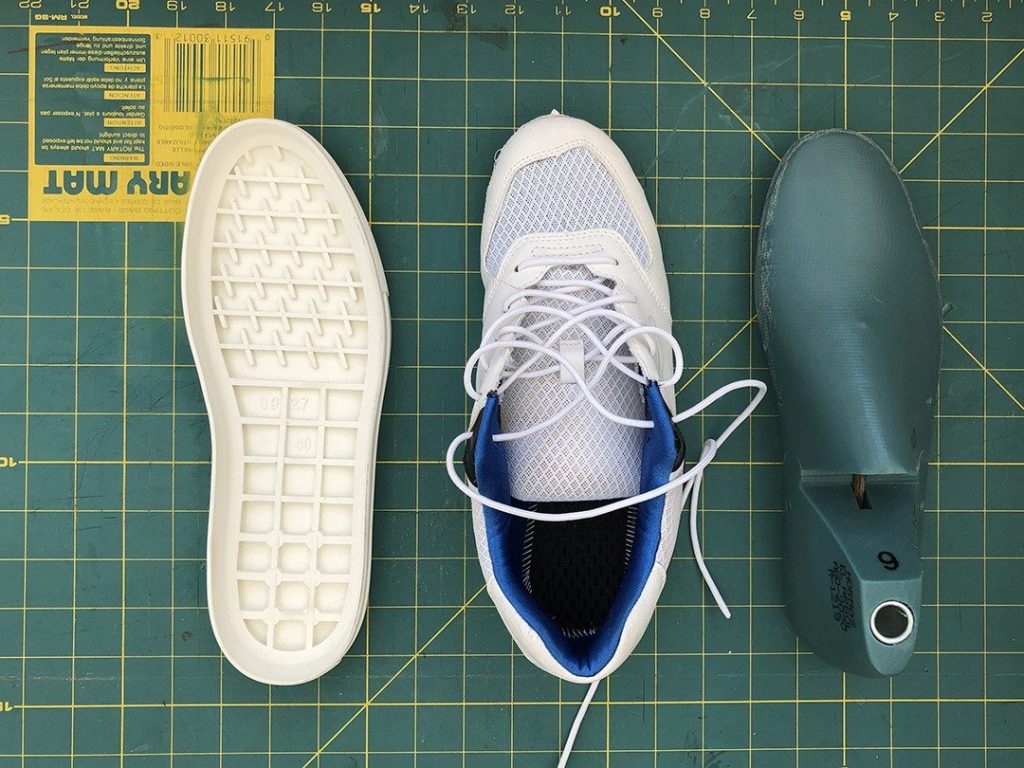
Sneaker parts
You need your upper, your last, and your outsole unit. If your upper has laces, make sure you have threaded the shoelaces or have some temporary laces installed.
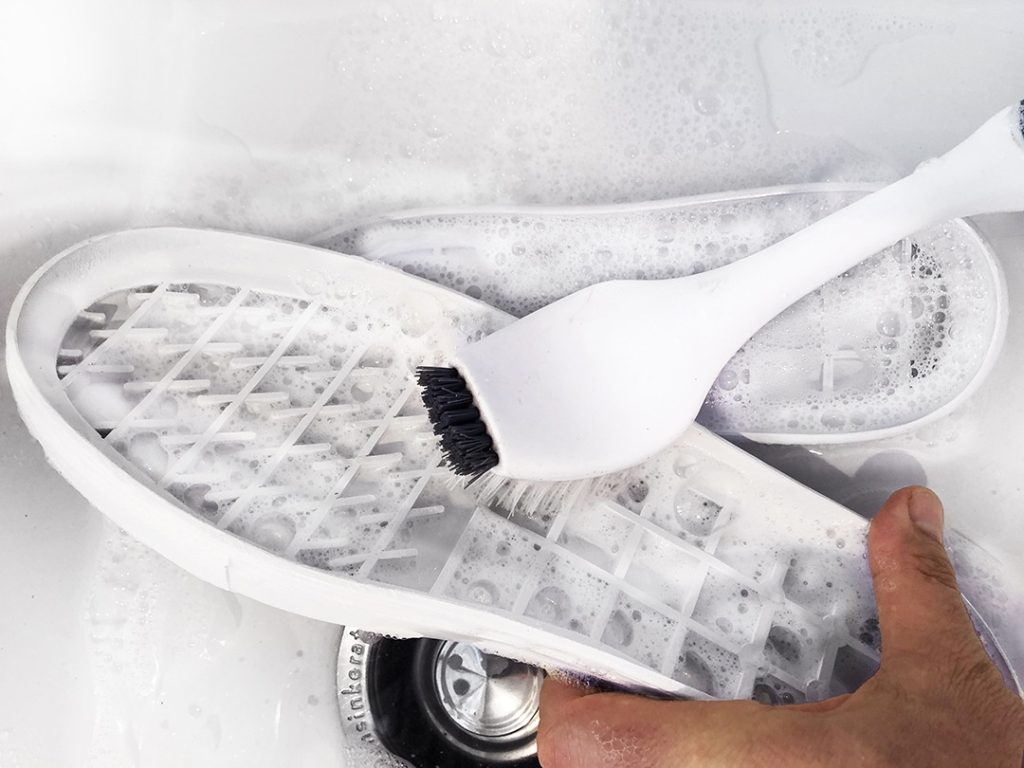
Washing your sneaker outsoles
Yes! You should wash your outsole parts. During the manufacturing process, the production mold is sprayed with a lubricant. The lubricant spray helps the rubber flow in the mold and allows the hot metal and rubber to be separated once the molding is complete. Before you can bond your parts, give them a hot soapy bath.
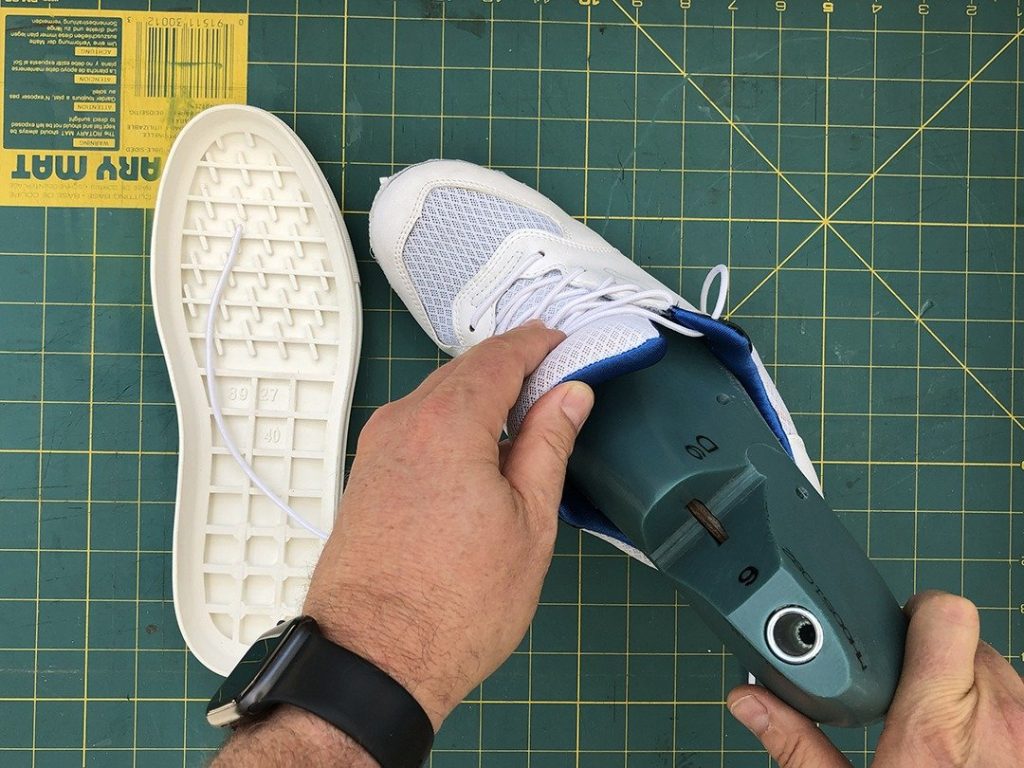
Lasting your uppers
If you are building a board-lasted shoe, you may already have your uppers lasted and ready. In this case, I will show you how to prepare a Strobel upper. Carefully slip or force the last into the upper. If the upper is very tight, you may use a damp towel and a little heat to soften the upper. I have a proper industrial shoehorn to help. Work slowly so that you stretch the upper without damaging the material or stressing the seams. Make sure the shoelaces are loose. If you have a hinged last you can “break” the last to get it inserted, then carefully close the last to tighten the upper.
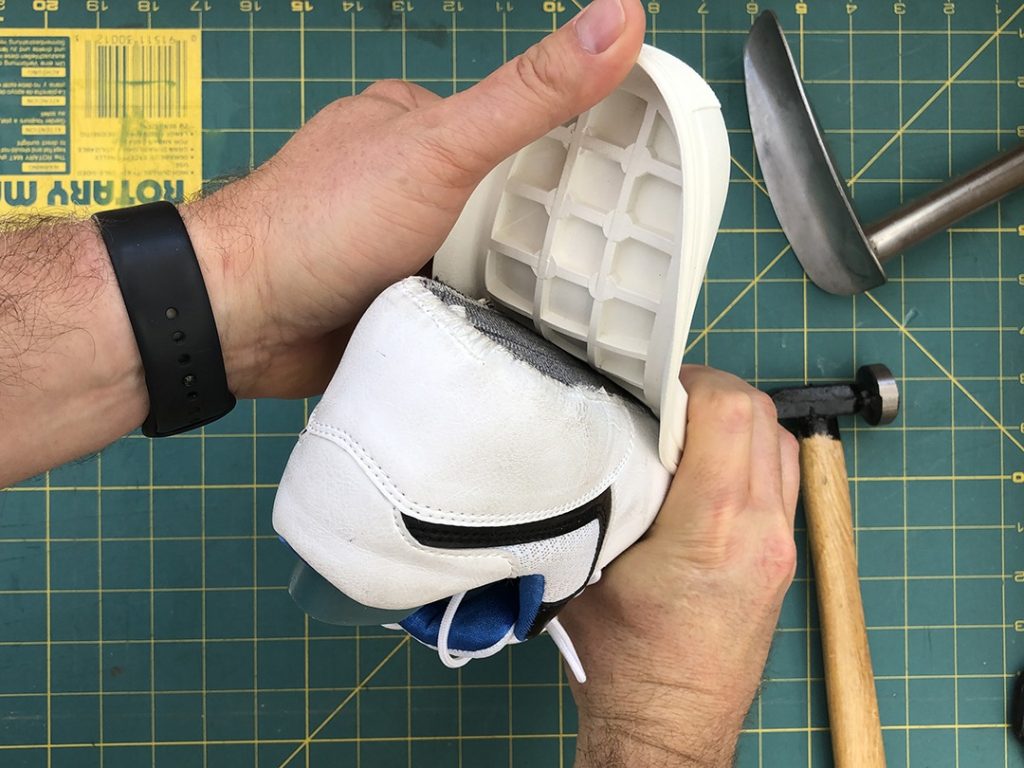
With the last completely inside, tension the laces bottom to top. Pull tight! Now, check the upper fitting to make sure you don’t have any loose spots. You can use a hammer to seat the heel and toe down to the last. You may need to tighten the laces again afterward. Make a final check that the pattern is straight and not crooked or rotated on the last. If you steamed the upper or used a damp towel, now is a good time to dry the upper with a hairdryer. Let the upper cool off and dry out; this will help pull the upper tight to the last. Now, recheck your shoelace tension.
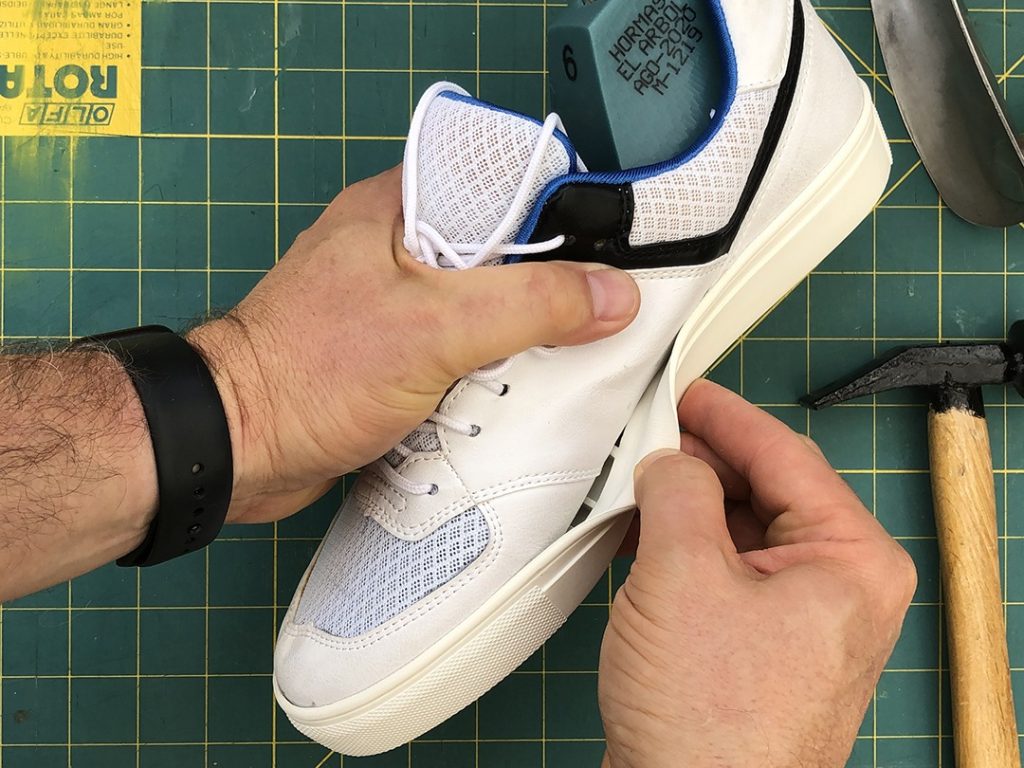
With the upper tight to the last, it’s time to double-check the fit of the sole unit. Most rubber outsole parts have some stretch, and we are looking for a tight fit. If the rubber is loose, you will need to downsize. It’s better to stretch a small unit than try to bond an oversized part.
Check the fitting around the length, toe perimeter, across the bottom, and sidewalls.
Check the upper width
Is the upper seated?
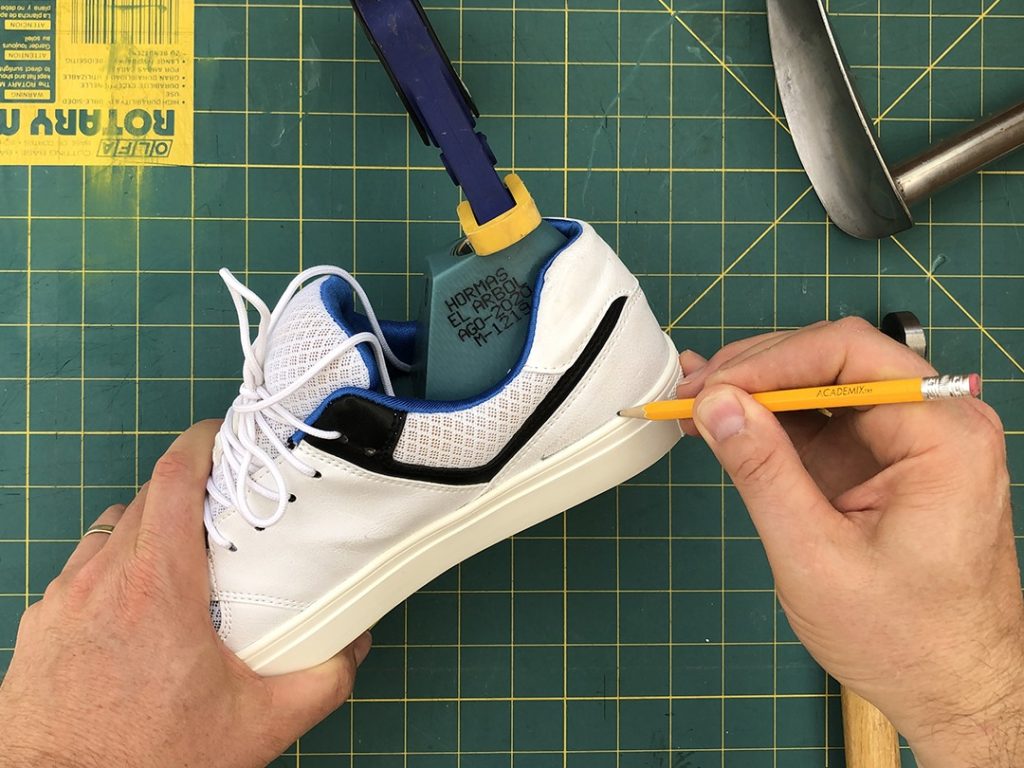
Marking the upper
To prepare the upper, mark the bonding surface that will be in contact with the rubber sidewall. In the factory, a worker uses a press to hold the parts together. You can use a clamp, rubber bands, or a tabletop. Firmly press the sole and upper together and, using a pencil, lightly mark the edge. This is the cement line.
How to use the cement line
The cement line shows you where to rough your upper and apply shoe cement. Depending on the upper material for your shoe, you may need to rough (or buff) the bonding surface. Suede and mesh materials don’t require buffing. Smooth leather and PU leather materials will require some roughing to ensure the primer and cement penetrate the materials. Following the cement line, use sandpaper or a rotary tool to lightly buff the material’s surface. Be careful not to grind too much or damage the stitching. You must never rough above the pencil line, as this will show after the sole is attached.
Roughing the outsole
While you have your roughing tools in hand, it’s a good idea to rough the inside surface of the outsole unit. After you have roughed the upper and outsole, you must clean away any dust. Use a vacuum, high-pressure air, or dry towel to clean all the parts. You must remove any dust for the bondings surfaces.
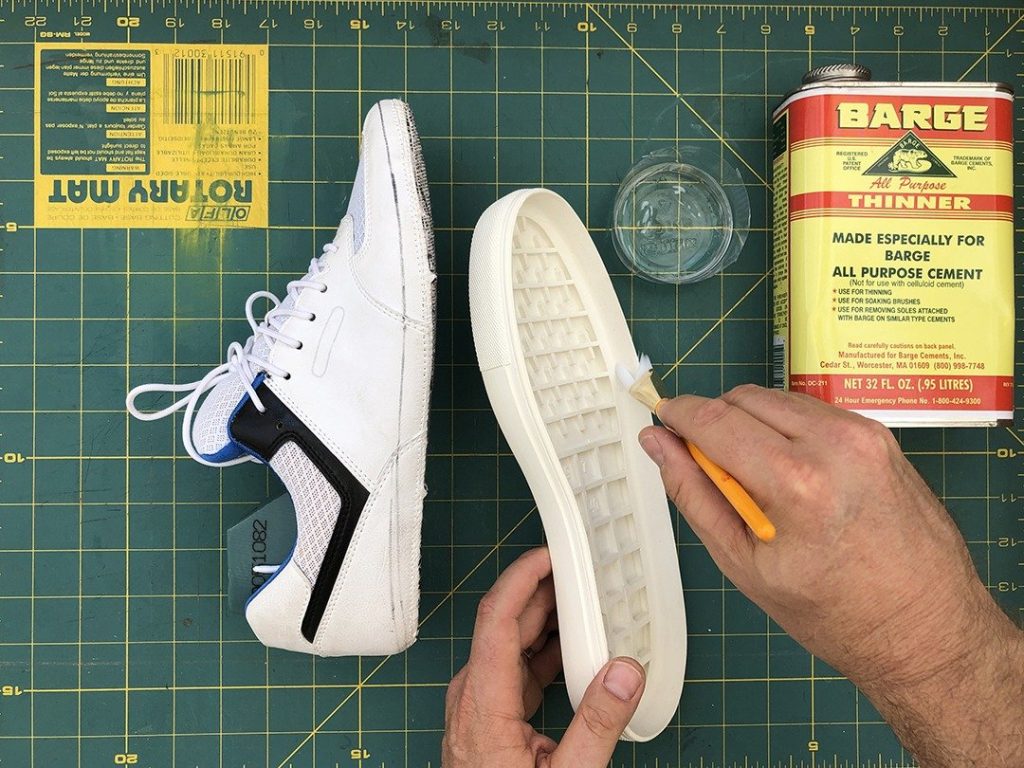
Priming your shoe parts
Primer is a mixture of shoe cement and cement thinner. You must test it first to make sure you have the correct thinner for your cement. The idea is to thin the cement into a liquid that can penetrate the upper materials and the surface of the rubber parts. Try a mix of 50% or even 75% thinner.
Coat the bonding surfaces of the upper and outsole with the primer, let it dry for a few minutes, and prime again.
The shoe factory will use a different primer for the rubber and upper parts but for our DIY shoe project we can use the same primer mix for both.
Once the primer coats on your outsole and upper are completely dry, you can apply the cement. Follow the same procedure and apply multiple light coats of cement to both the upper and the outsole. Again, be careful not to cement above your line.
Now, wait! On a hot, dry day in California, the cement will dry to the touch in just a few minutes. If you are working in a cool, damp London studio, you may need to add a little heat to dry the cement. Be patient! DO NOT put wet parts together.
A word about shoemaking contact cement
The cement we are using is not like Elmer’s glue, epoxy, Superglue, or other types of glue you may have used. We are using CONTACT cement. What does that mean?
Contact cement must be dry when the parts are brought together. The cement has already bonded to the parts and when we bring the parts together we are bonding the cement to itself “on contact.” If the cement is wet and the parts can slide against each other the bond will not be strong.
Assembly
When the parts look dry, test the surface with your fingertip. The cement should be tacky but not wet. Now, the tricky part. Starting at the heel of the shoe, bring the parts together. We are using CONTACT cement, so the goal is to press the parts together and not slide them against each other. Getting the heel lined up straight is critical to getting the sole application right.
Start by touching the heel down into the sole. To do this, bend the rubber sole backward and try to keep the side walls “open” as you apply the sole to the upper. It is a good idea to practice this assembly procedure with dry parts, so you feel how to do it. Next, work your way from the heel to the toe. Don’t press the sidewalls yet.
Before you press the sidewalls, it is a good idea to press the bottom down hard onto your work surface to ensure the upper is fully seated in the sole. If you see the sidewall is below the marked line, carefully peel back the sidewall and push it into place once the bottom edge is seated.
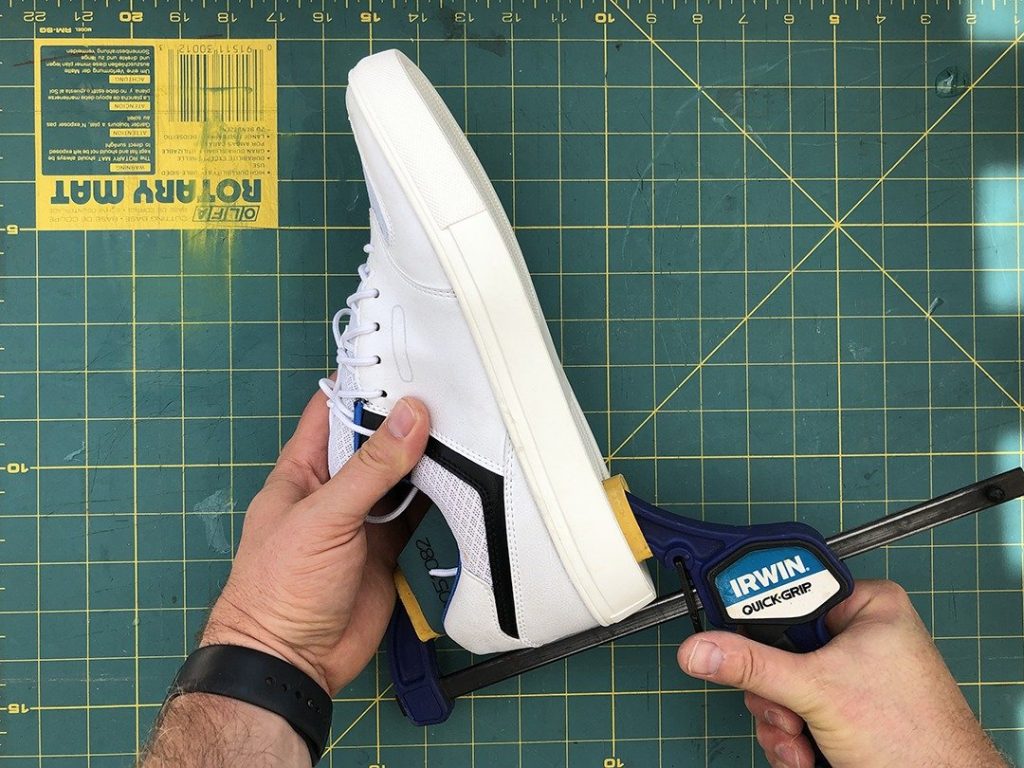
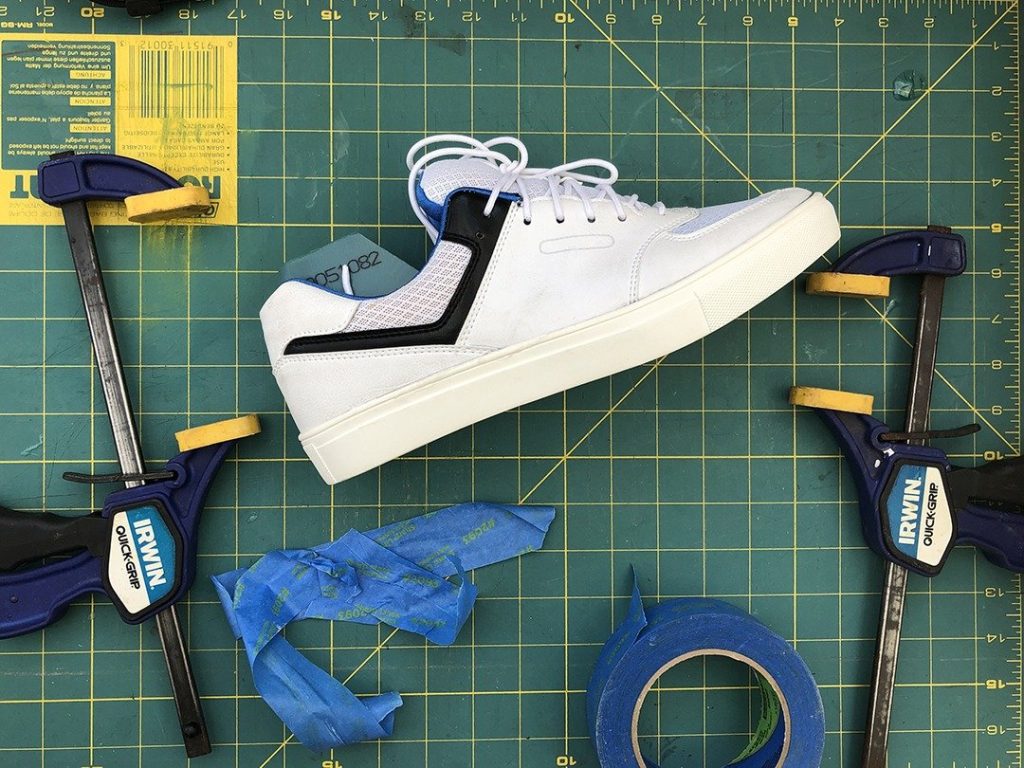
Fitting and pressing the parts together
In the factory, they use a press; we can use clamps, a hammer, our thumbs, and tape to make sure the sidewall is in full contact with the upper. If you see any gaps you can peel back the upper and apply more cement. Make sure to hold the sidewall back for a few minutes to let the glue dry. Press firmly. Now relax and let the glue cure.
Removing the last from the upper
With the upper cooled and the glue cured, it’s time to remove the last. For sports shoes with open eye stays, simply loosen or remove the laces and push the last out from the bottom. For leather shoes with solid vamps, “break” the last on the hinge and remove it. Many shoemakers drill a hole and thread a cord thru the last to create a handle. Then, they use the cord to pull the last out of the shoe. For leather shoes, be very careful not to crease the shoe when removing the last.
Outsole Stitching Process
Stitching the sole For a DIY sneaker project, it’s a good idea to reinforce the cement bonding with outsole channel stitching. You can stitch the toe, heel, or the entire perimeter to keep your sole fixed in place. See the step-by-step channel stitching process here.
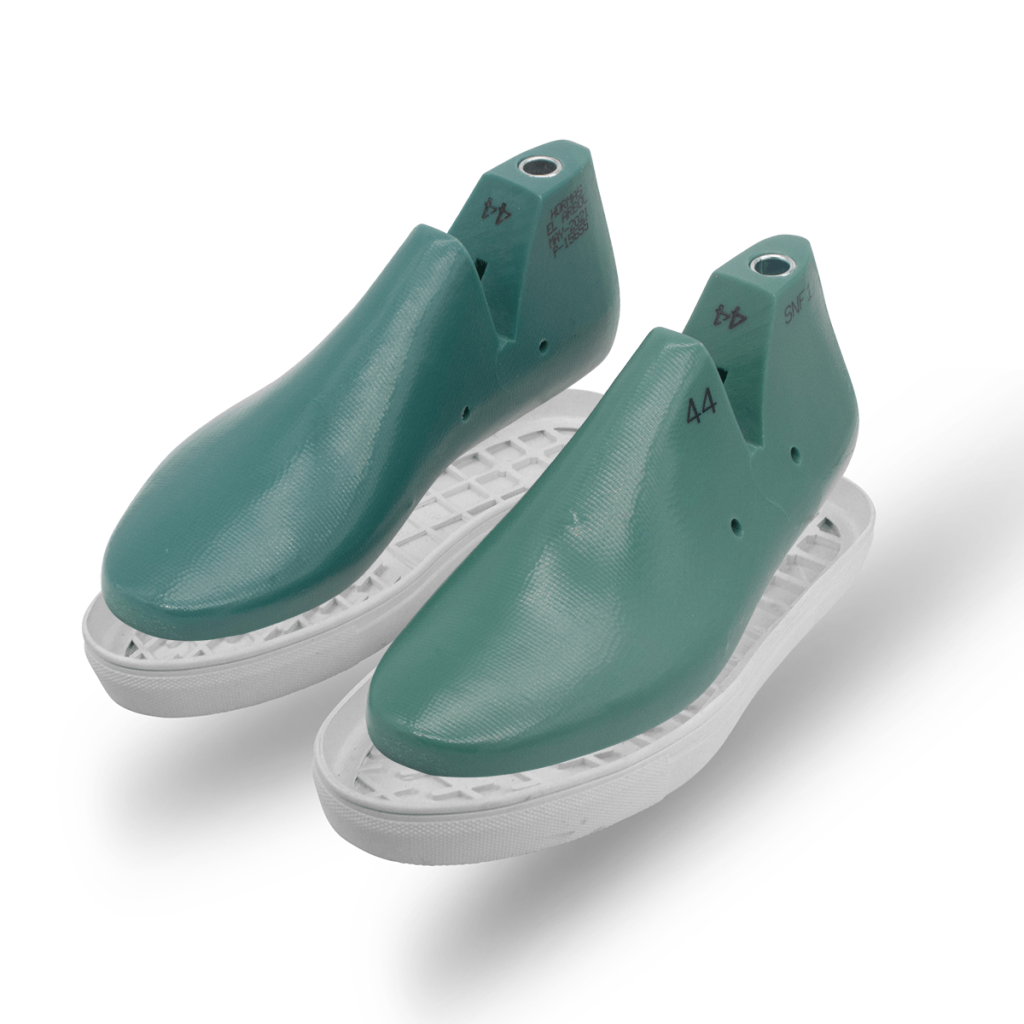
Today is a big day at the sneaker factory workshop! The lasts arrived from León, Mexico. Our sneaker last, SNF-1, is made by Hormas El Arbol. Hormas El Arbol is one of the top last makers in Mexico. The SNF-1 is made of high-density polyethylene plastic and has a spring hinge. These lasts are made by injection molding the rough shape then turning (machining) it down to the exact shape and size. The team at Hormas El Arbol has done an incredible job with our SNF-1 last, it’s perfect and easy to use! You can see the SNF-1 lasts here.
Our Lasts arrive!
The SNF-1 is perfect!
Sizes from 37 to 47SNF-1 is made by Hormas El Arbol in León, Mexico.
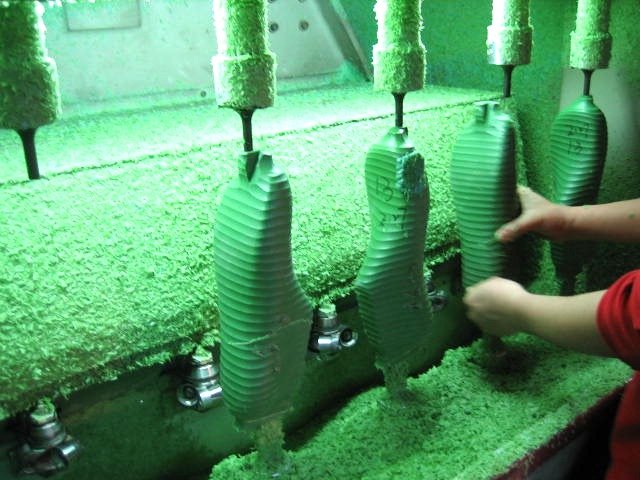
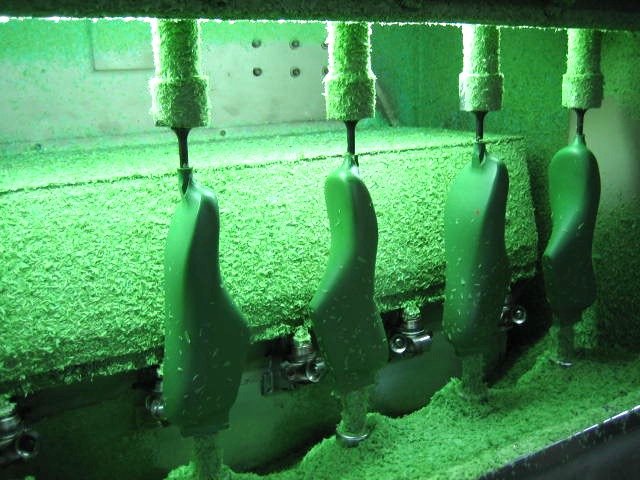
How the sneaker last is made
Shoe last – High-speed rough cutting
Shoe last – High-speed rough cutting
Shoe last – High-speed finish cutting
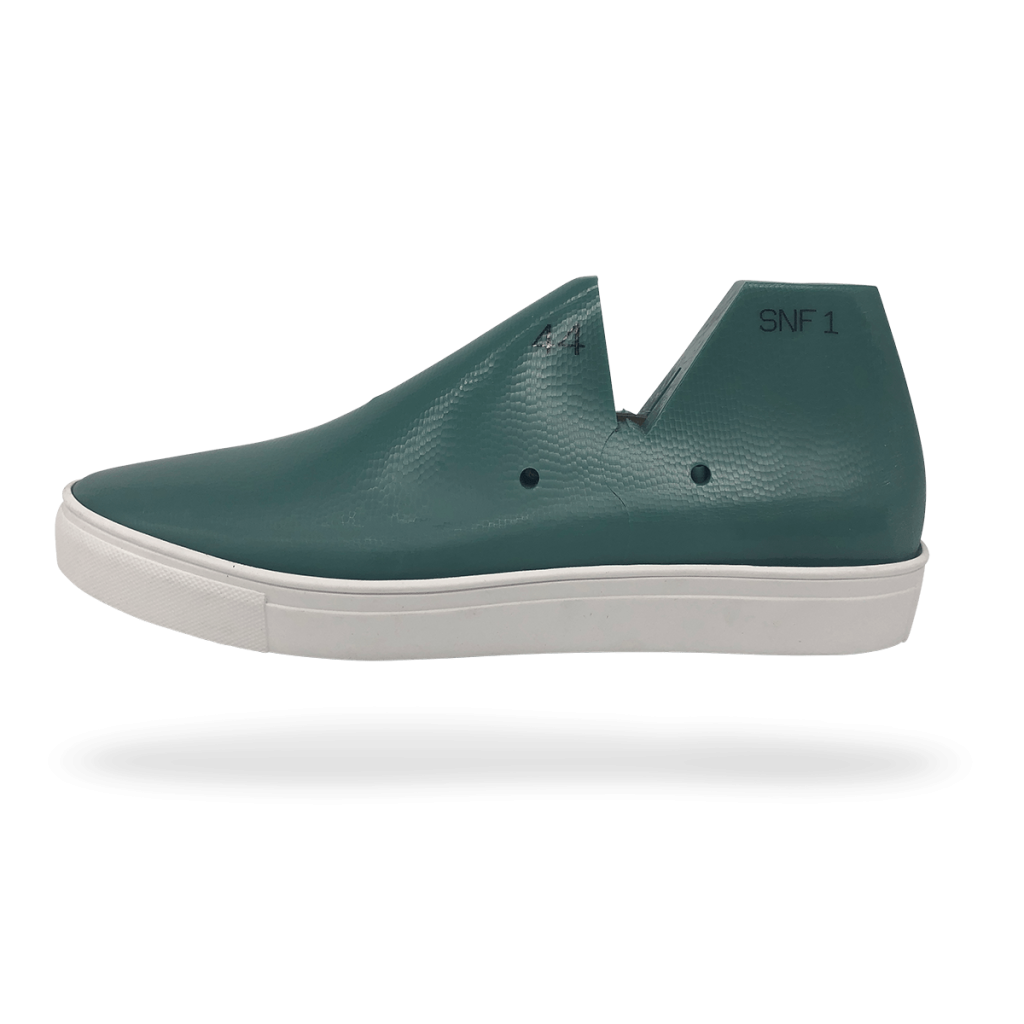
SNF-1 Last : Pure sneaker styling!
Classic sneaker styling
The SNF-1 shoe last allows for a sleek vamp and toe box yet it’s accommodatingly wide in the midfoot. The SNF-1 shoe last features a defined feather edge (suitable for both hand-lasting and Strobel-lasting footwear constructions). The spring hinge allows for easy removal without damaging your shoes. You can buy the SNF-1 lasts here.
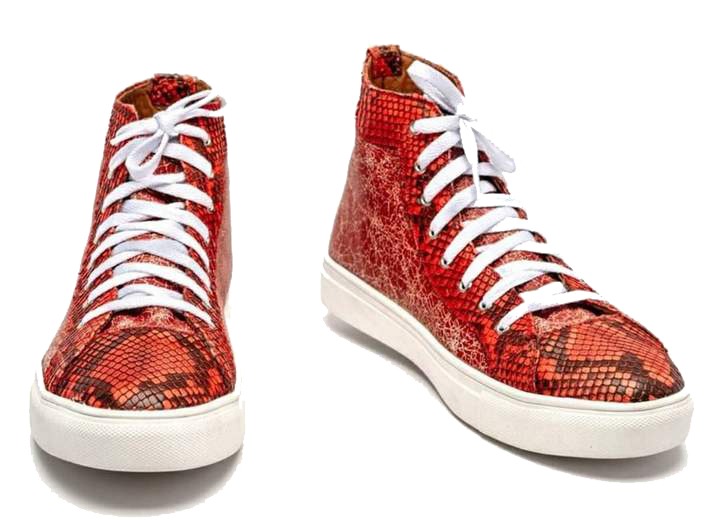
Based on the classic “Vans” styling, the SNF-1 last instep is suitable for low-cut, mid-cut, and high-top patterns. This casual shoe last also works for slip-on and lace-up style shoes.
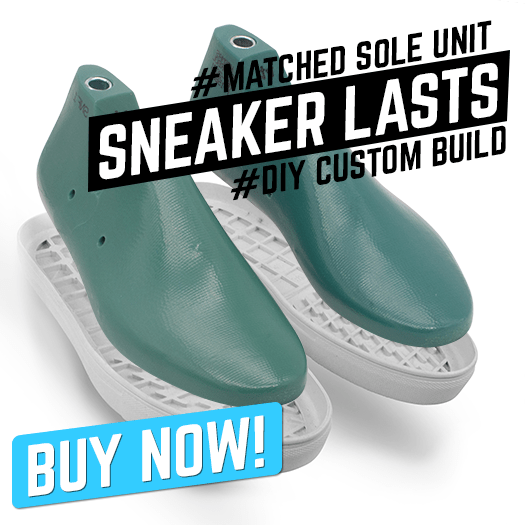
Last and matching outsole – Now Available!
Vans last styling DIY shoemaking and Sneaker Making Kit
Vans last styling DIY shoemaking and Sneaker Making Kit
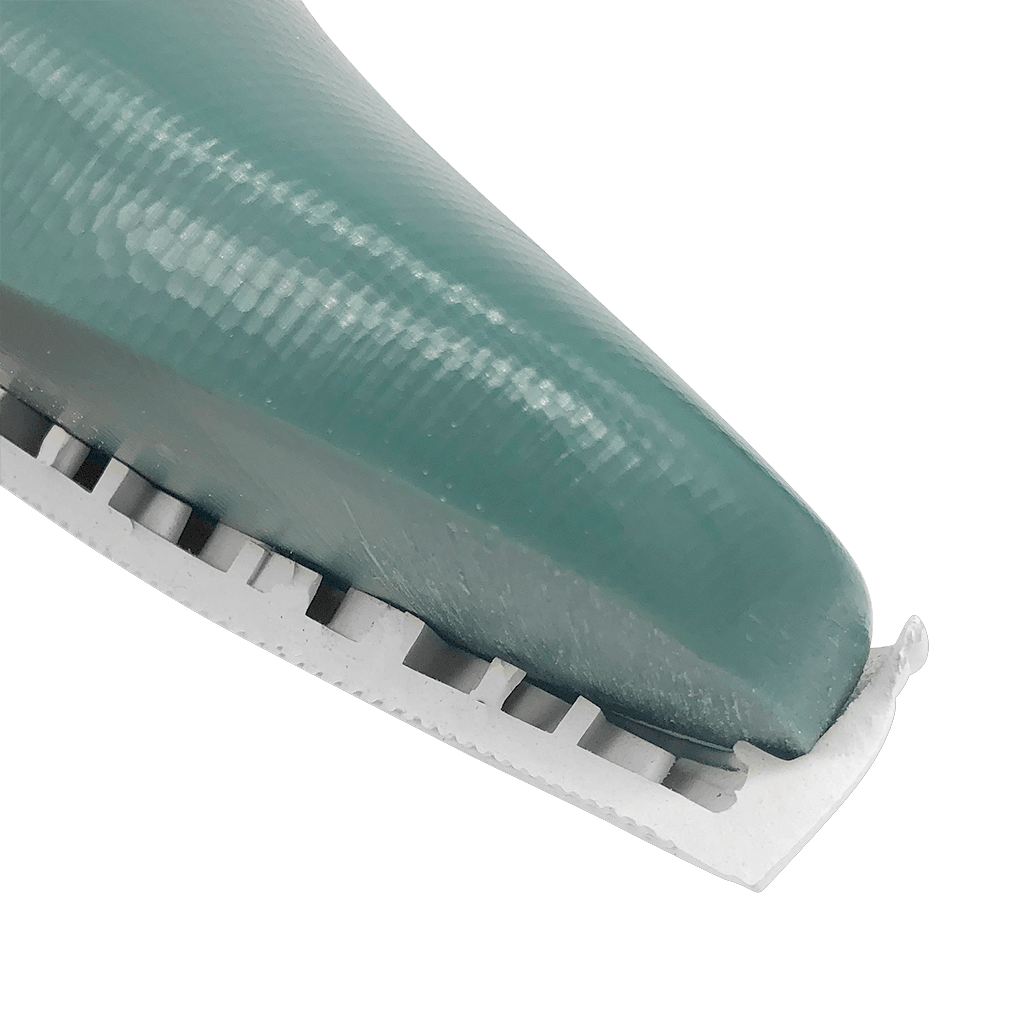
Last bottom profile
Last bottom profile
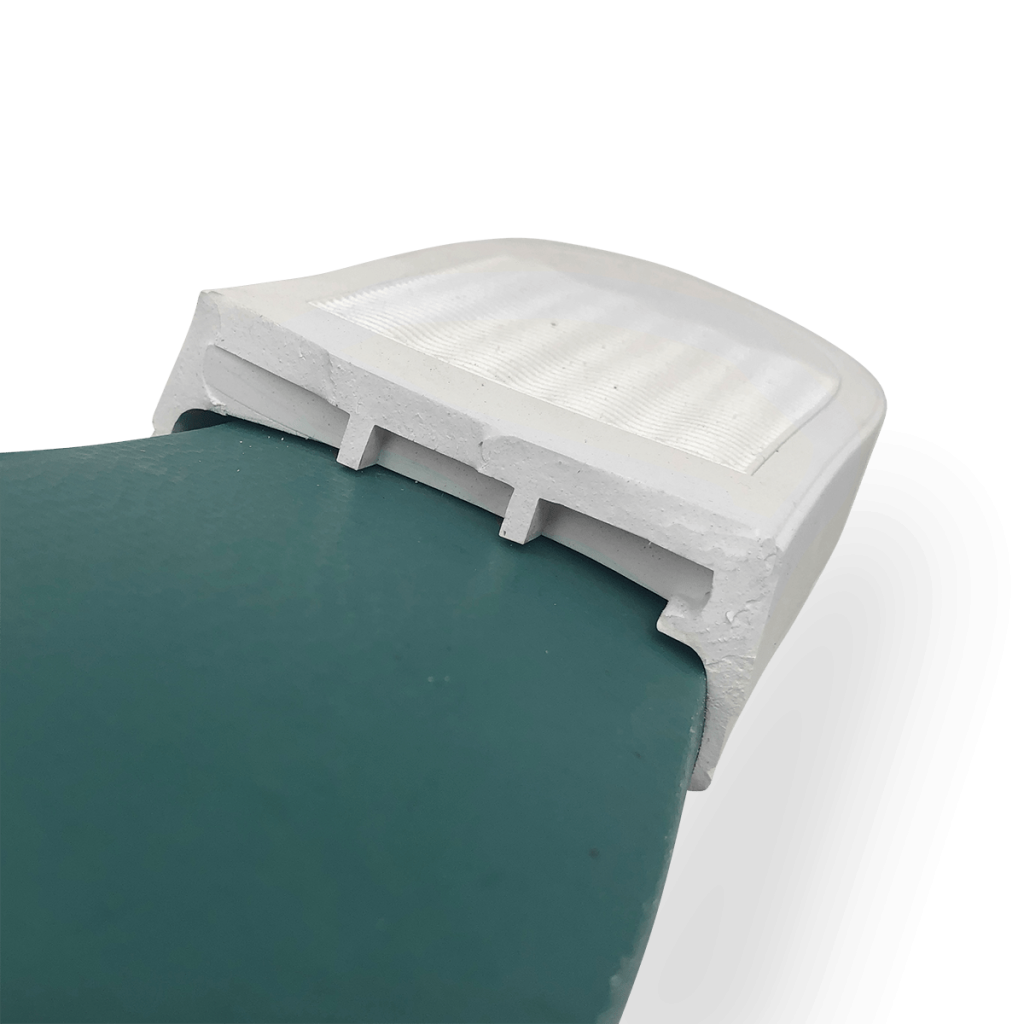
Last bottom section
Sneaker last and sole side view DIY shoemaking kit
This matched set is perfect for your DIY pattern-making and home shoemaking projects. Together, the proven SNF-1 sneaker last and our classic rubber cupsole unit are a great choice for making casual-style shoes. The classic cupsole unit has a high sidewall for bonding. The rubber egg-crate midsole provides cushioning and reduces weight. The modeled sidewall groove allows for a secure stitch-down attachment.