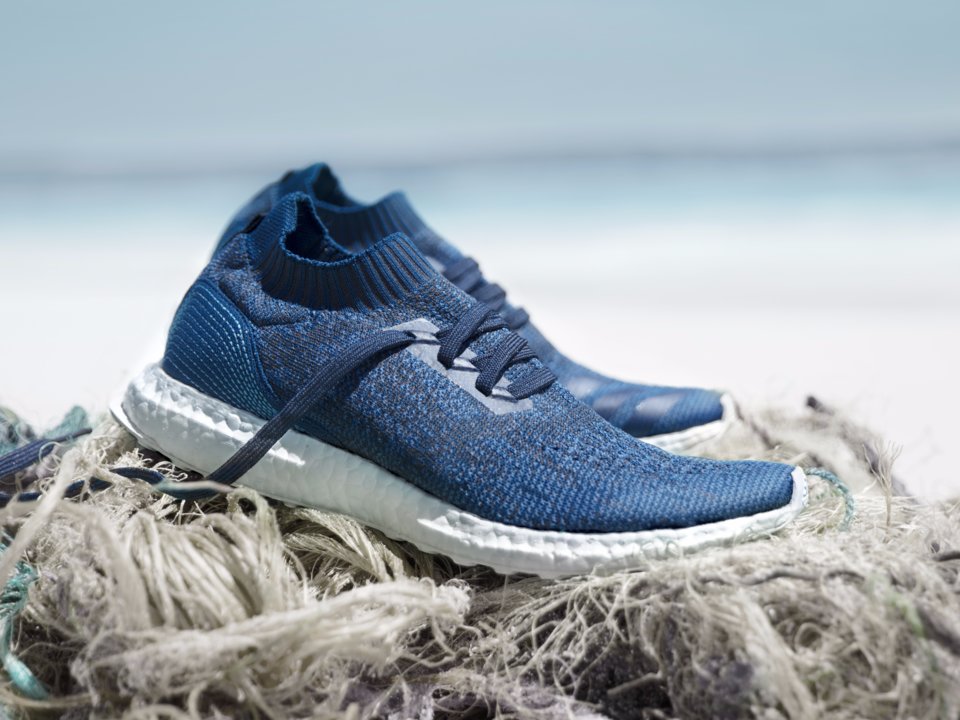
The largest sportswear manufacturer in Europe and second only to Nike worldwide, ADIDAS, has recently pledged to reduce plastic use. By 2024, ADIDAS will use only recycled plastic in all its shoes and sportswear along with its offices, distribution centers, warehouses, and retail outlets.
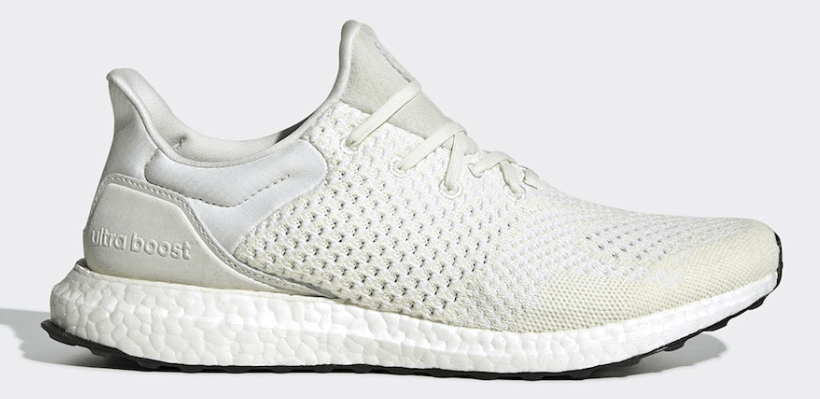
The German company is also expecting a sharp increase in sales of its Parley shoes. Introduced in 2017, in partnership with Parley A.I.R Strategy, this collection of Ultraboost shoes turns ocean plastic waste into thread that is woven into running shoe laces, heel webbing, heel lining, and sock liner covers. Adidas expects purchases to jump to 5 million pairs this year compared to 1 million in 2017.
You can find fake Nike shoes in stores all around the world. A counterfeiting ring smuggled thousands of counterfeit Nike Air Jordan sneakers into New York and New Jersey! Five people are each expected to receive 20 years in prison for trafficking copy Air Jordans.
How can you tell if Jordans are fake?
Today we have two pairs of the Air Jordan 1 and we will have a good look at the small details that tell the big story of counterfeit Nikes. We will study the real Air Jordan shoe purchased directly from Nike and the counterfeit shoe imported from South China. You will learn how to tell if a Nike shoe is real or fake. The secret to making a real sneaker legit check is…quality shoemaking.
The price is right?
When shopping for real Nike shoes you should expect to pay real Nike prices. If you find a rare Air Jordan or a unique color at a price that is too good to be true… then it IS too good to be true. Low prices and beat up boxes are your first clue that you have a fake, counterfeit, or illegally smuggled-in B-grade Nike shoe.
Make any mail-order or E-Bay purchases with trusted retailers. Remember, slightly used does not mean the shoes were real Nikes to start with.
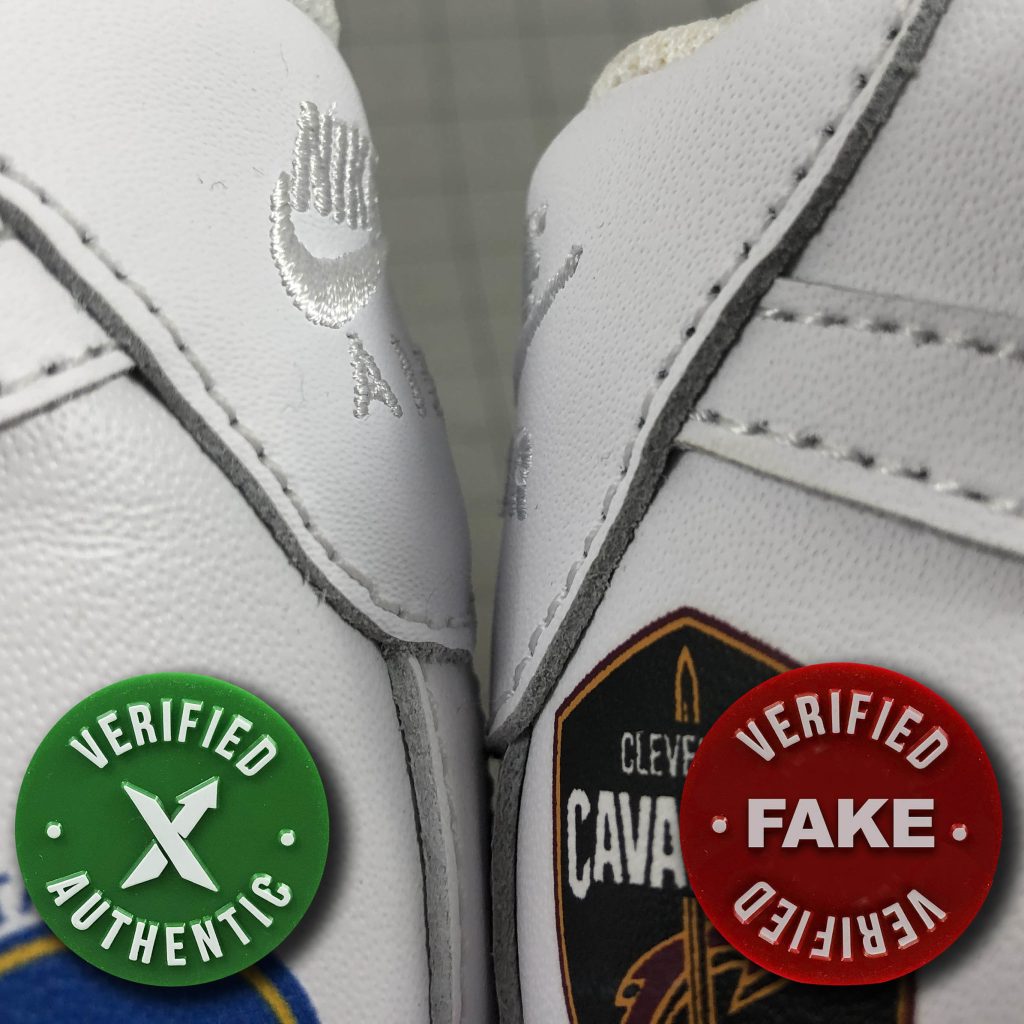
Look for the alignment guides, the red shoe is the fake Nike.
Air Jordan wings logo:
Studying the real Air Jordan and the fake Air Jordan side-by-side, you can see the factory making copies did a nice job on the logo. The artwork on the fake shoe is correct, but the real Jordan 1 logo is still embossed a little deeper into the leather. In this case, it’s hard to tell the difference until you look at the pattern of the cut parts. The real Nike does not have any stitching guides to help the stitchers locate the panels during assembly. The red logo panel of the fake Nike is loaded with these little assembly guides. These assembly guides are not a sign of poor shoemaking and are very common, just not on the real Air Jordan.
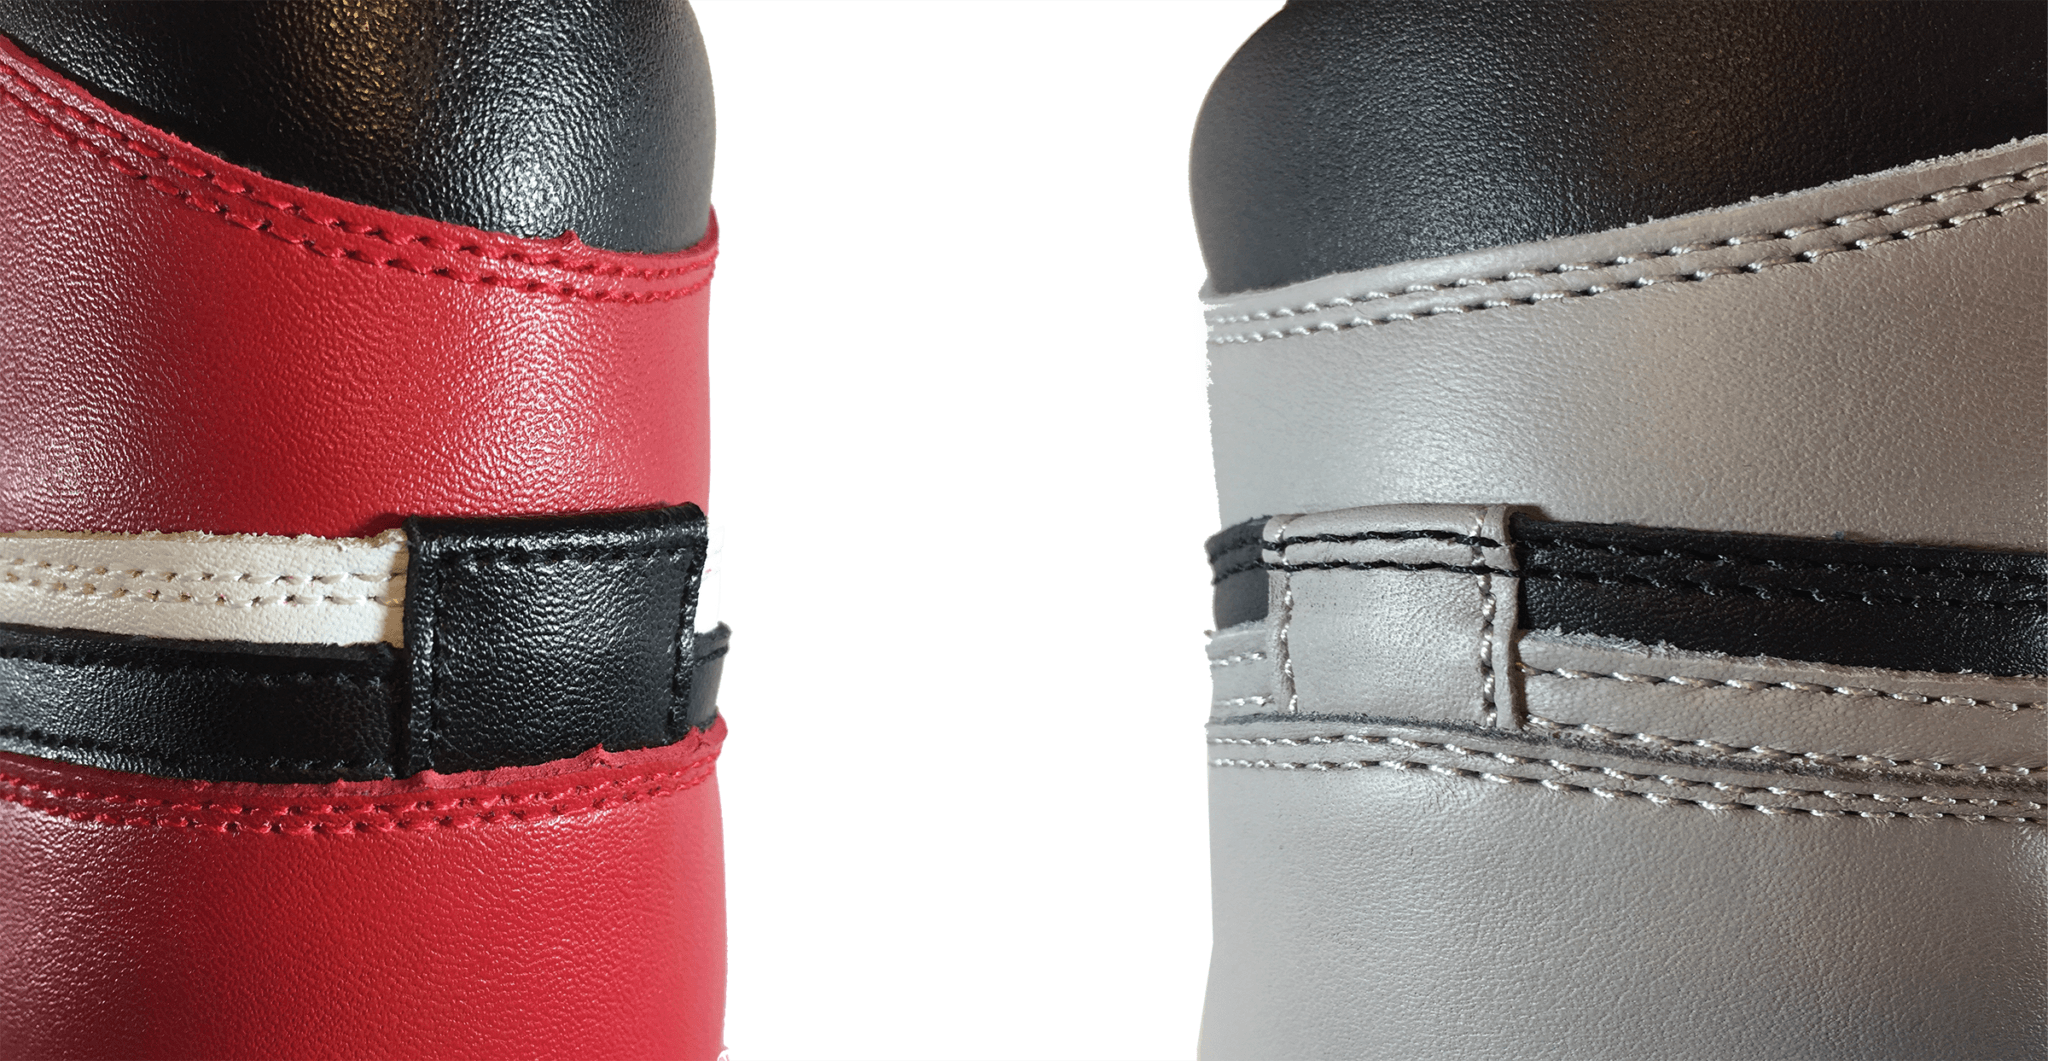
Two stitch lines on the grey Nike, that’s the real deal!
The Jordan 1 heel strap stitching:
The Air Jordan 1 has a tiny heel tab that covers the back seams of the quarter panel and the Swoosh. You can see the back tab on the real (grey) Nike has two stitch lines as the quarter top lines cross over. Also, the black thread contrasts with the grey leather. On the fake Jordan 1, a single stitch line crosses the tab and they used black thread on black leather. The stitching on the fake matches the leather instead of contrasting it with the leather. Again this detail is not an indication of low-quality shoemaking, it is just not how the original was made.
You can also see the centering guides on the red leather parts of the fake Jordan 1. The original Jordan does not show any assembly guides.
Look at the “K”, if it is not touching the swoosh, it’s not real.
The Jordan 1 outsole logo:
If you look closely at the Nike logo on the outsole you can see the fake artwork is wrong. The width of the letters is too narrow. Another obvious mistake is that the “K” of the fake Nike logo is not touching the tail of the Swoosh. Additionally, when you look closely at the tread patterns you can see the fake (red) tread has glossy spaces between the tread features where the grey does not.
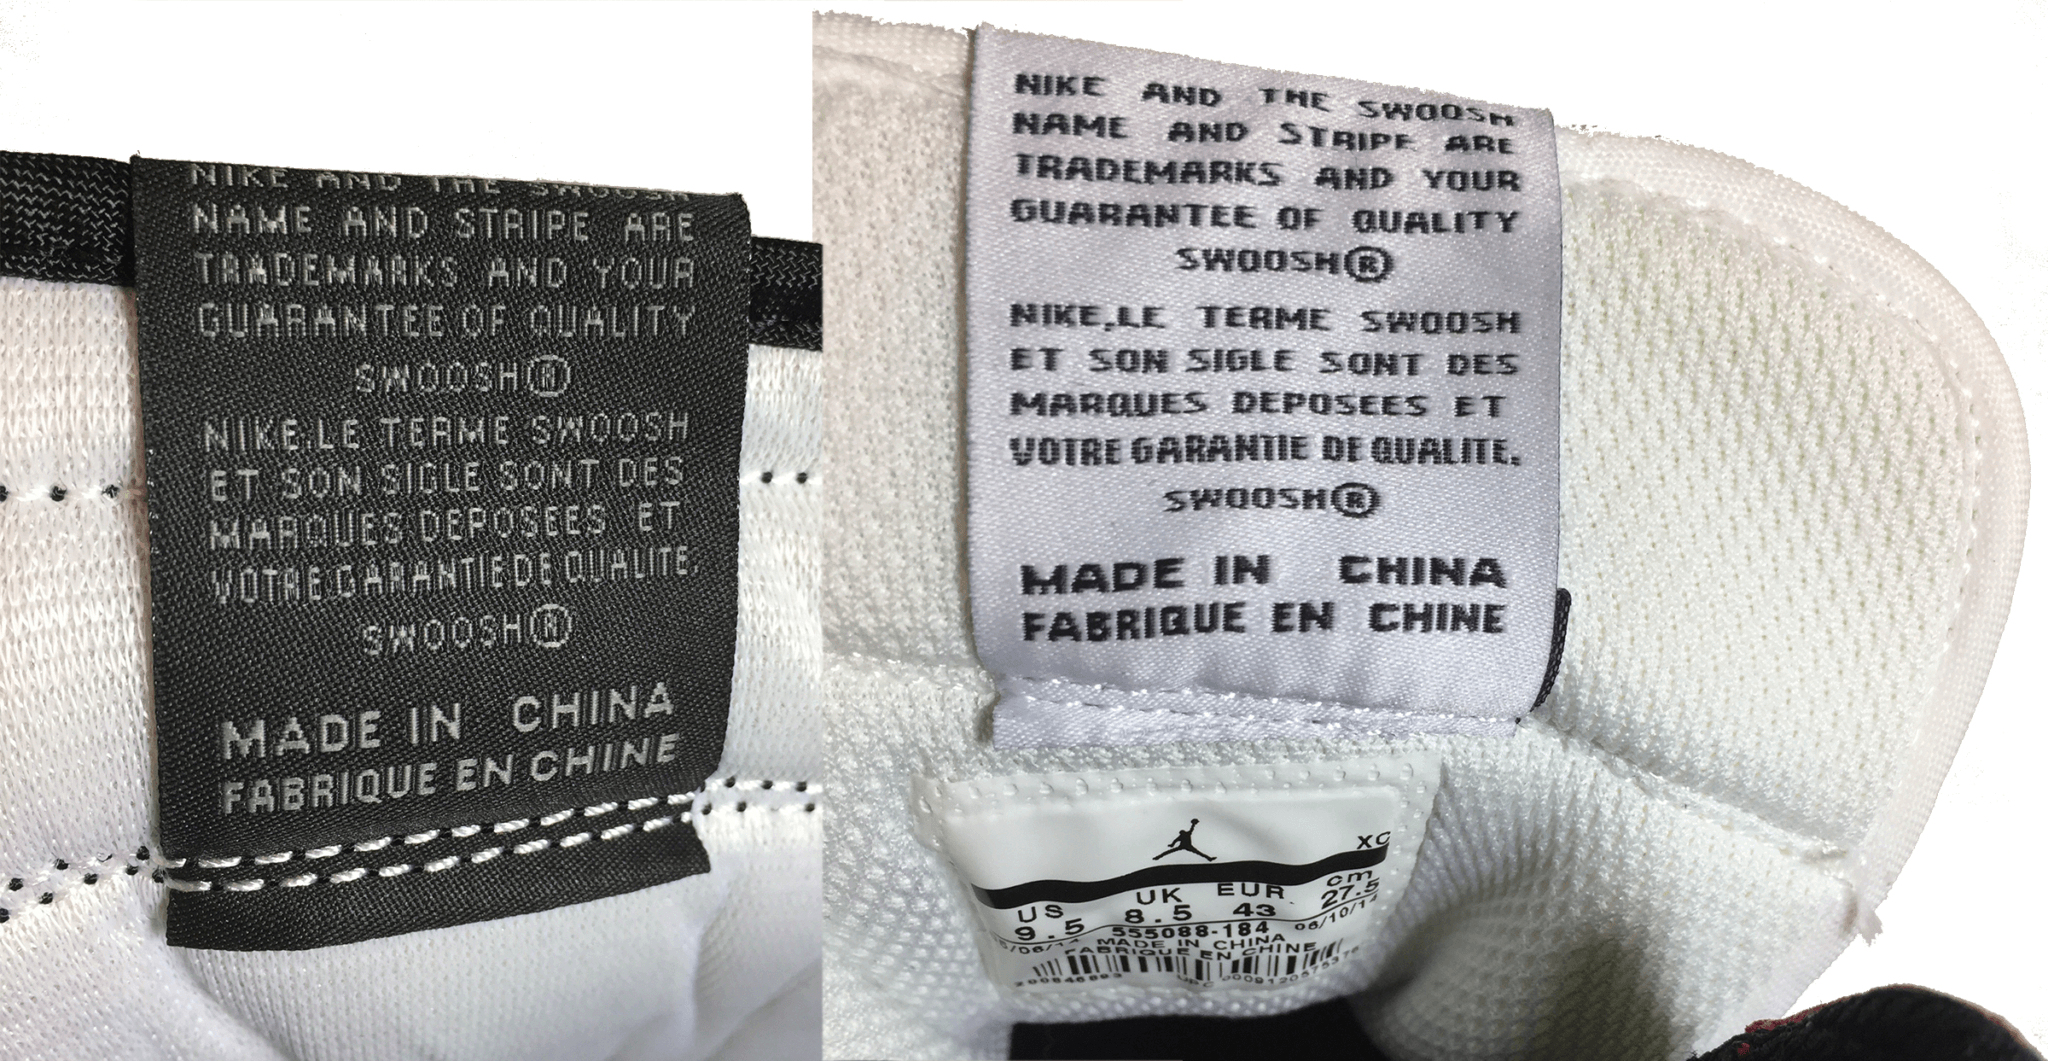
Yes, two trademark logos are correct!
The Jordan 1 tongue logo:
Next, get a good look at the woven label attached to the tongue top. The fake Jordan is missing the registered trademark circle “R”. I know it’s strange, but Nike likes to have the circle “R” twice on the woven label. On the backside of the woven logo label (below), you will see the trademark information in English and French. The fake has the wrong lettering style and the tag is stitched on crooked. Crooked parts are a sure sign of poor shoemaking.
Inside the shoe, you will see the size label with the Jordan Jumpman logo (above). The fake shoe has the tag welded to the back of the tongue. On the real Jordan 1, the tag is sewn down on the inside.
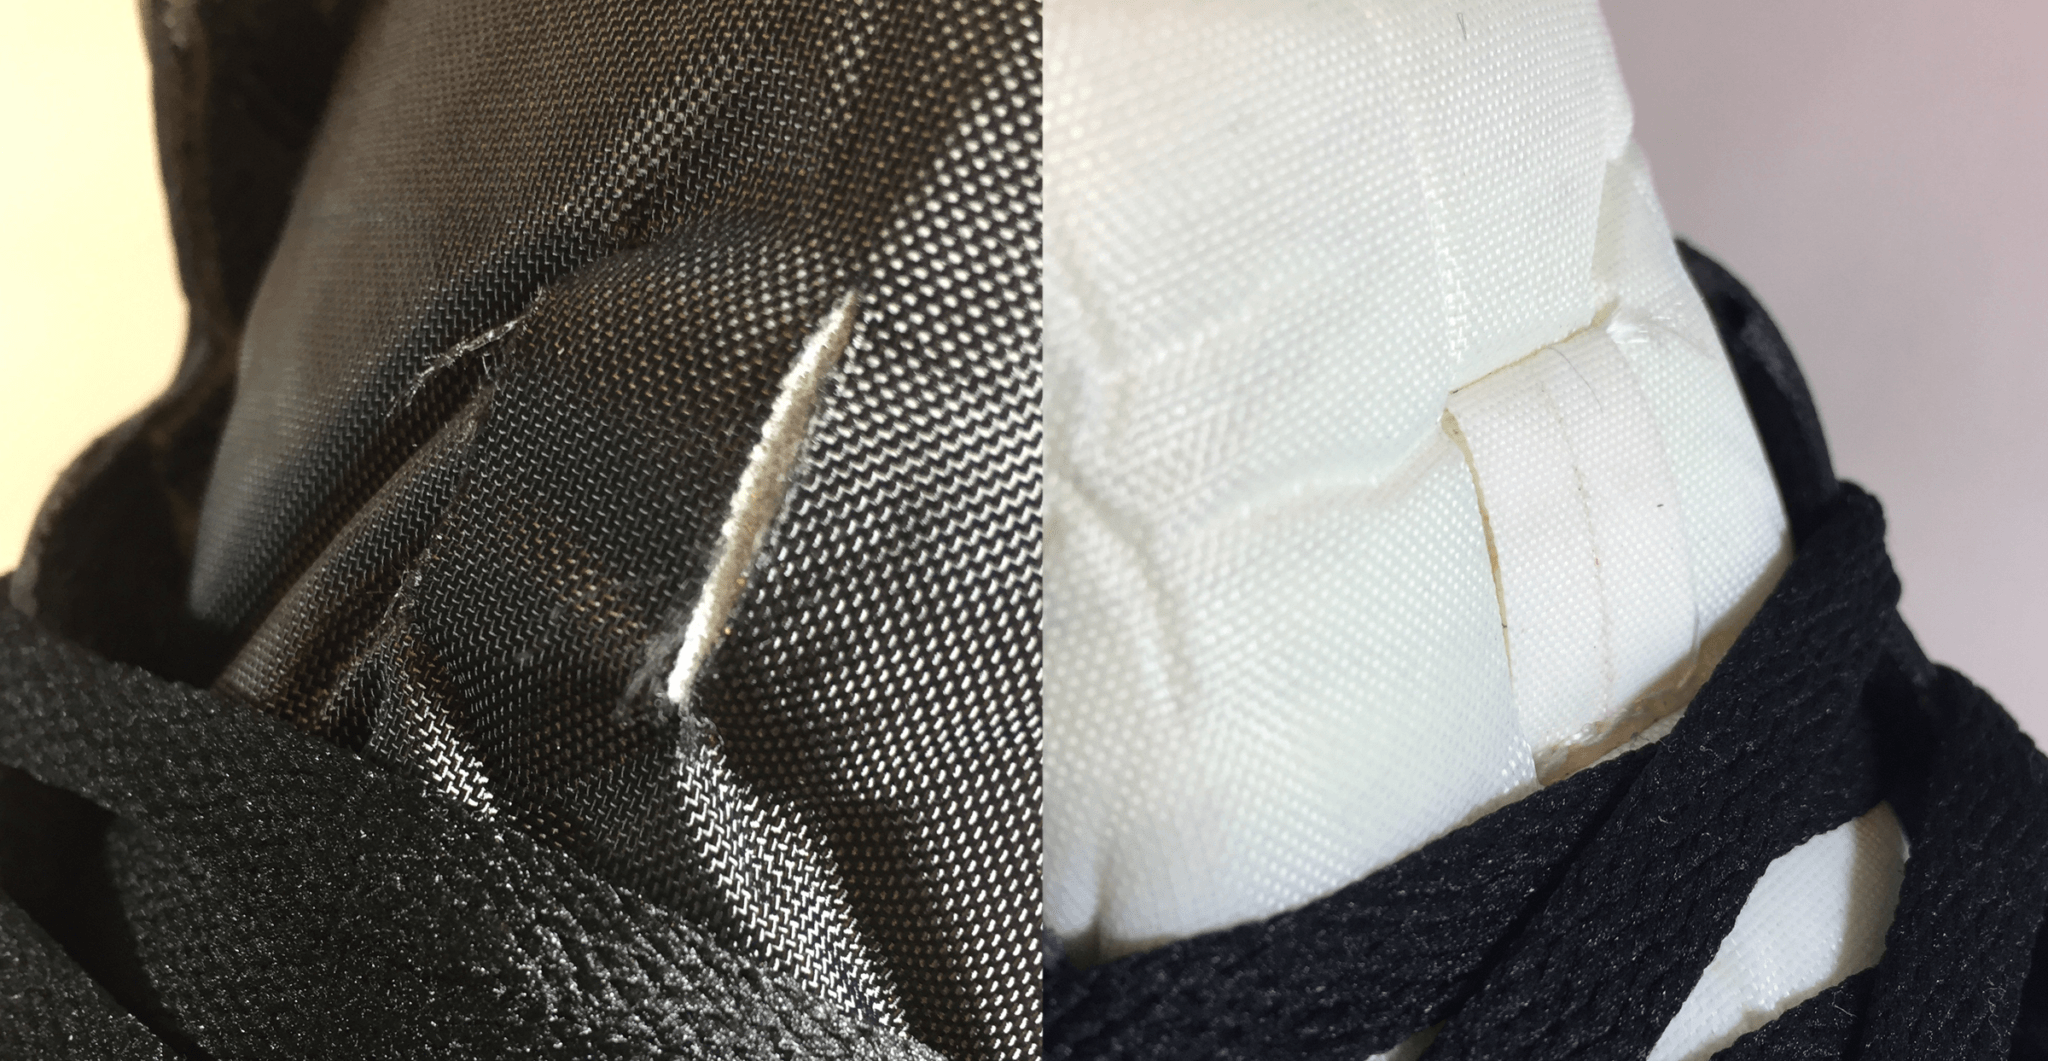
The cut lace keeper on the left is legit.
The Jordan 1 tongue lace keeper:
The lace keeper is a small point but a dead giveaway when looking for fakes. The real Nike shoe has simple cuts in the tongue fabric to act as the lace keeper. This construction looks pretty low rent for a $120 basketball shoe, but this is how the original was made. The counterfeit Nike has a small piece of fabric added as the lace keeper.
See inside More Nike Shoes
We have made a proper sneaker legit check on a pair of Vans Old Skool sneakers. Check it out here.
How To Tell If Your Nike Air Force 1 Supreme NBA is a Fake, The official Sneaker Factory legit check.
Nike Air Force 1: Real or Fake?
How to Spot Fake Nike Air Force 1’s
Today we have two new pairs of the Nike Air Force 1 Mid Supreme NBA White. One pair is a real Nike 100% authentic purchased from StockX. The other pair of Supreme NBA White was recently purchased in China. The real Nike Air Force 1 Mid from StockX set us back US$343.95. The fake Nike Air Force 1 Mid Supreme NBA cost RMB $300, or about US$45. Now it’s time to see which Nike is counterfeit and which one is real.
Real vs. Fake : What to look at first?
Can I buy real shoes at fake prices? Simply put, NO. If the price seems too good to be true- the shoes are fake.
What if the footwear packaging is missing? If the sneakers do NOT have the packaging included…watch out!
What about shoe production quality? Real Nike shoes can have some quality issues. Look closely for small flaws. A real Nike may have some flaws but more than one or two issues is a danger sign for fake shoes.
StockX to the rescue
The StockX sneaker marketplace saves you the worry and trouble of authenticating shoes. When you purchase shoes from StockX you receive a guarantee that their staff has carefully checked them over to confirm the shoes are real. The Stockx team are real pros, They know how to make a sneaker legit check. When your shoes arrive they will have a StockX badge and sales slip. Hang on to these! When you are ready to sell, these will be very valuable. Visit their online shop: https://stockx.com
How to spot a fake Supreme Sneaker?
We have two pairs of the Nike Air Force 1 Mid x Supreme NBA in white. Before we cut them open we are going to make a few quick observations.
How to Tell Real Shoes Like Airforce Ones From Fakes. Can you see the fake Nike Supreme?
Color Matching
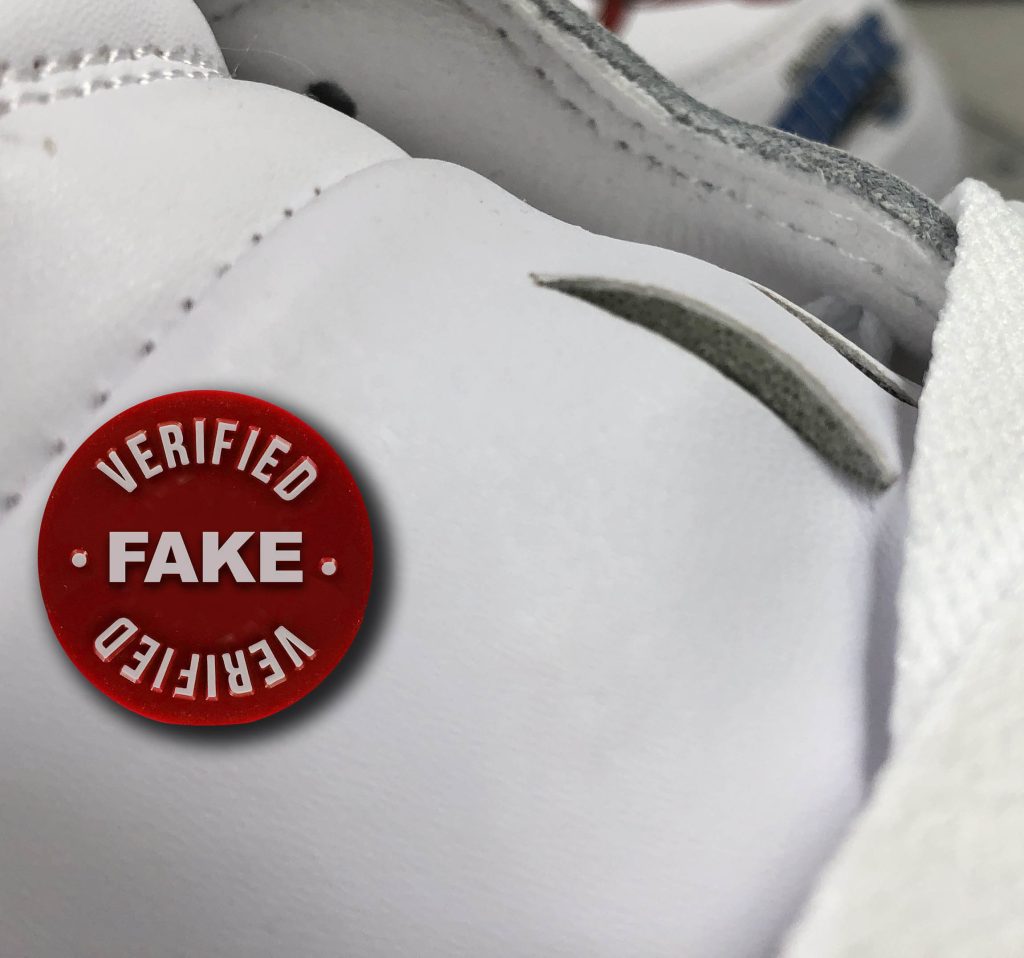
How to Spot Fake Nike Air Force One Sneakers? Look at the colors! Right off the top, we see the fake Nike Air Force 1 Mid’s have a major problem with color matching. Check out the collar lining. The real Nike collar lining is white with a smooth, turned out seam. The fake Supreme NBA is yellowish (off white) with a lumpy seam.
Fake shoes are usually made with local market materials, meaning quality and color matching may be poor. Authentic Nike shoes will only be made with high-quality materials and the material color matching will be perfect.
Have a look at the heel view of the top collar. The real shoe has a smooth, round curve. The fake Nike is a completely different shape.
Counterfeit Nike Logos and Labels
Plugged vent holes and the nose holes
Clean printing art – the nose
Logo looks okay
Not great stitching
Logo and labels are often a weak point in counterfeit Nike sneakers. When you make a Nike sneaker legit check you must study the logos carefully. Our pair of knock-off Nike Supremes has all the common faults. The Chicago Bulls logo on the vamp has some problems. The nostril holes on the fake are mis-shapen. Also, on the fake shoe, you can see an air vent hole has been filled in with ink.
The Supreme embroidery logo on the top strap of the fake sneaker actually looks okay, but the edge stitching around the strap is a bit rough. The Nike swoosh logo on the strap ends have very different stitching patterns. The fake has perimeter stitching, while the authentic Nike has solid cross stitching. Note the rough stitching on the strap perimeter.
The “E” is messed up
The real deal
Printing problems
you can see the clovers
Lorem ipsum dolor sit amet, consectetur adipiscing elit. Ut elit tellus, luctus nec ullamcorper mattis, pulvinar dapibus leo.The tongue logo label on the fake is close, but not perfect. The bottom leg of the Nike ”E” is buried in the tail of the swoosh. The ”Supreme” logo is a little thin when compared to the real logo.
Look closely at the Boston Celtics logo on the lateral side mudguard. The ink color on the leprechaun’s vest is not correct and on the fake Nike, you don’t see any clovers. Now take a closer look at the basketball. The printing design on the ball is incomplete. Look above the basketball, you can see the stitching on the eyestay is rough and does not follow the pattern edge.
Construction Quality
Plugged vent holes and the nose holes
Clean printing art – the nose
Poorly fitting parts
Stitching quality
Notice the centering mark on the tip of the toe cap. The real Nike shoe does not have the centering mark. When comparing the strap ends you will see that they are different. The fake Supreme Air Force 1 has a mismatched end cap, you can see the plastic is not fitting correctly. The real strap end has smooth, even stitching, while the fake has rough stitching. You can see rough stitching all over the fake shoe.
The Fake Nike has thicker leather.
Fake vs real Sneakers Leather Quality
Both the real shoes and fake shoes are made with plastic coated “Action” leather. The fake shoe actually has thicker leather. You can see the blue chrome tanned leather edge on both shoes. The edge of the fake’s leather is much darker.
The Nike Air Force 1 outsole is a classic design but the tooling is modern. Nike manufactures shoes in China and Vietnam. Rather than move outsoles and tooling from country to country, Nike will own several sets of tooling. The Nike Air Force 1 outsole has a distinctive star pattern. What I find interesting is the fake outsole unit has a cleaner, more organized, texture pattern. If you zoom in on the fake you can see a cleaner mold parting line and a slightly sandblasted texture. The real Nike sole unit lacks the sandblasted texture and has a uniquely chaotic star pattern. The heel logo on the counterfeit Nike is close to the original but has some problems. The fake “Air” logo is further from the parting line. The design line has a wider gap between the “R” and the end. You can also see the “I” on the fake Nike is a bit narrow compared to the real logo.
Fake Nike Footbeds
The real Nike has the size sticker
Notice the glue line pattern
The copy is thicker
The two footbeds are interesting to compare side by side. The real Nike footbed has a size sticker. You can also see a portion of the Supreme logo’s red box which is in stark contrast with the footbed fabric. The footbed of the fake Nike is actually thicker, and when comparing the cut edges, the copy footbed has a cleaner, trimmed edge. Lastly, the bottom design. The last notation and size mark are clearly different. On the underside of the footbeds you can see the pattern made by the gluing machine. The real and fake footbeds have different stripe or gluing patterns. The Glue pattern is great fake “tell”.
Overall, this shoe is an okay fake. Not a great fake and not the worst we have seen. The material quality is okay, the outsole assembly is pretty good, and the assembly stitching quality is poor. The fake Nike shoes have visible over-gluing and paint touch-ups. The embroidery logos and woven labels are of high quality but the screen printed logo coloring and artwork are substandard.
Does this fake have a “tell”?
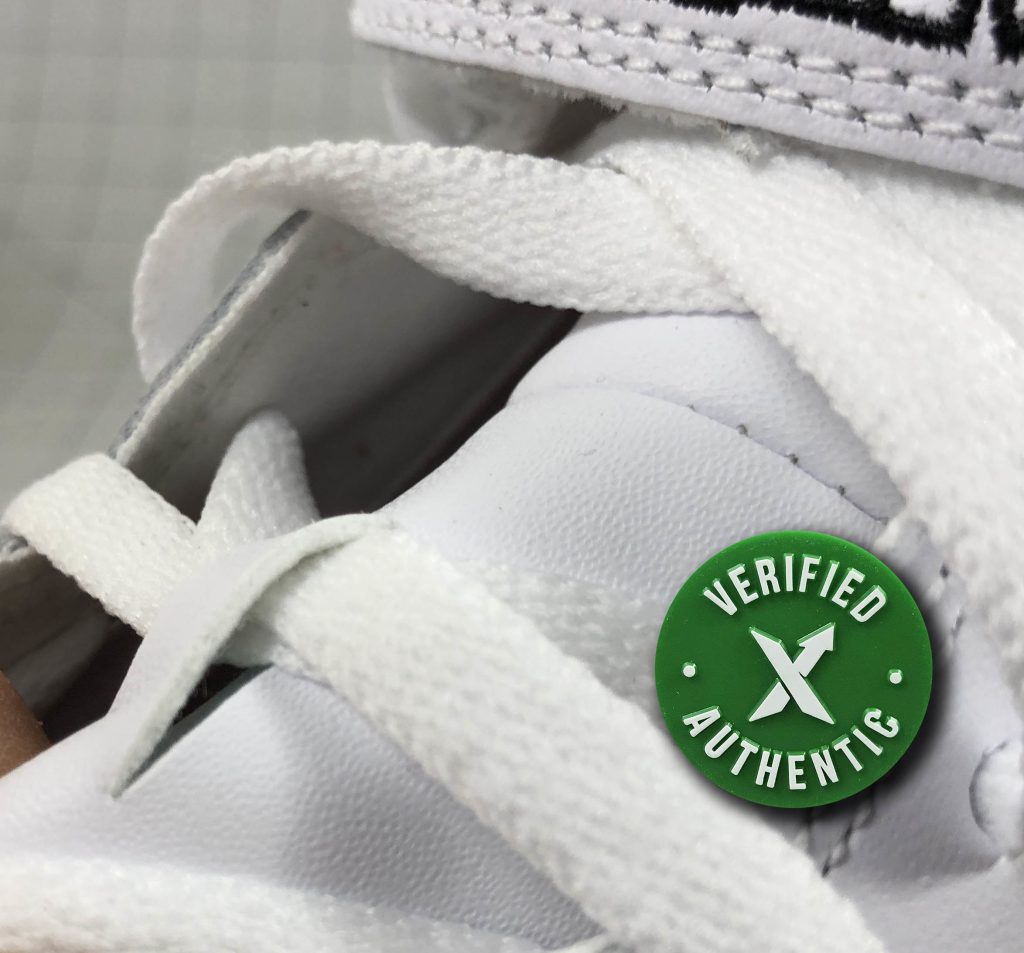
After a few minutes of study, we did find a tell. This is a tiny detail but if you are looking closely it’s a dead give away. Look carefully at the cut lace keeper on the PU tongue face. On the real Nike Supreme Air Force 1 you can see the lace keeper is a single layer of PU with white backing. Look carefully at the fake Nike, in this case, you can see a layer of blue-tinted PU foam glued to the back of the lace keeper!
NOT A SHOE EXPLOSION! Zion Williamson and the broken Nike PG 2.5
Very rarely do we get to see first hand the failure of an athletic shoe on national television. Last night, basketball superstar Zion Williams, the 6 ft 7 in 285 pound Duke player, was injured in a fall as his Nike PG 2.5 shoe failed. As a footwear professional, I hate the popular headline “Nike sneaker explosion injures Duke star Zion Williams.”
This shoe failure is not an “explosion.” There is nothing in a modern sports shoe that can “explode.”
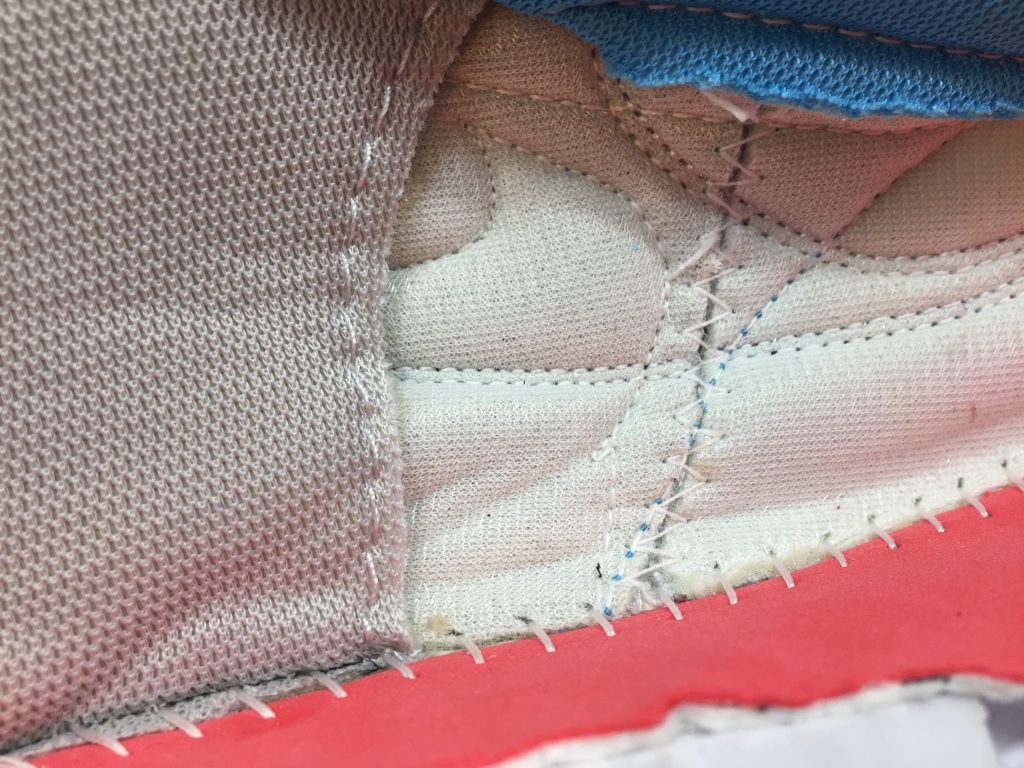
What I see from the photos is that Zion Williams applied enough pressure on the on the side wall of the Nike 2.5 to break the Strobel stitching. In photos, you can clearly see the shoe separated at the Strobel seam. The outsole rubber is also torn and the side wall of the EVA midsole has ripped.
I would not look at the EVA and rubber parts as a cause of the failure. The side wall of the midsole can provide some strength, but EVA is a cushioning material. The Nike PG 2.5 failed because of tension as Williamson’s foot pushed through the Strobel seam.
Looking at the photos of the broken Nike PG 2.5, it’s hard to tell what part of the Strobel seam failed. The Strobel seam has three parts to consider:
1. The Strobel sock or Strobel board 2. The upper material 3. The stitching thread
Broken Seams
When looking at any failed footwear seam you must consider several factors:
Is the shoe material subject to the “perforation effect?” Too many stitches and stitches too close together can weaken the material.
Was the seam allowance wide enough? Similar to the perforation effect, if the stitching is too close to the edge of the shoe the material can fail?
Is the thread strong enough?
Are there enough stitches per inch ?
Strobel Stitching inside a Nike shoe
I do have one final thought in this case. I would like to know if the footbed was glued in to stop it from sliding inside the shoe and also if Williamson’s socks and the top surface of the footbed have enough friction to hold his foot in place? If the shoe was poorly fit to his foot, and his foot was allowed to slide inside, this may have been a contributing factor.
As this story develops I look forward to hearing more about what happened. Of course, we all wish Zion Williamson a speedy recovery.
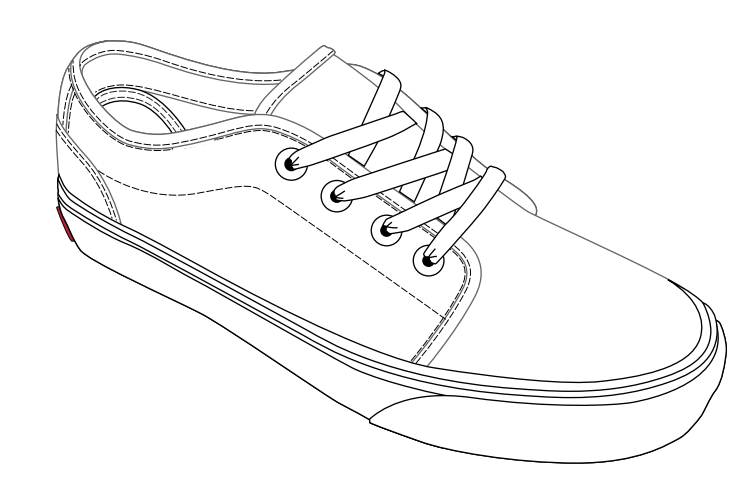
Do you want to know how Vans shoes are made? The Vans classic slip on and skate shoes are made by the vulcanized shoemaking process. The Van Doren brothers, Paul and James, started The Van Doren Rubber Company in 1966. Over the next 40 years, they opened factories in California and later contracted factories in China and Vietnam to make the classic Vans vulcanized shoes.
“vulcanize: The process of heating raw rubber to cure it. This process creates crosslinks inside the rubber compound bonding it together. Before the rubber is vulcanized it is stretchable, gummy, and easy to tear. After being vulcanized the rubber is tough, stretchable, and ready to wear.”
How Vans Shoes are Made: Vulcanized
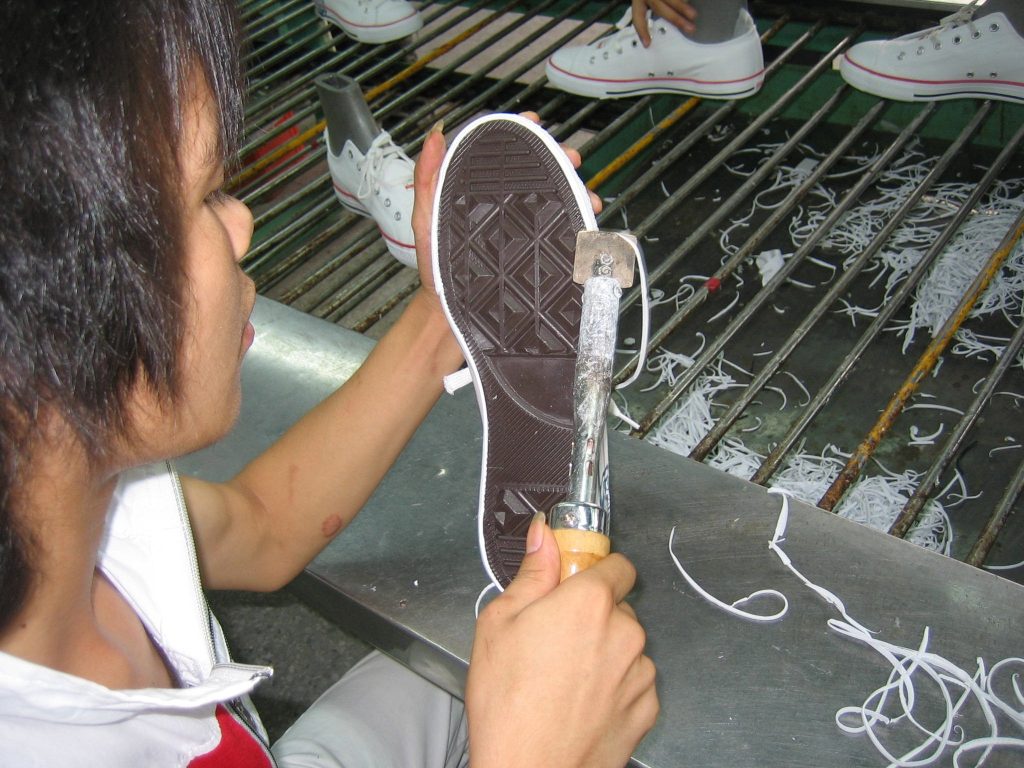
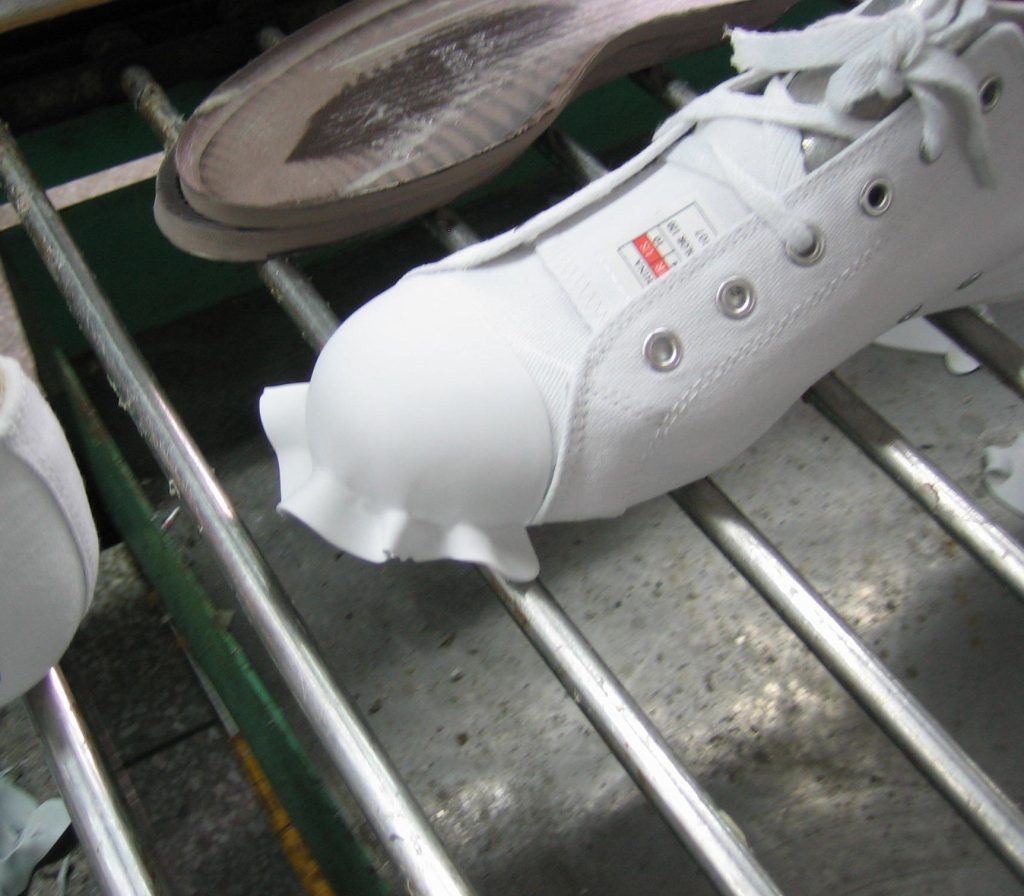
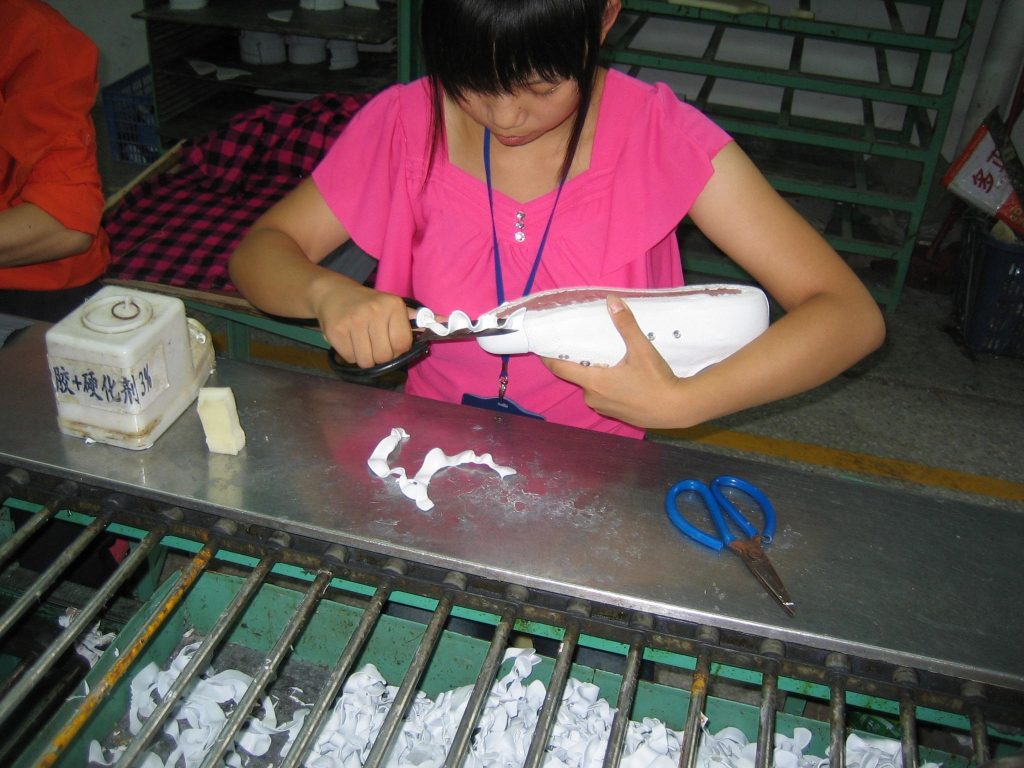
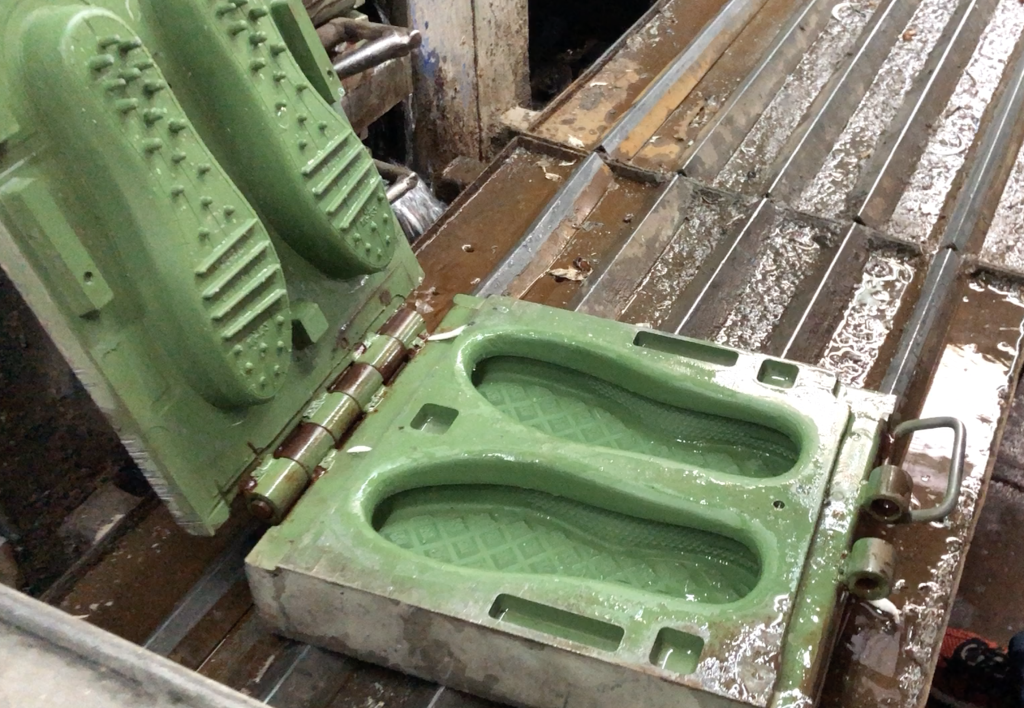
In the Vans vulcanized shoemaking process, the rubber shoe outsole parts are assembled onto the lasted upper before the rubber is completely cured. With the sole attached, the entire shoe must be heated in a vulcanizing oven. The shoe must be heated to around 110˚C/230˚F for 80 minutes. The heat required to vulcanize the rubber sole will melt nylon and polyester fabrics, making them unfit for vulcanized shoes. Also, certain types of foam, like EVA and PE, will get damaged by the heat. This can limit the material choices for footwear designers. Uppers must be made of heat-resistant materials like suede, leather, and cotton canvas with metal hardware.
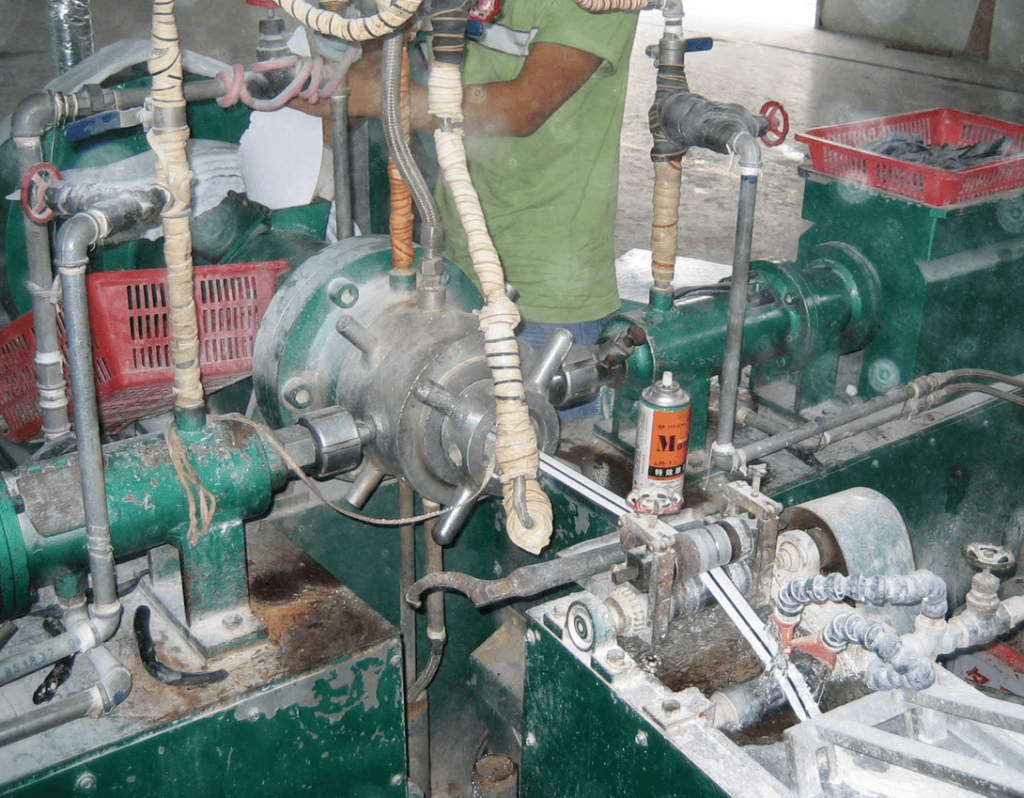
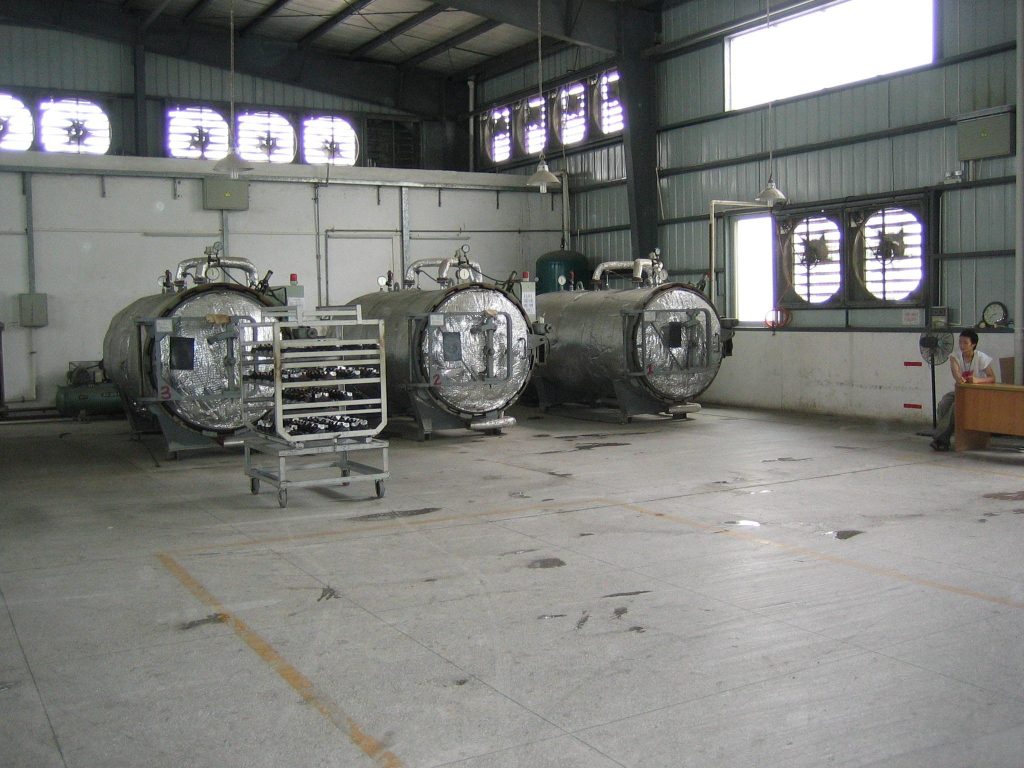
Vulcanizing equipment
The vulcanized shoemaking process must be done in a specific factory equipped with lots of special machines. The shoemaking equipment required for vulcanizing is very different from the equipment needed to make cold cement shoes. A shoe factory will usually specialize in one process or the other, you will rarely find both vulcanized and cold cement processes inside the same factory.
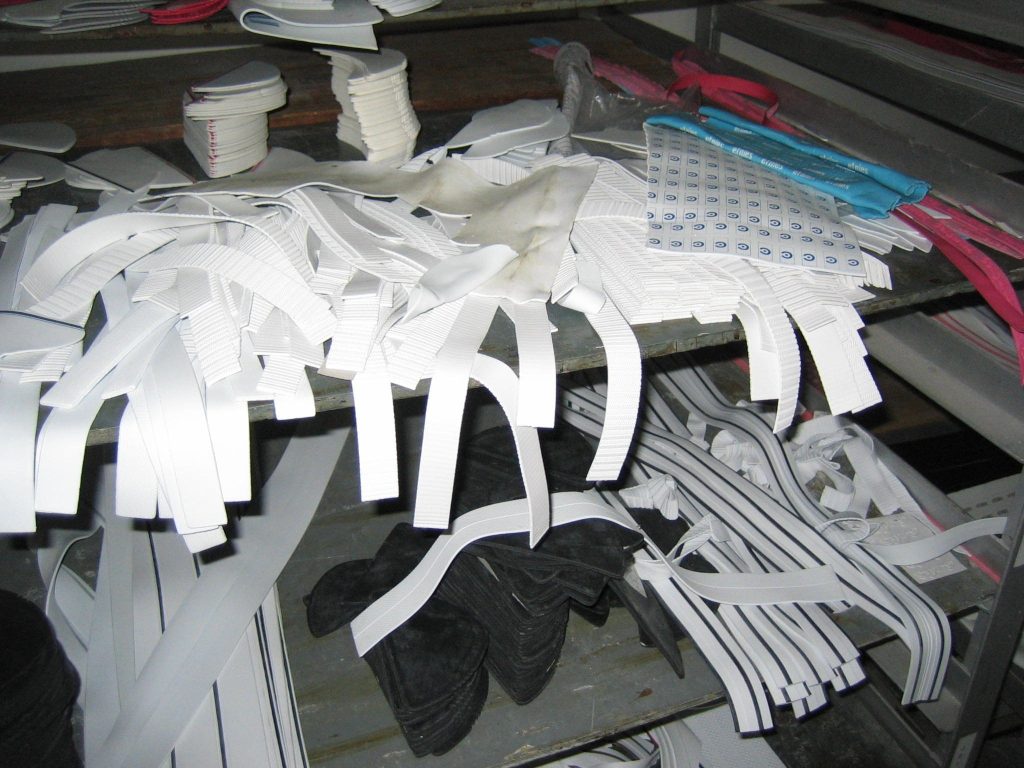
The upper stitching and construction of a Vans vulcanized shoe are nearly the same as a cold cement shoe, with an exception being the inside reinforcements for the toe and heel counters are made of thin rubber sheets instead of plastic. Again, due to the high temperature required for the vulcanized rubber, any kind of plastic, PVC logos, or trim treatments must be avoided when designing a vulcanized shoe. The lining of a Vans shoes is made from lightweight cotton canvas.
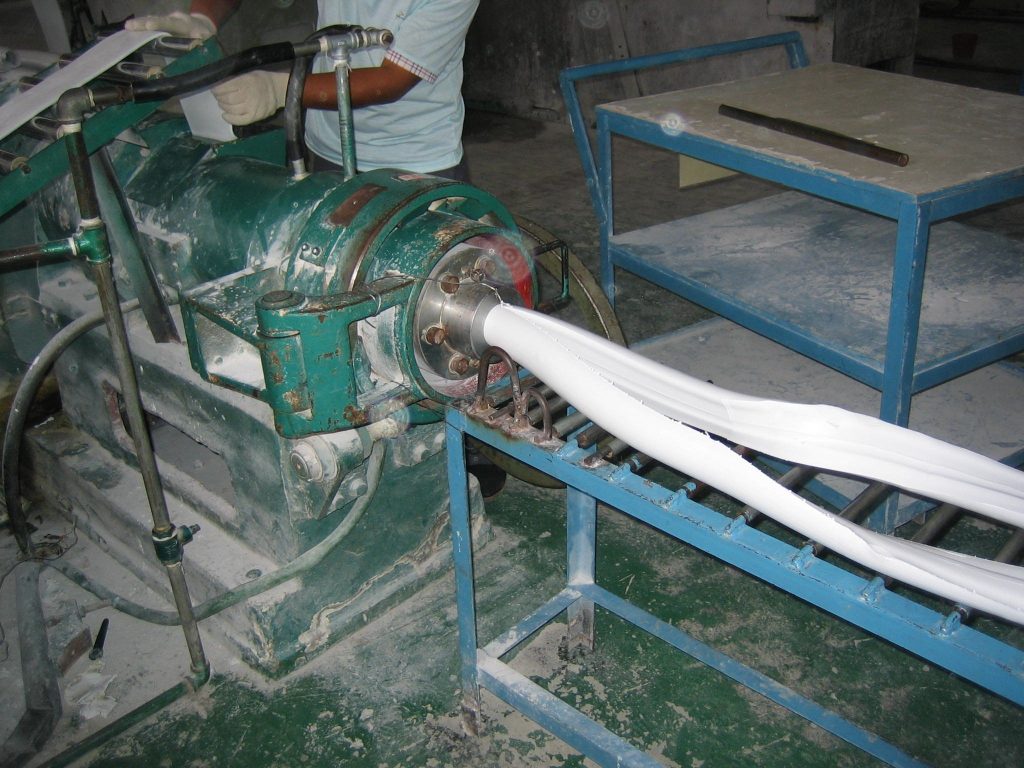
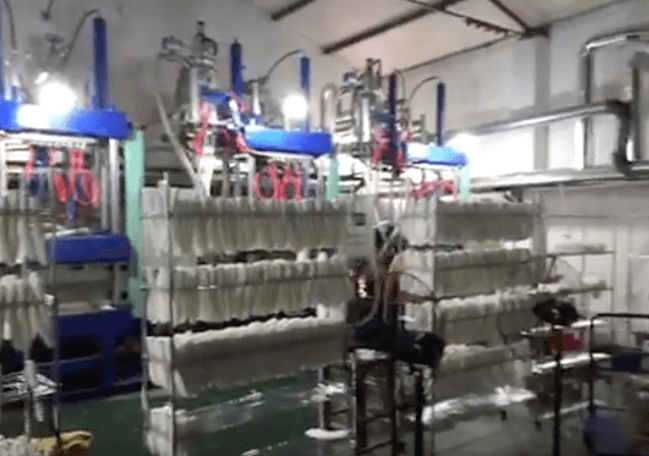
While the uppers are being stitched, the rubber components for the vulcanized sole unit must be prepared. The rubber components have a shelf life of only a few days. If the rubber parts are made and set aside, the rubber will begin to oxidize, partially cure, and leading them to not cure properly when the shoes are being vulcanized.
https://www.youtube.com/watch?v=lZwW86sYnlQ
The Shoe Dog would like to tell you about how vulcanized shoes are made. Have a look!
The Shoe Dog would like to tell you about the difference between vulcanized construction and cold cement process.
https://www.youtube.com/watch?v=XpGKmKqcjPg
Want to learn more about how vulcanized shoes are made and other shoe construction techniques?
Check out Chapters 12 in the book How Shoes are Made. We will cover all the popular shoe construction methods. You will learn shoe construction terms, sneaker construction, and common shoe construction terminology.
As a New Midsole Material Launches has Adidas Boost Foam met its match?
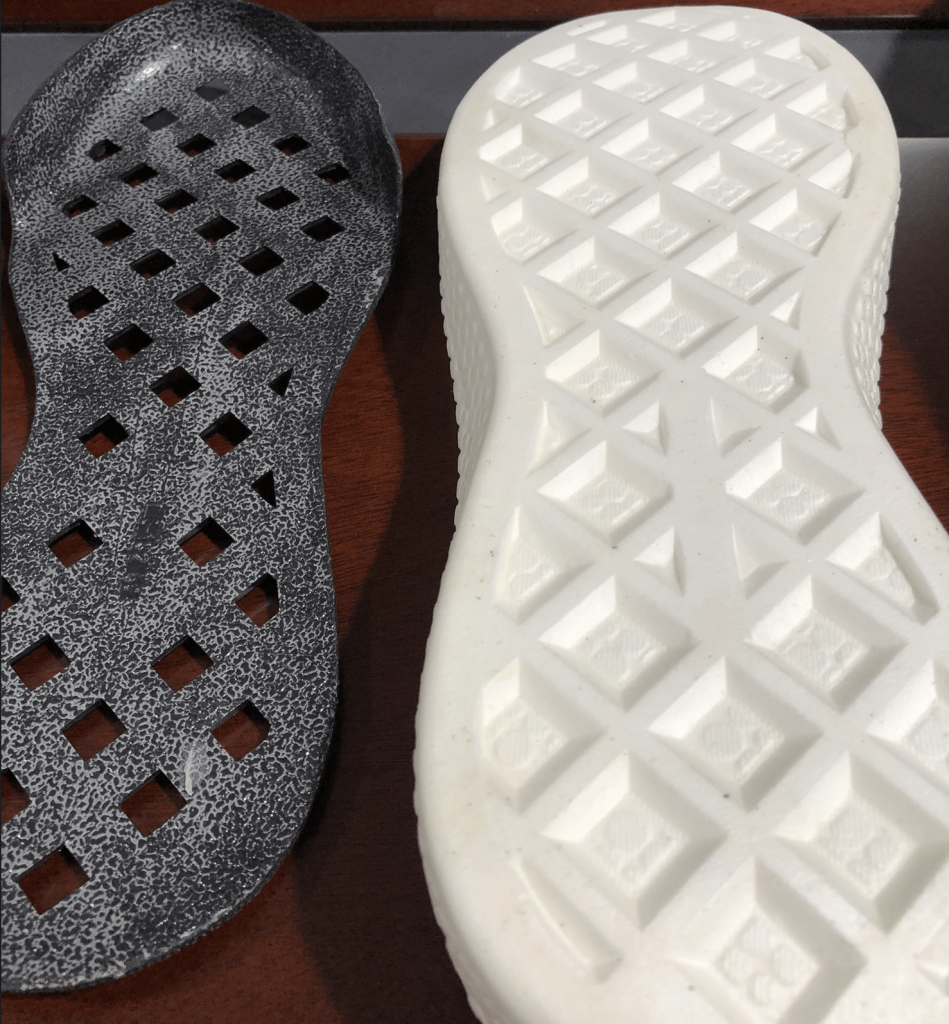
Adidas and BASF turned heads with the introduction of the futuristic Boost Foam technology. The unique midsole material has performance advantages and a distinctive look. Boost foam is actually a new formulation of a common plastic, TPU. TPU or Thermoplastic poly-Urethane Boost is “blown” meaning the chemical engineers at Adidas and BASF have figured out a way to introduce air bubbles into the plastic making a new TPU foam.
The challenge of making Boost TPU foam midsoles
Steam Expansion Equipment to make Adidas Boost.
The texture, while distinctive, makes all Boost midsoles look alike. This distinctive look is great for marketing launches but designers need the ability to make shoes look different year to year.
Boost foam also has a color issue. The TPU foam cannot be molded in color so the midsoles must be painted. Painting midsoles adds cost to the product and even flexible paint can be scratched off or chipped off the foam surface.
The Boost midsole also requires special steam expansion equipment not found in the standard shoe factory.
A new midsole foam better than Boost?
New foam uses standard equipment
Today we visited an EVA pressing factory with a new compound in development. This new midsole foam is a mixture of EVA and TPU. This new foam has the resilient, wrinkle-free feeling of Boost foam but it can be made with standard EVA forming machines. The foam maker is hush hush about the exact compound but he tells us the new foam is about 30% TPU and 70% EVA.
This new midsole compound is lighter than standard EVA and can be molded in any color like standard EVA midsole foam. This new EVA TPU foam is a little more expensive than standard EVA but costs much less than Adidas TPU Boost foam.
If you are interested in the battles between Nike and Adidas you will love the podcast Business Wars: Nike vs Adidas. This 7 part podcast series produced by Wondery is an awesome look into the birth of Adidas and its decades-long clash with the brash upstart from America, Nike.
Adi Dassler Founder of Adidas Nike Founder Phil Knight
The podcast covers the humble beginnings of both Nike and Adidas. While Adi Dassler and Phil Knight started their companies on different continents some 40 years apart, their brands would battle for hearts, minds, athletes, singers, teams, and even entire sports leagues.
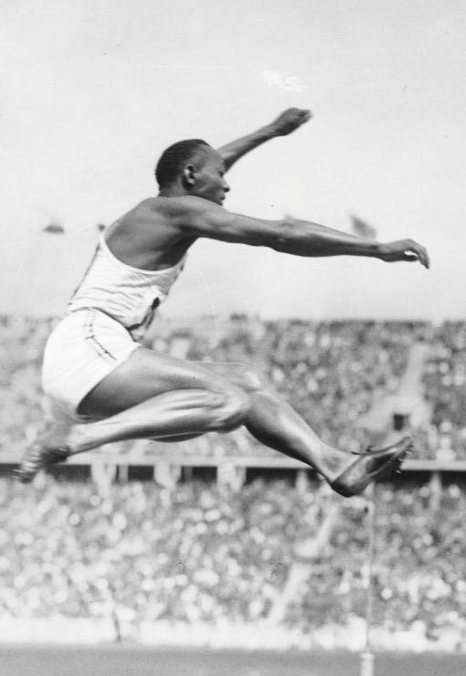
Jessie Owens in his Adidas
It’s an amazing saga! From the triumphs of Adidas and Jessie Owens to the battle for Kanye West and Kobe Bryant, you will get the whole Nike vs Adidas story!
Check out the podcast series Business Wars: Nike vs Adidas.
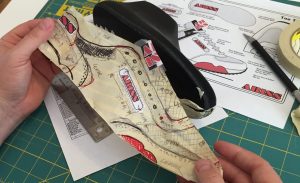
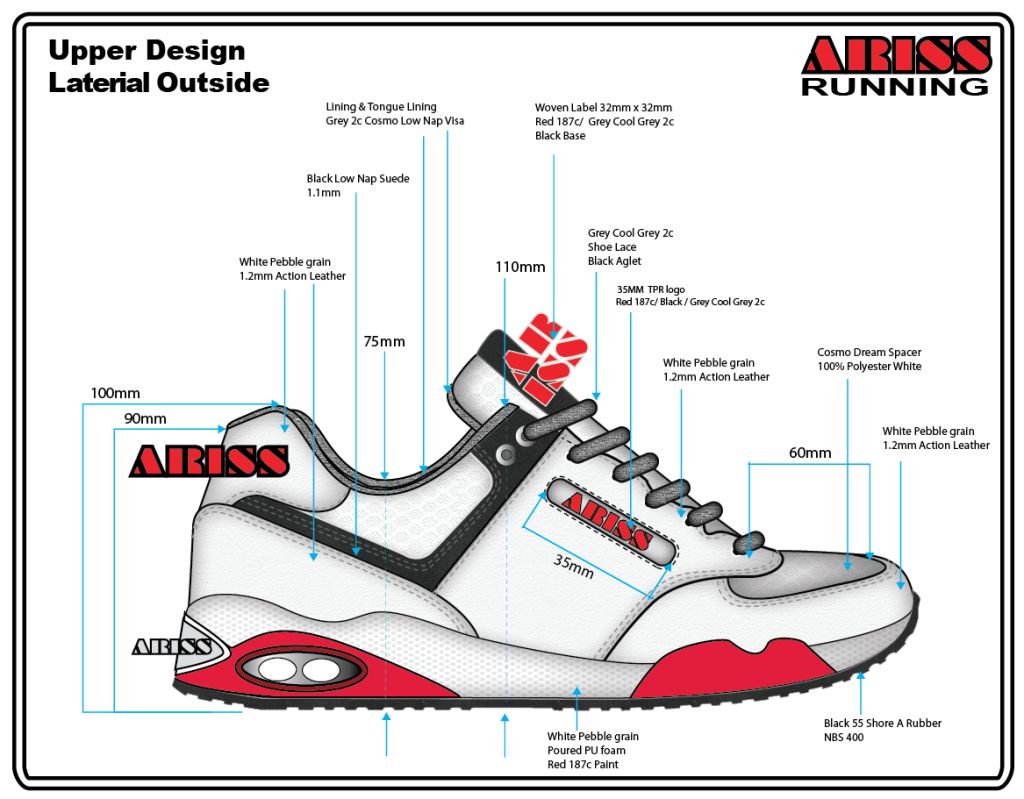
You can buy a real shoe pattern! This pack contains the computer cut shoemaking pattern for the Arris classic jogger. This footwear pattern is cut from heavy paper stock and is just what you will find in a shoe factory. Every shoe pattern part is marked with its name. If you want to learn shoe pattern making this is a must have! We have included the files for digital download in editable PDF and AI file formats. This kit will help you learn the shoe pattern making process. Also included is the printed outsole drawing and digital files for the outsole design.
1. Factory shoe flat pattern in Downloadable PDF and live vector .ai formats.
2. Printed factory blueprint for an EVA/Rubber running shoe outsole unit. Includes PDF and live vector files.
3. Complete line item shoe specification. In Microsoft .xls format.
4. Sample shoe specification drawing – 8 pages. Includes PDF and live vector .ai formats.
Footwear Pattern Parts
Shoe design pattern PDF downloadable File
Footwear pattern download .ai vector file, how to draw shoe patterns
Making a shoe pattern or cutting a shoe pattern is not a difficult shoemaking skill. If you have the time and patience, you can produce shoemaking patterns with just a few common tools. The shoe pattern making process is not complicated. The basic techniques for drawing on a shoe last are simple, and the process is easy, but the skills required to make a beautiful, well proportioned, mechanically sound, shoe pattern may take years for a shoemaker to perfect! This is the true art of the shoemaker that a computer cannot replace. A skilled pattern cutter is the heart of a shoe factory’s development group. Here we will show you how you can cut your own pattern.
Here is a list of the shoemaking tools you will need to make a shoe pattern:
1. A shoe last. If you don’t have a shoe last you can tape over a shoe or 3D print a last. 2. A roll of 1/2 inch wide masking tape. This will be used to cover the shoe last. (3/4 inch will do too.) 3. A sharp X-Acto knife or other hobby knives. 4. Pens and pencils. 5. A small flexible steel ruler. 6. Bristol paper (any stiff paper will do, like a manila folder) Here is a list of some other shoemaking tools you may need,
How to make your own shoe pattern
First step: tape up the shoe last
To make a new shoe pattern step-by-step you will first need to “tape” the last so you can “pull the shell” off the shoe pattern. The tape should be layered in two different directions so the pattern stays together when you are ready to peel it off the last. You will start on the lateral or outside of the shoe last. First, starting at the top, lay the tape lengthwise down the lateral side of the last. Next, run a strip of tape down the center of the last from the top of the instep down to the toe. Do the same on the heel of the last. Finally, run layers across the last from the bottom edge up the side of the last. Make this extra smooth, this will be your drawing surface when you start marking your shoe pattern.
Make sure the tape wraps around the bottom edge of the last. You will need this edge, as it will become the bottom edge of your shoe pattern. If your shoe design is symmetrical then half the last is okay. If the medial and lateral side of your shoe design is different you will need to tape the entire last. The process is the same for both sides.
Once the shoe last is covered with tape, it is time to start marking the shoe pattern. With the steel ruler, mark the centerline of the last from the instep to the toe tip and down the heel. For a list of last terms you can read this post about shoe lasts and how lasts are made. With the centerlines marked it is time to start drawing the pattern on the last.
Drawing the shoe pattern:
It’s fun to add a little color or paste on a logo. You can start to get a feel for what the design will look like in 3D. Go ahead and iterate upon your design, this is your time to be creative. If you don’t like your line, grab some tape, cover it up, and try again.
Make a quick check of the top line, collar, and heel notch heights. For a size 9 shoe, (measure from inside to the Strobel sock,) the collar line is 55mm, the heel notch is 80-85mm to top eyelet, 90mm measured from the Strobel’s bottom.
The design does not have to be perfect now but keep an eye out for any major flaws. This is a good time to show it to your developer. Are the pattern parts wasting material? Are there any overlapping issues? Too many layers overlapping in the flex zone will cause problems.
After you have your shoe design down on the tape it is time to peel off the tape. Using a sharp blade, cut the tape down the center lines of the toe and heel. Next, cut the tape along the bottom edge of the last. Now, start peeling off the tape. If the tape was laid down correctly in overlapping layers the pattern will pull off.
Here is the pattern free of the last. You may find that it does not lay flat, don’t worry.
Now, carefully lay the tape on a sheet of stiff paperboard and press your new shoe pattern flat. Starting at the top eyelet position and collar line, work your way down the middle then out to each end. As you move to the heel and toe, the 3D pattern will need some relief cuts to “spring” the pattern. Add a few cuts and the pattern will flatten.
Cut the shoe pattern:
Once the tape is peeled from the last and flattened you have the shoe pattern! The pattern with all the parts together is called the “shell” pattern. With the pattern attached to some paper, it’s time to “trim out” the pattern. Now the shoe pattern can be redrawn in a computer and cut out of heavy paper. The Pattern Cutter will add the overlaps and alignment marks.
As a shoe designer, you should always ask for the flat pattern of a new shoe design. When you make corrections for the pattern maker, it’s easier to draw on the flat pattern than to draw on the sample. It is also much faster to scan the corrections and email them to the factory rather than Fed-Ex the shoe back to China.
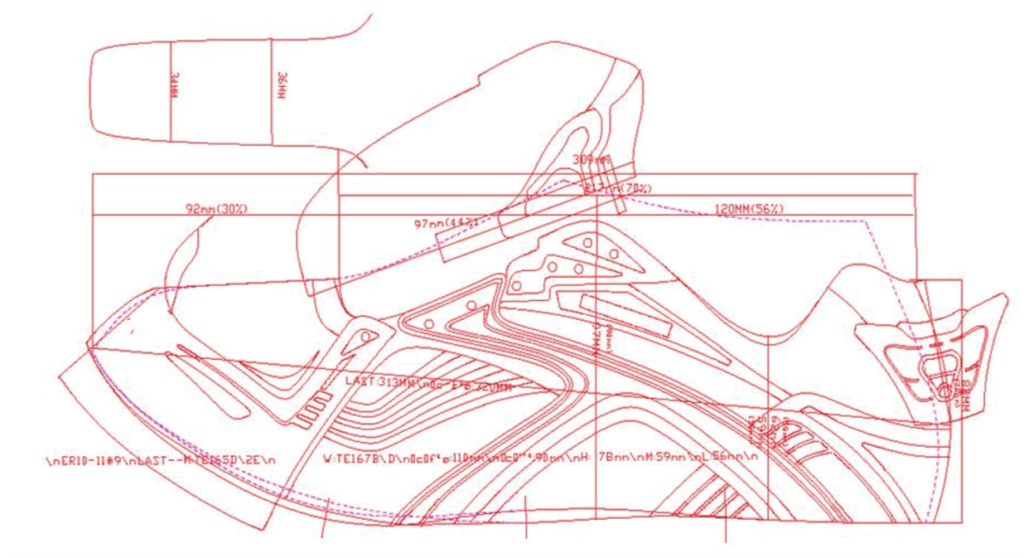
Here is the finished flat pattern. Scanned and with overlaps added, this pattern is ready for the sample room. Buy the pattern here.
Once you have completed drawing your shoe design, you will need to make a flat pattern. The pattern will be used to cut and sew the materials for your initial sample. The pattern records the actual shape of the shoe. The pattern and the shoe last together determine the profile, fit, collar height, vamp length, tongue length, throat width and all the other dimensions of the shoe.
This classic jogger shoe pattern looks simple but it has many pattern parts. Shoemaking patterns can be very complicated.
The complete shoe shell pattern, as shown above, may not show the material overlaps but is an easy way to communicate the design. Often, the factory will include the shell pattern with any new pull-over samples. This allows the designer to scan the pattern back into the computer and make corrections.
Shoe design pattern PDF downloadable File
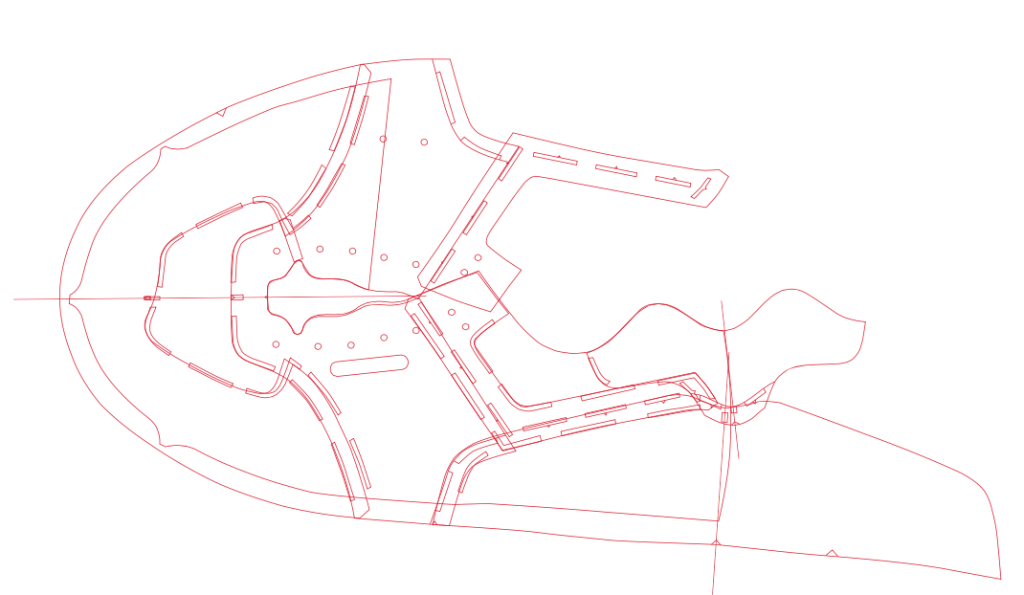
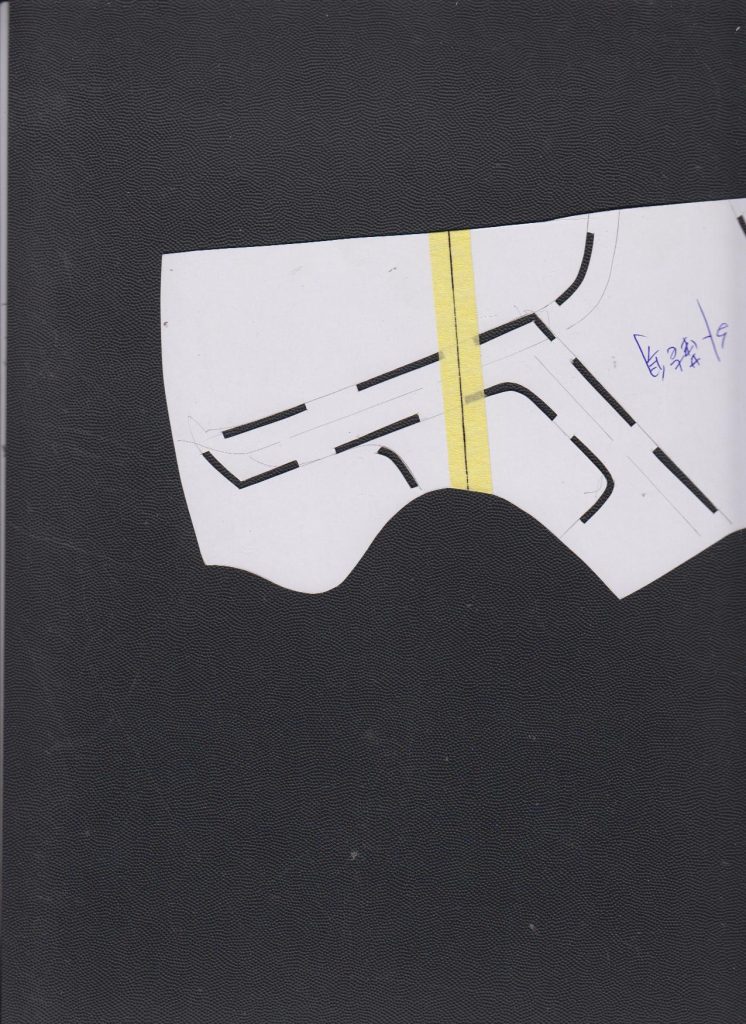
Another method (shown above) is to display all the pattern parts; including the overlap and the alignment marks. This drawing helps the pattern maker see how the parts fit together and where the overlaps occur.
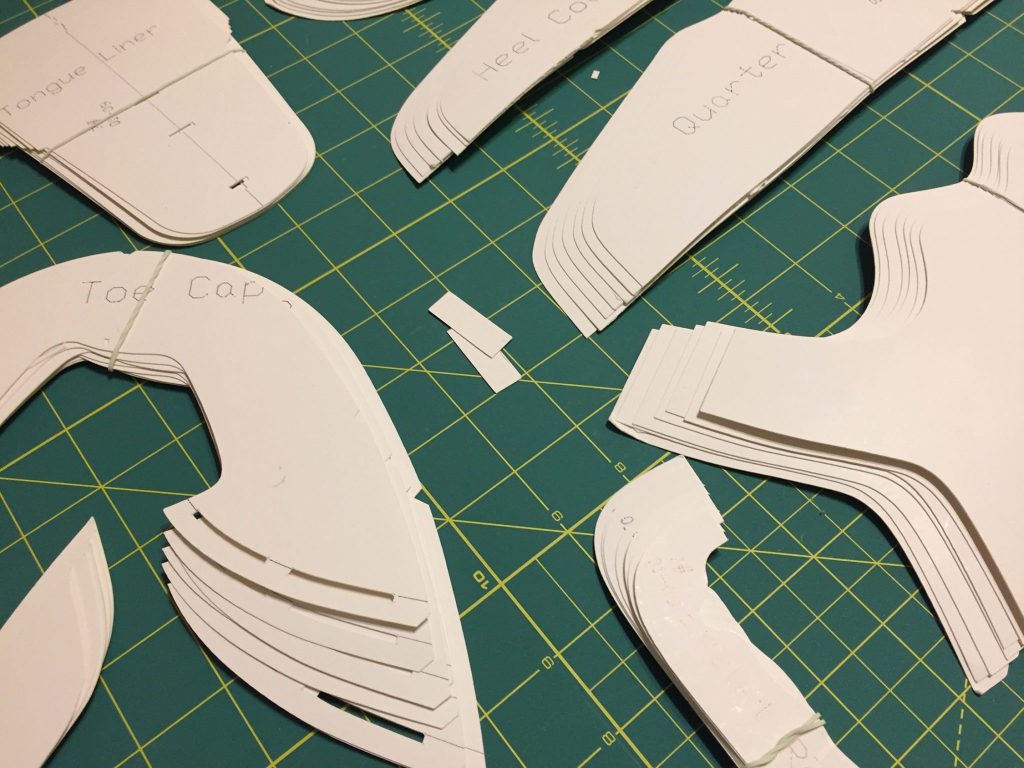
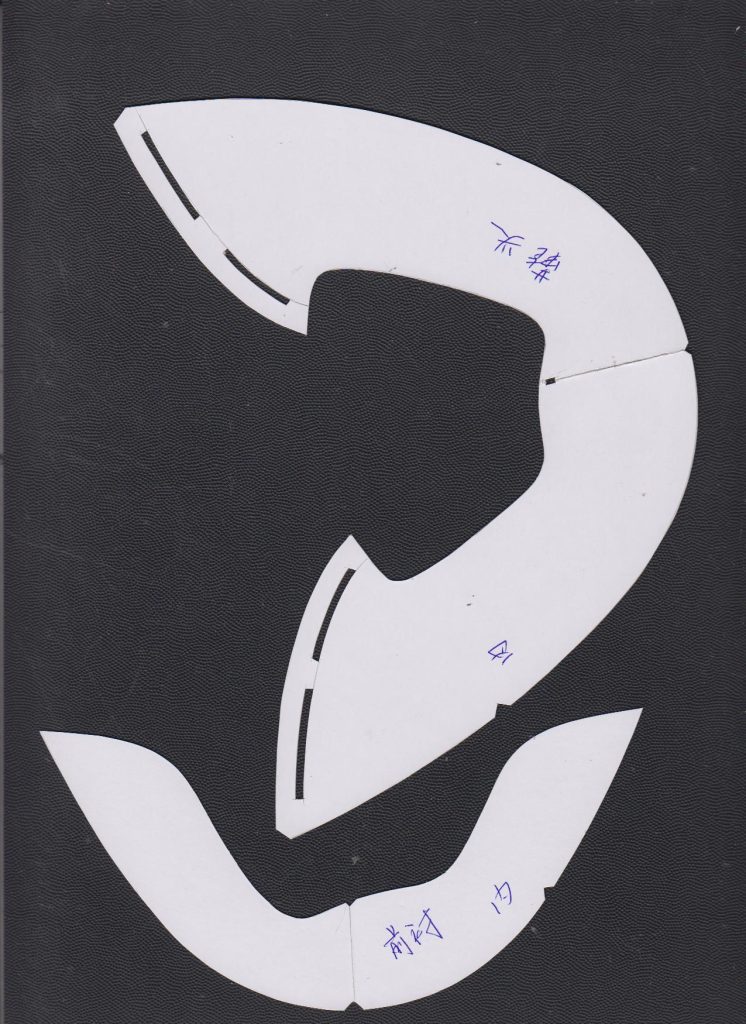
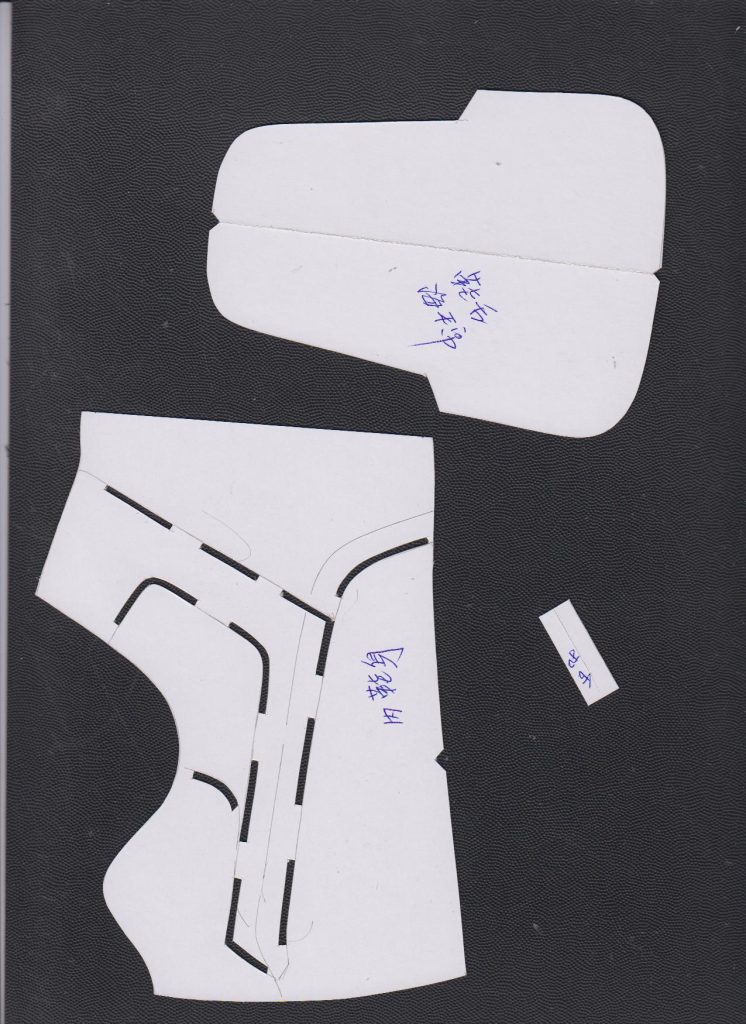
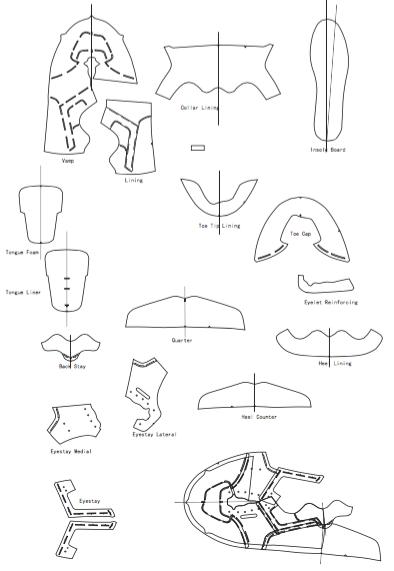
Here you can see the cut paper pattern parts. These are what the sample pattern cutter will use to make the first sample shoe. Many factories will use a machine to cut sample parts but cutting the paper by hand saves the time involved in computerizing the pattern.
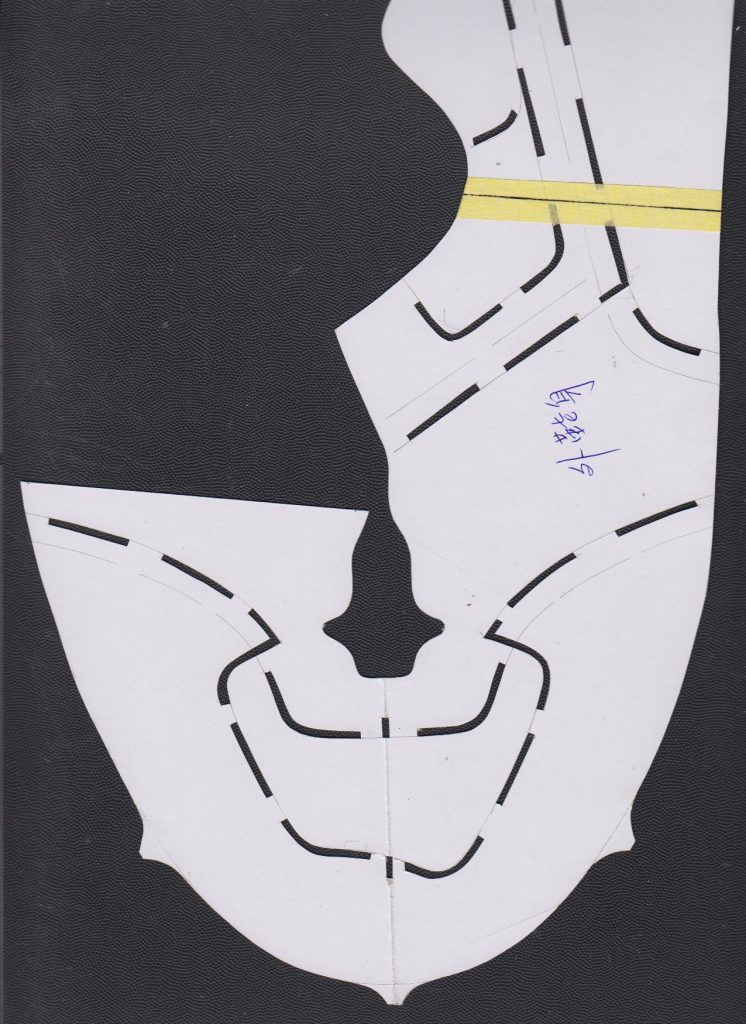
The vamp and lining pattern parts make up the base layer for assembly.
The vamp and lining pattern parts make up the base layer for assembly.
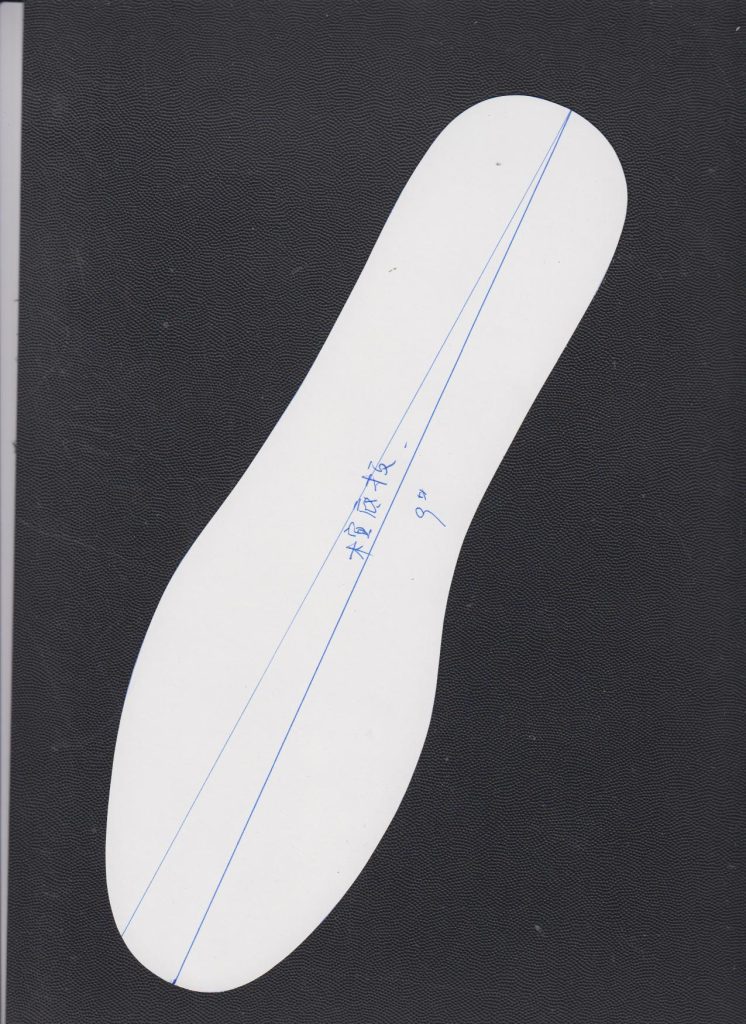
The insole pattern is the strobal sock, this is made from a tough non-stretch material.
Sneaker patterns: The Toe piece will be leather. You can see it’s not symmetrical. The extra panel is called a toe burst panel. This prevents the big toe nail from wearing through the vamp mesh. The heel lining is the pattern for collar foam.
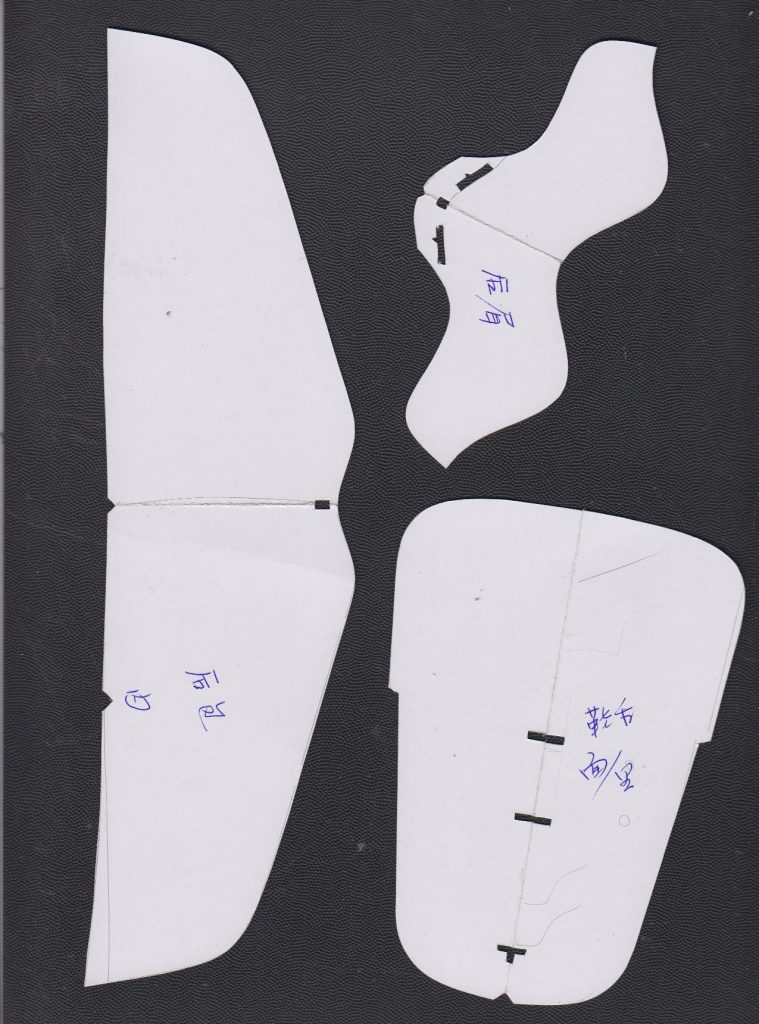
Running shoe pattern: The tongue foam pattern for 10mm Kff Foam.
Shoe pattern: The heel counter is a small part. It will be made from a reinforcing material. The back stay is a leather panel, great for logos.
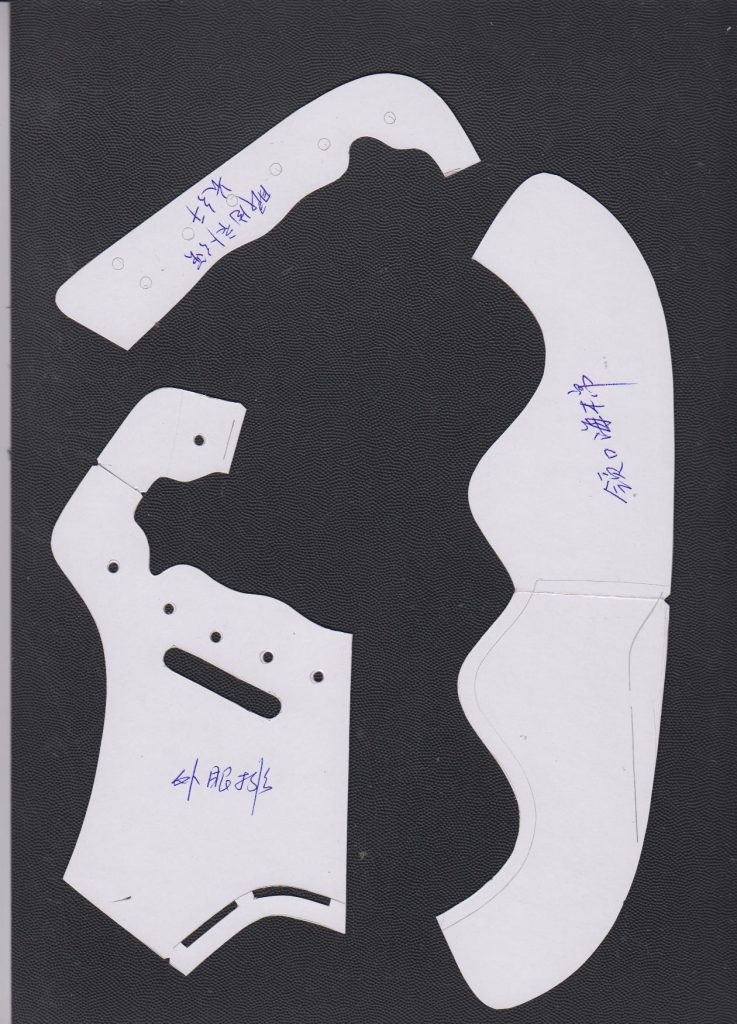
Sneaker patterns: The medial eyestay and lateral eyestay are leather parts. The break line is on the medial inside of the shoe. If this was one part it would wrap around onto itself and waste material. The break line could be in the middle, at the base of the tongue. The lateral side has a die cut for the logo.
The eyestay underlay parts are the same pattern, mirrored.
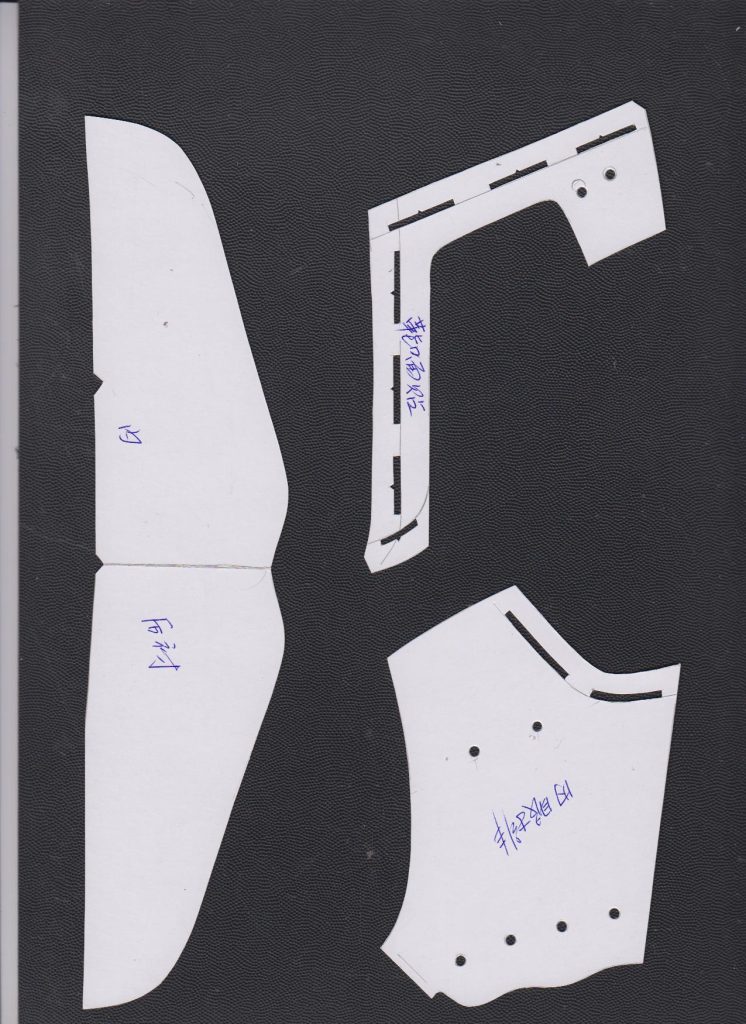
This pattern for the Ariss running shoe is available for download here. The vamp and lining pattern parts make up the base layer for assembly these will be mesh. The tongue pattern is both the lining and face. The face is made of mesh and the lining is made from Visa terry. The tongue foam pattern for 10mm Kff foam. The quarter panel is the made of leather.
The heel counter is a smaller part which will be made from a reinforcing material. The backstay is a leather panel, great for logos.
The medial eyestay and lateral eyestay are leather parts. The break line is on the medial inside of the shoe. If this were one part, it would wrap around onto itself and waste material. The break line can be in the middle at the base of the tongue. The lateral side has a die cut for the logo.
The eyestay underlay parts are the same pattern, mirrored. The toe tip will be leather, you can see it’s not symmetrical. The extra panel is called a toe burst panel. This prevents the big toenail from wearing through the vamp mesh. The heel lining is the pattern for collar foam. The collar lining is made from Visa terry fabric. The shoe has a perforated eyestay, to prevent “tear out” reinforcement material is added. The insole pattern is the strobal sock, this is made from a tough non-stretch material.


 The Fake Nike has thicker leather.
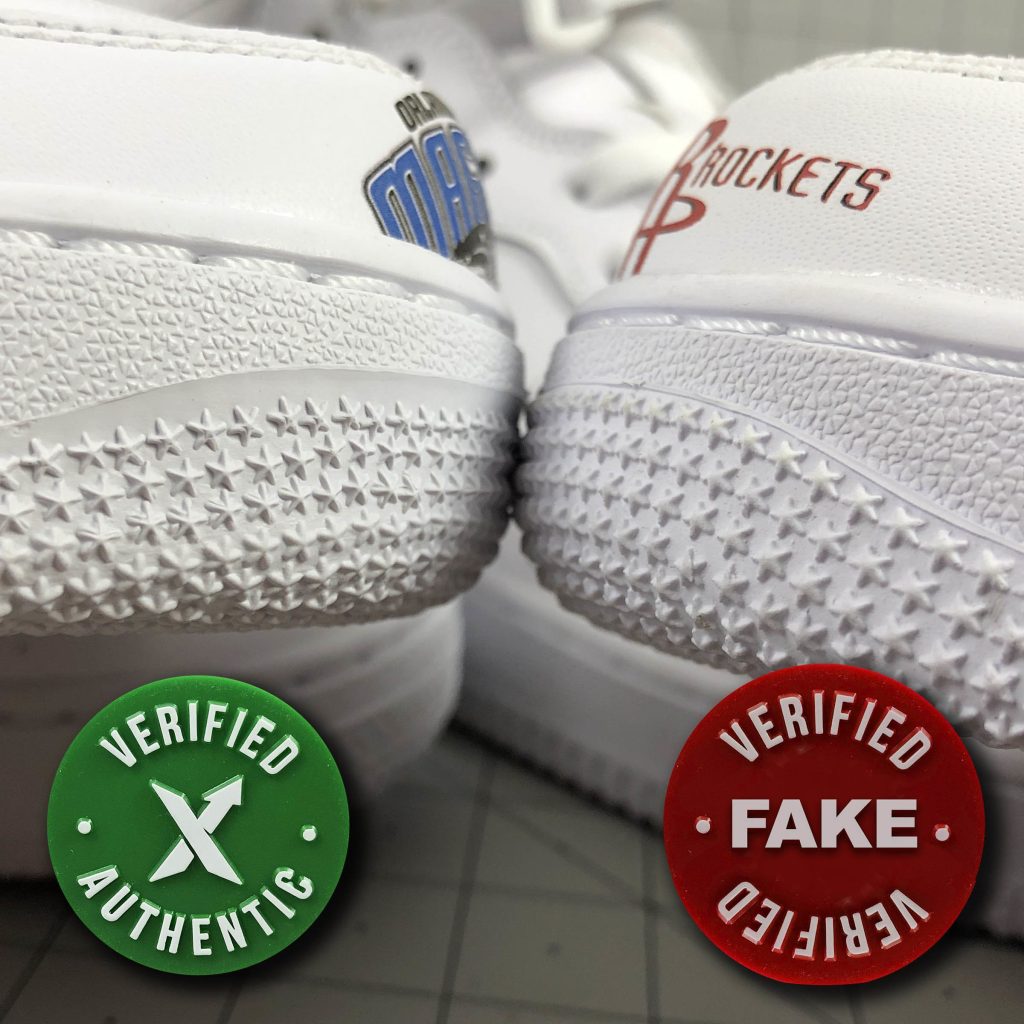


 To make a new shoe pattern step-by-step you will first need to “tape” the last so you can “pull the shell” off the shoe pattern. The tape should be layered in two different directions so the pattern stays together when you are ready to peel it off the last. You will start on the lateral or outside of the shoe last. First, starting at the top, lay the tape lengthwise down the lateral side of the last. Next, run a strip of tape down the center of the last from the top of the instep down to the toe. Do the same on the heel of the last. Finally, run layers across the last from the bottom edge up the side of the last. Make this extra smooth, this will be your drawing surface when you start marking your shoe pattern.
 It’s fun to add a little color or paste on a logo. You can start to get a feel for what the design will look like in 3D. Go ahead and iterate upon your design, this is your time to be creative. If you don’t like your line, grab some tape, cover it up, and try again.


 Here is the pattern free of the last. You may find that it does not lay flat, don’t worry.
 Once the tape is peeled from the last and flattened you have the shoe pattern! The pattern with all the parts together is called the “shell” pattern. With the pattern attached to some paper, it’s time to “trim out” the pattern. Now the shoe pattern can be redrawn in a computer and cut out of heavy paper. The Pattern Cutter will add the overlaps and alignment marks.


