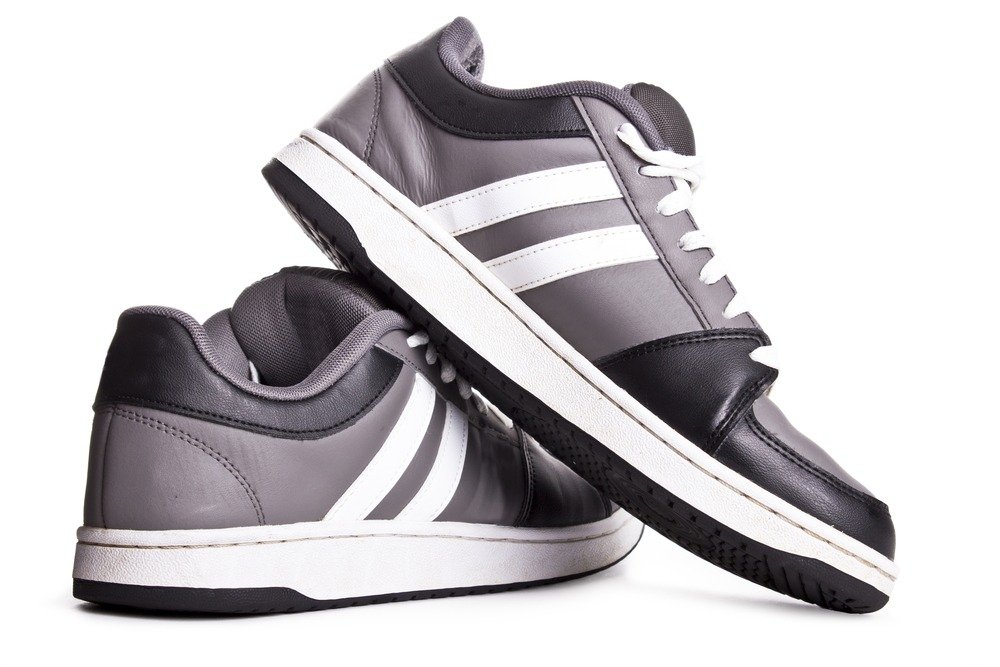
You can buy a real shoe pattern! This pack contains the computer cut shoemaking pattern for the Arris classic jogger. This footwear pattern is cut from heavy paper stock and is just what you will find in a shoe factory. Every shoe pattern part is marked with its name. If you want to learn shoe pattern making this is a must have! We have included the files for digital download in editable PDF and AI file formats. This kit will help you learn the shoe pattern making process. Also included is the printed outsole drawing and digital files for the outsole design.
1. Factory shoe flat pattern in Downloadable PDF and live vector .ai formats.
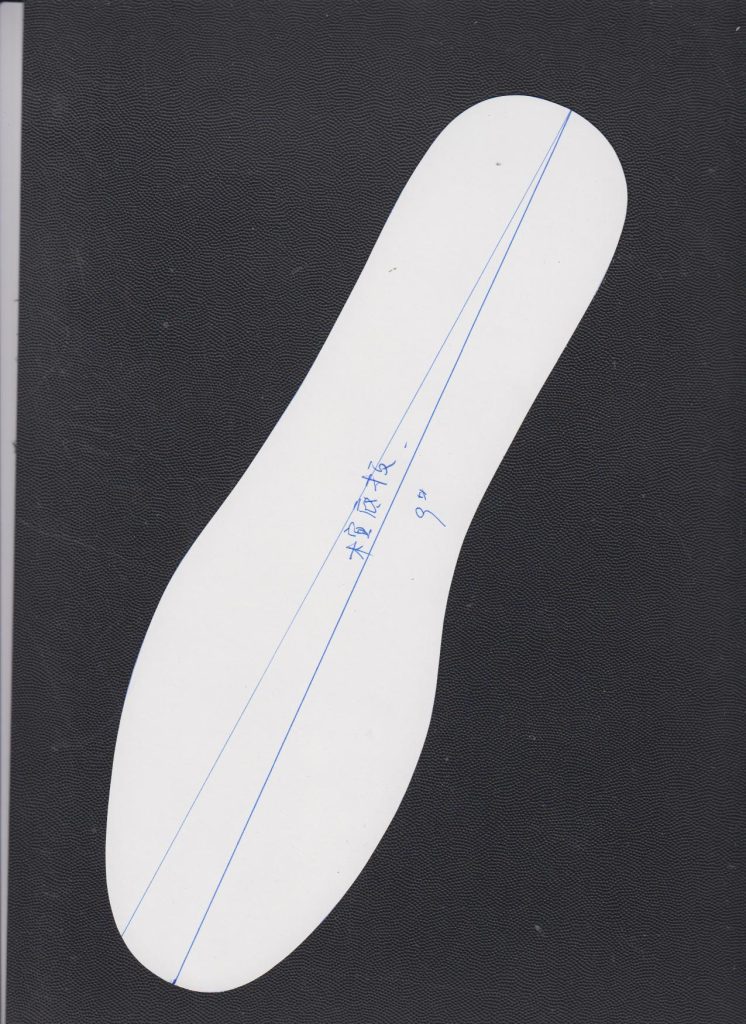
2. Printed factory blueprint for an EVA/Rubber running shoe outsole unit. Includes PDF and live vector files.
3. Complete line item shoe specification. In Microsoft .xls format.
4. Sample shoe specification drawing – 8 pages. Includes PDF and live vector .ai formats.
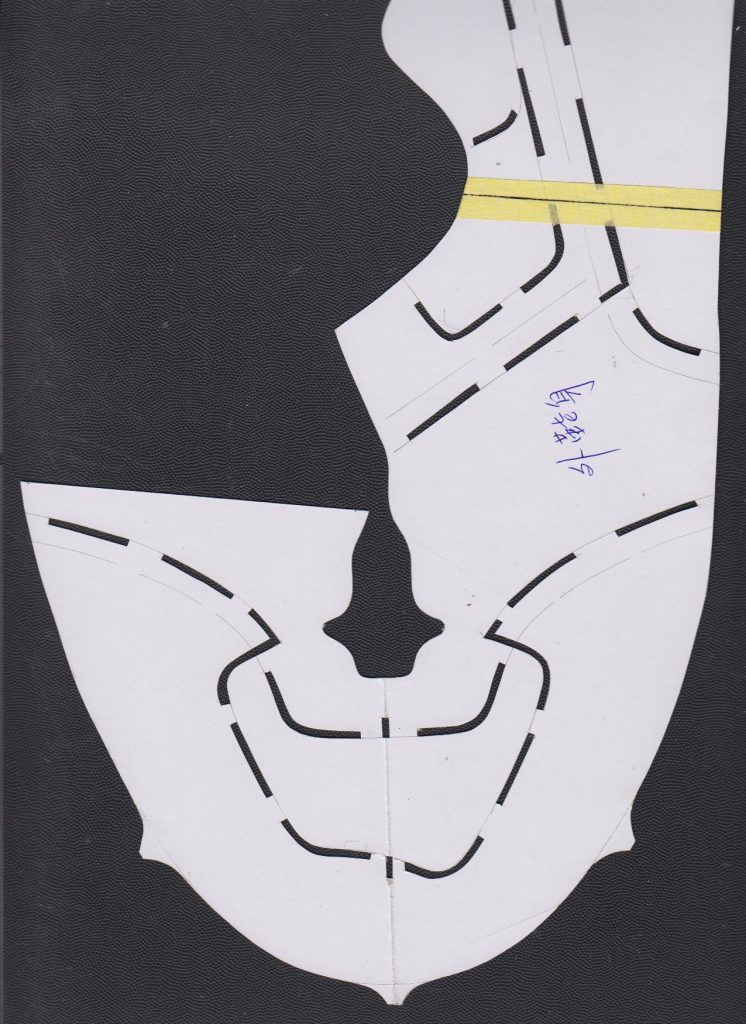
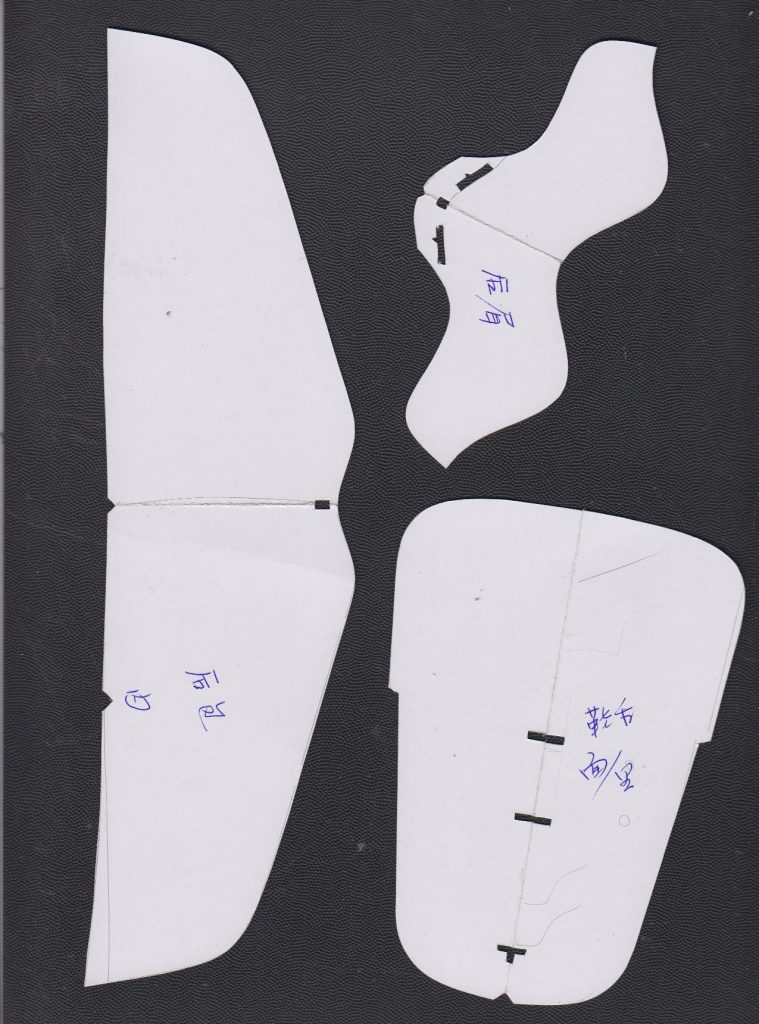
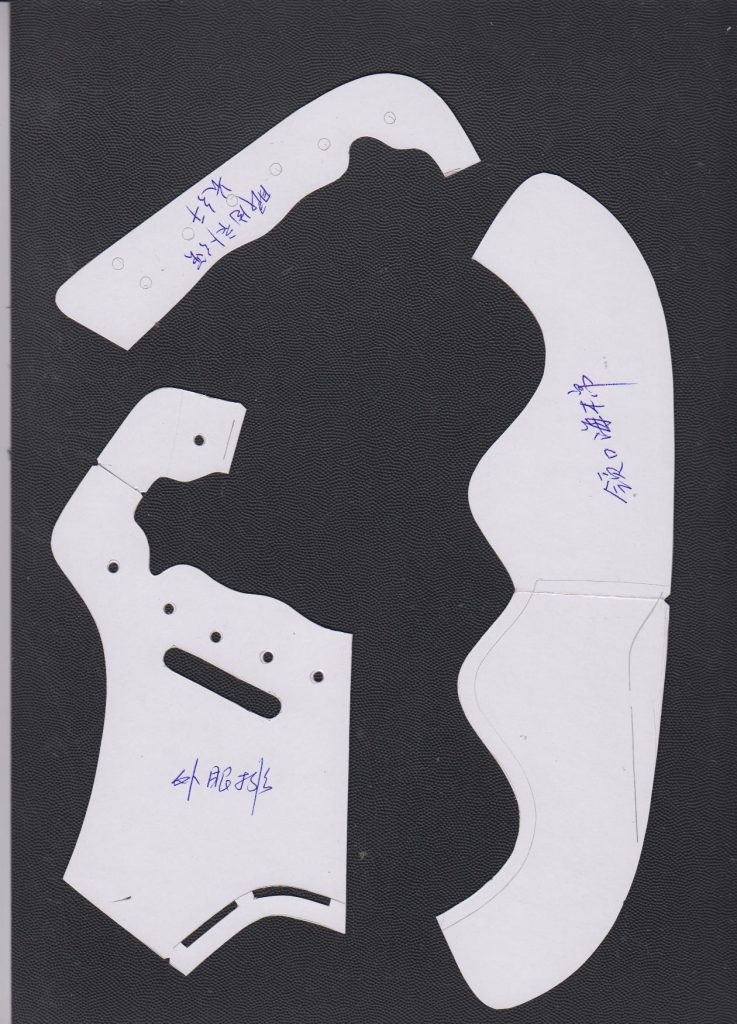
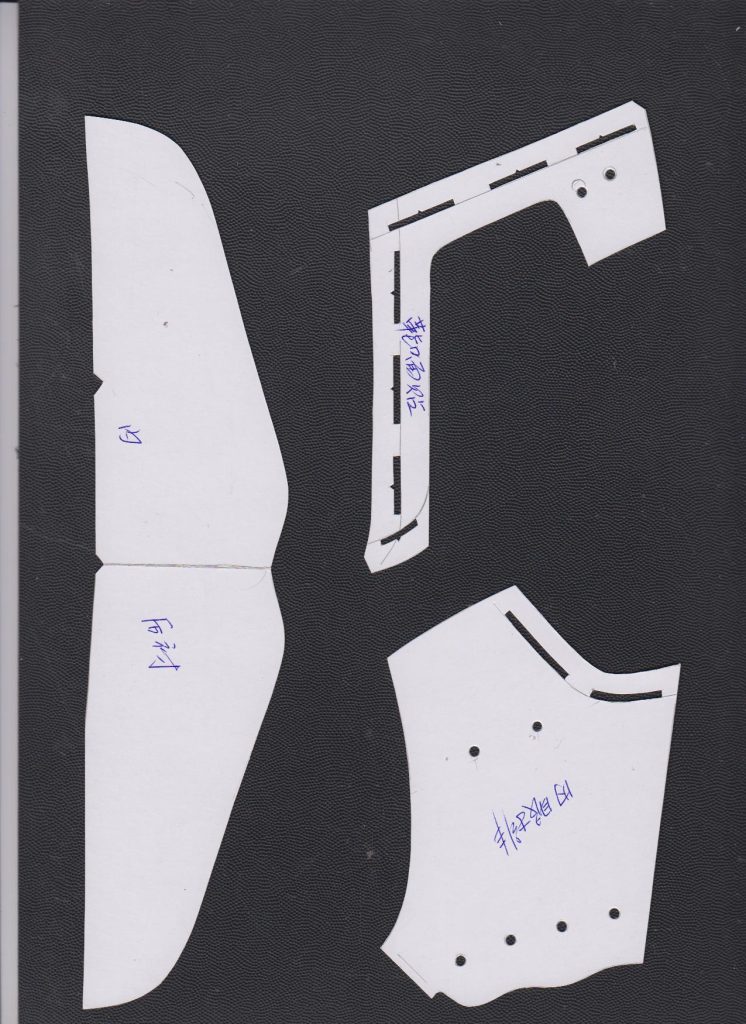
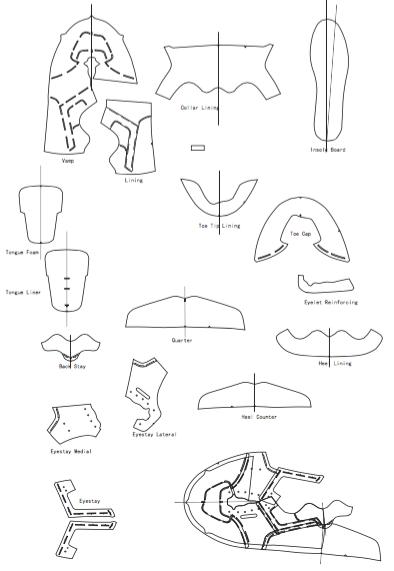
Footwear Pattern Parts
Shoe design pattern PDF downloadable File
Footwear pattern download .ai vector file, how to draw shoe patterns
Making a shoe pattern or cutting a shoe pattern is not a difficult shoemaking skill. If you have the time and patience, you can produce shoemaking patterns with just a few common tools. The shoe pattern making process is not complicated. The basic techniques for drawing on a shoe last are simple, and the process is easy, but the skills required to make a beautiful, well proportioned, mechanically sound, shoe pattern may take years for a shoemaker to perfect! This is the true art of the shoemaker that a computer cannot replace. A skilled pattern cutter is the heart of a shoe factory’s development group. Here we will show you how you can cut your own pattern.
Here is a list of the shoemaking tools you will need to make a shoe pattern:
1. A shoe last. If you don’t have a shoe last you can tape over a shoe or 3D print a last. 2. A roll of 1/2 inch wide masking tape. This will be used to cover the shoe last. (3/4 inch will do too.) 3. A sharp X-Acto knife or other hobby knives. 4. Pens and pencils. 5. A small flexible steel ruler. 6. Bristol paper (any stiff paper will do, like a manila folder) Here is a list of some other shoemaking tools you may need,
How to make your own shoe pattern
First step: tape up the shoe last
To make a new shoe pattern step-by-step you will first need to “tape” the last so you can “pull the shell” off the shoe pattern. The tape should be layered in two different directions so the pattern stays together when you are ready to peel it off the last. You will start on the lateral or outside of the shoe last. First, starting at the top, lay the tape lengthwise down the lateral side of the last. Next, run a strip of tape down the center of the last from the top of the instep down to the toe. Do the same on the heel of the last. Finally, run layers across the last from the bottom edge up the side of the last. Make this extra smooth, this will be your drawing surface when you start marking your shoe pattern.
Make sure the tape wraps around the bottom edge of the last. You will need this edge, as it will become the bottom edge of your shoe pattern. If your shoe design is symmetrical then half the last is okay. If the medial and lateral side of your shoe design is different you will need to tape the entire last. The process is the same for both sides.
Once the shoe last is covered with tape, it is time to start marking the shoe pattern. With the steel ruler, mark the centerline of the last from the instep to the toe tip and down the heel. For a list of last terms you can read this post about shoe lasts and how lasts are made. With the centerlines marked it is time to start drawing the pattern on the last.
Drawing the shoe pattern:
It’s fun to add a little color or paste on a logo. You can start to get a feel for what the design will look like in 3D. Go ahead and iterate upon your design, this is your time to be creative. If you don’t like your line, grab some tape, cover it up, and try again.
Make a quick check of the top line, collar, and heel notch heights. For a size 9 shoe, (measure from inside to the Strobel sock,) the collar line is 55mm, the heel notch is 80-85mm to top eyelet, 90mm measured from the Strobel’s bottom.
The design does not have to be perfect now but keep an eye out for any major flaws. This is a good time to show it to your developer. Are the pattern parts wasting material? Are there any overlapping issues? Too many layers overlapping in the flex zone will cause problems.
After you have your shoe design down on the tape it is time to peel off the tape. Using a sharp blade, cut the tape down the center lines of the toe and heel. Next, cut the tape along the bottom edge of the last. Now, start peeling off the tape. If the tape was laid down correctly in overlapping layers the pattern will pull off.
Here is the pattern free of the last. You may find that it does not lay flat, don’t worry.
Now, carefully lay the tape on a sheet of stiff paperboard and press your new shoe pattern flat. Starting at the top eyelet position and collar line, work your way down the middle then out to each end. As you move to the heel and toe, the 3D pattern will need some relief cuts to “spring” the pattern. Add a few cuts and the pattern will flatten.
Cut the shoe pattern:
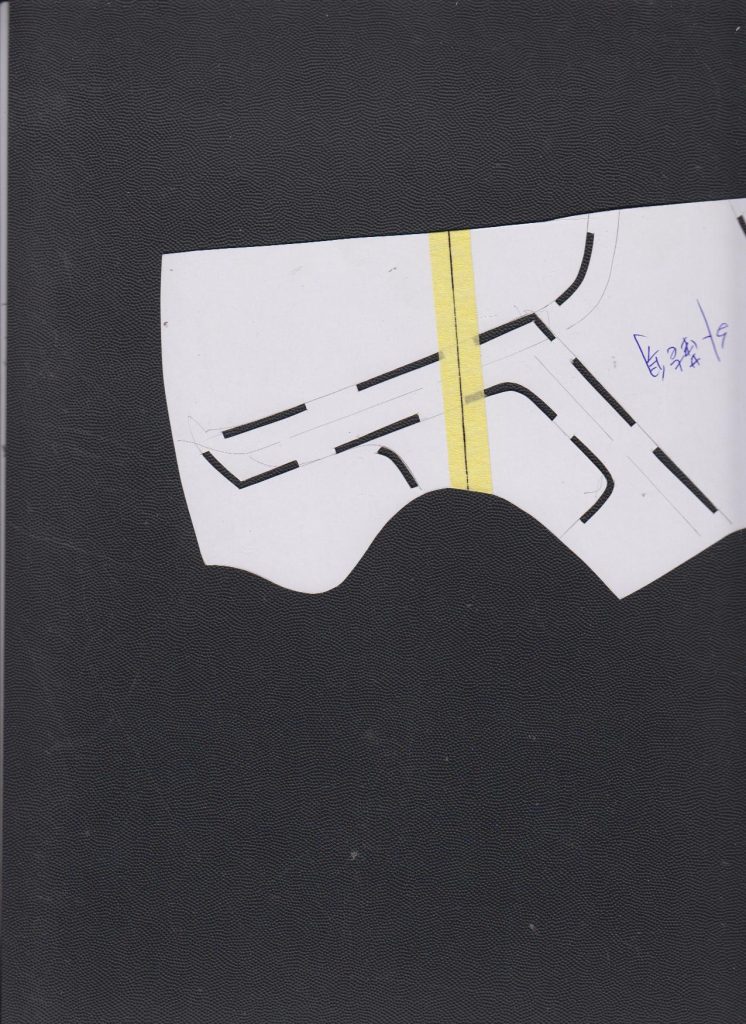
Once the tape is peeled from the last and flattened you have the shoe pattern! The pattern with all the parts together is called the “shell” pattern. With the pattern attached to some paper, it’s time to “trim out” the pattern. Now the shoe pattern can be redrawn in a computer and cut out of heavy paper. The Pattern Cutter will add the overlaps and alignment marks.
As a shoe designer, you should always ask for the flat pattern of a new shoe design. When you make corrections for the pattern maker, it’s easier to draw on the flat pattern than to draw on the sample. It is also much faster to scan the corrections and email them to the factory rather than Fed-Ex the shoe back to China.
Here is the finished flat pattern. Scanned and with overlaps added, this pattern is ready for the sample room. Buy the pattern here.
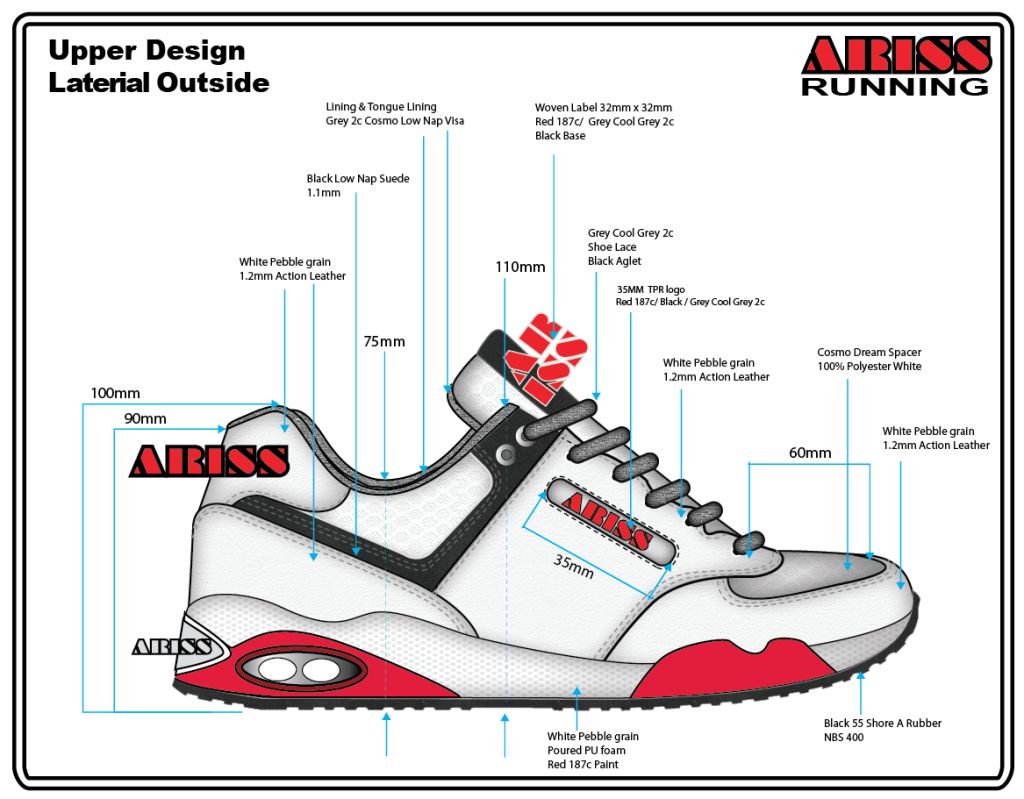
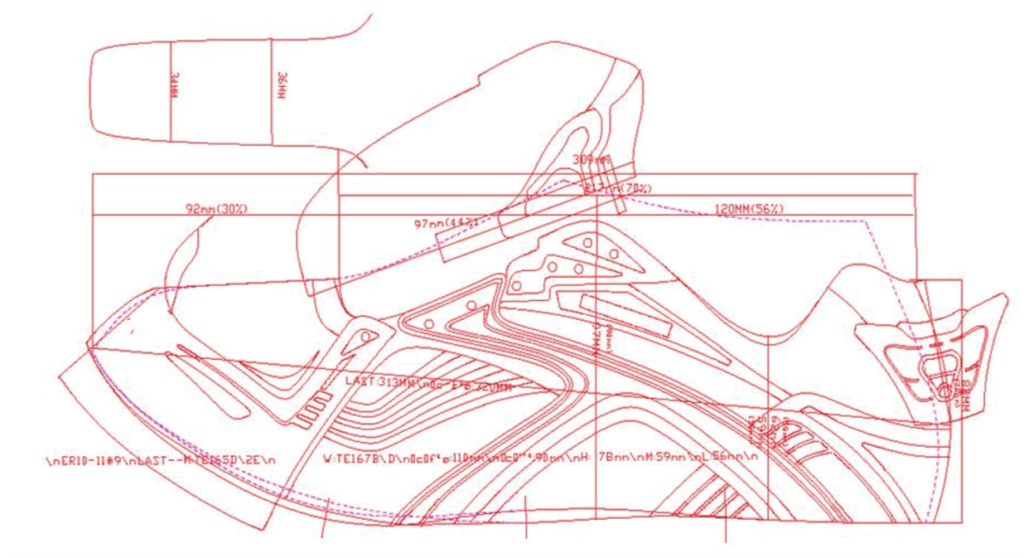
Once you have completed drawing your shoe design, you will need to make a flat pattern. The pattern will be used to cut and sew the materials for your initial sample. The pattern records the actual shape of the shoe. The pattern and the shoe last together determine the profile, fit, collar height, vamp length, tongue length, throat width and all the other dimensions of the shoe.
This classic jogger shoe pattern looks simple but it has many pattern parts. Shoemaking patterns can be very complicated.
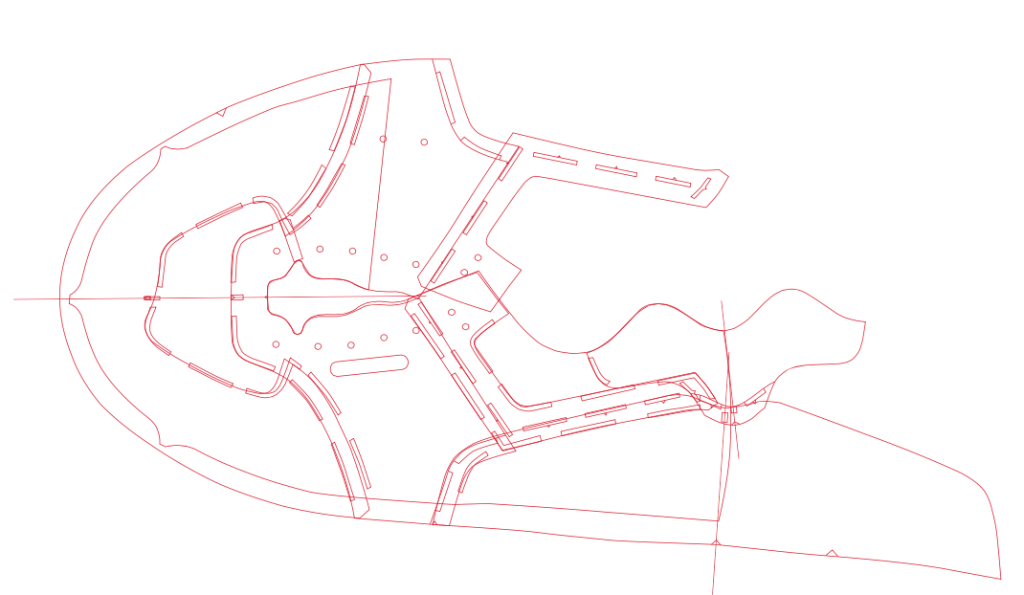
The complete shoe shell pattern, as shown above, may not show the material overlaps but is an easy way to communicate the design. Often, the factory will include the shell pattern with any new pull-over samples. This allows the designer to scan the pattern back into the computer and make corrections.
Shoe design pattern PDF downloadable File
Another method (shown above) is to display all the pattern parts; including the overlap and the alignment marks. This drawing helps the pattern maker see how the parts fit together and where the overlaps occur.
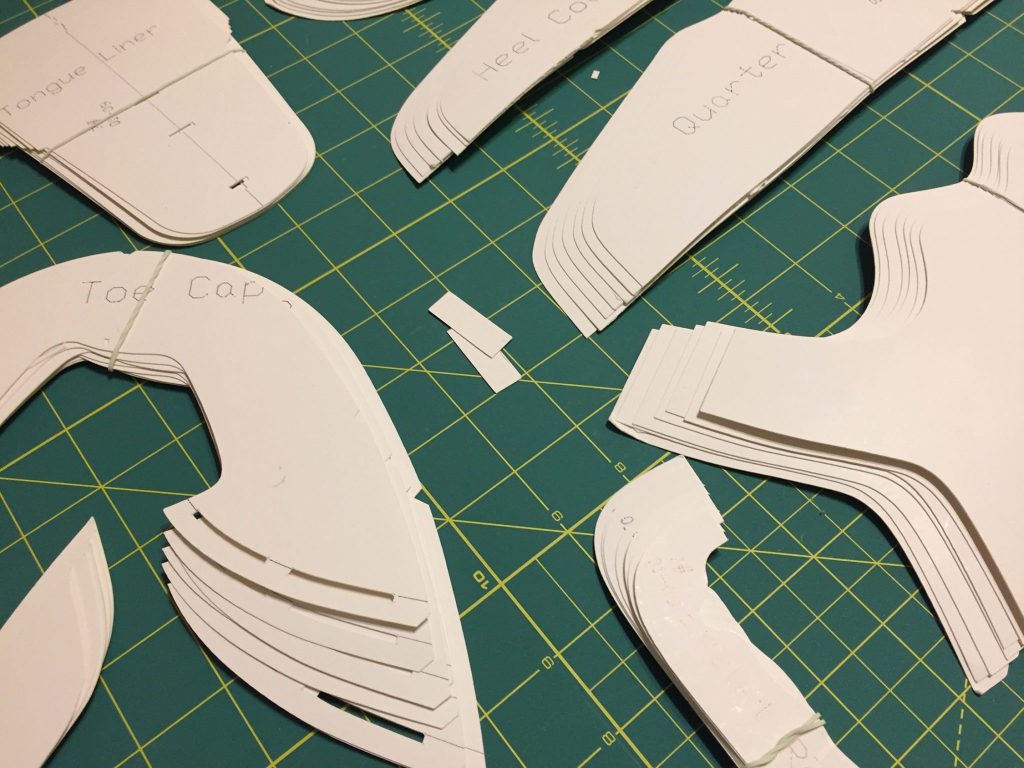
Here you can see the cut paper pattern parts. These are what the sample pattern cutter will use to make the first sample shoe. Many factories will use a machine to cut sample parts but cutting the paper by hand saves the time involved in computerizing the pattern.
The vamp and lining pattern parts make up the base layer for assembly.
The vamp and lining pattern parts make up the base layer for assembly.
The insole pattern is the strobal sock, this is made from a tough non-stretch material.
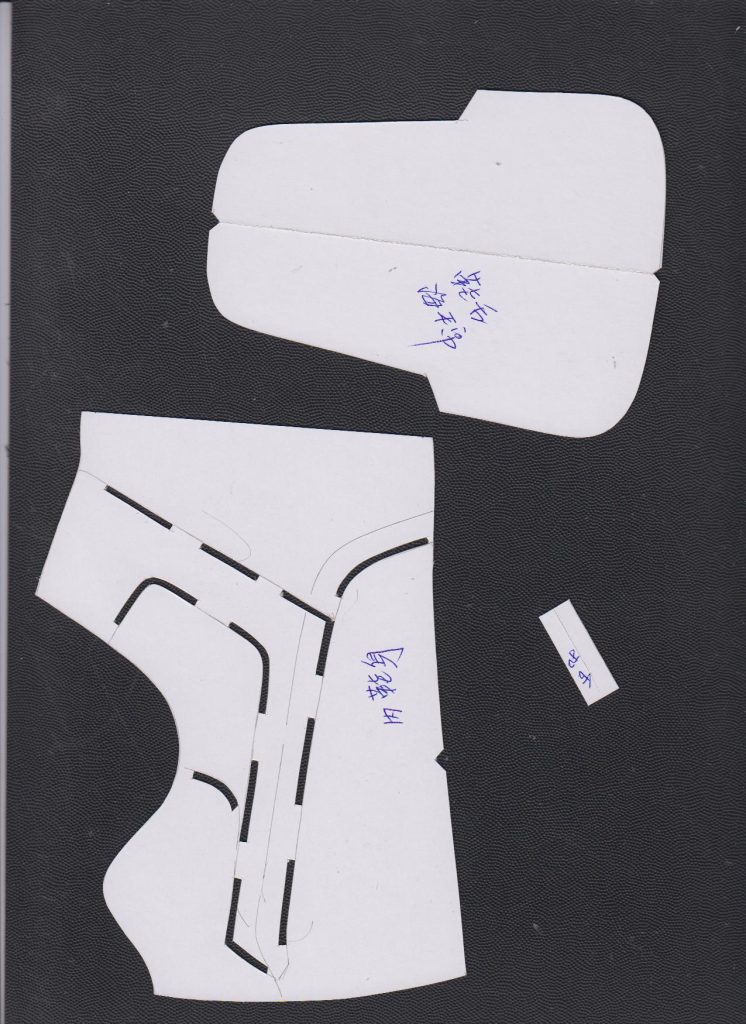
Sneaker patterns: The Toe piece will be leather. You can see it’s not symmetrical. The extra panel is called a toe burst panel. This prevents the big toe nail from wearing through the vamp mesh. The heel lining is the pattern for collar foam.
Running shoe pattern: The tongue foam pattern for 10mm Kff Foam.
Shoe pattern: The heel counter is a small part. It will be made from a reinforcing material. The back stay is a leather panel, great for logos.
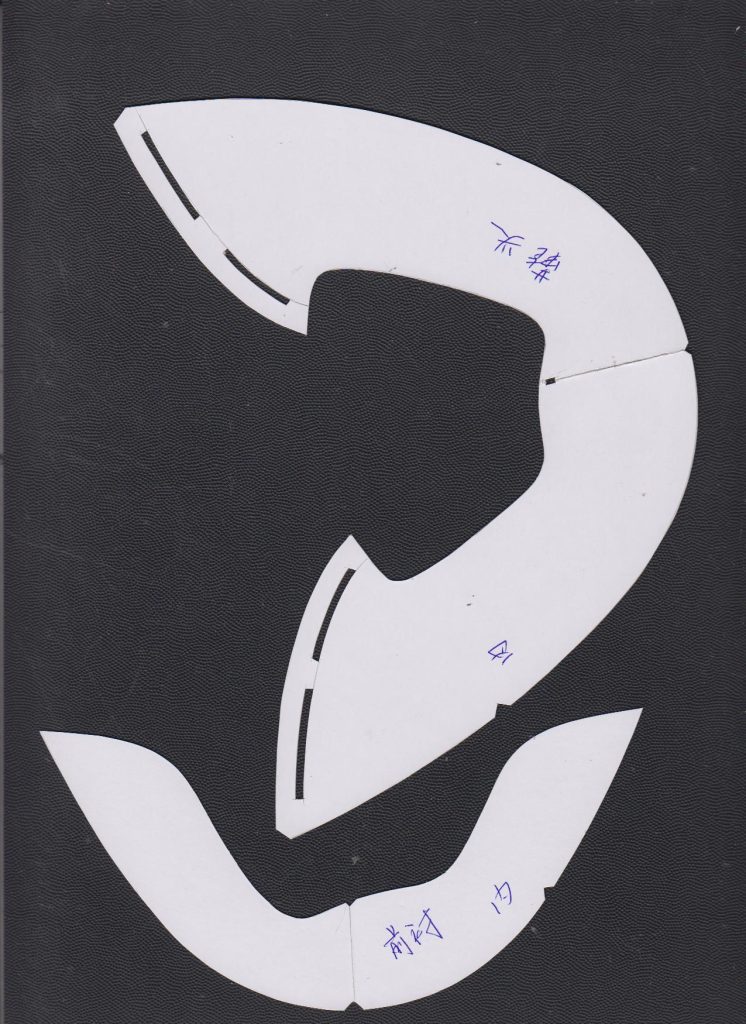
Sneaker patterns: The medial eyestay and lateral eyestay are leather parts. The break line is on the medial inside of the shoe. If this was one part it would wrap around onto itself and waste material. The break line could be in the middle, at the base of the tongue. The lateral side has a die cut for the logo.
The eyestay underlay parts are the same pattern, mirrored.
This pattern for the Ariss running shoe is available for download here. The vamp and lining pattern parts make up the base layer for assembly these will be mesh. The tongue pattern is both the lining and face. The face is made of mesh and the lining is made from Visa terry. The tongue foam pattern for 10mm Kff foam. The quarter panel is the made of leather.
The heel counter is a smaller part which will be made from a reinforcing material. The backstay is a leather panel, great for logos.
The medial eyestay and lateral eyestay are leather parts. The break line is on the medial inside of the shoe. If this were one part, it would wrap around onto itself and waste material. The break line can be in the middle at the base of the tongue. The lateral side has a die cut for the logo.
The eyestay underlay parts are the same pattern, mirrored. The toe tip will be leather, you can see it’s not symmetrical. The extra panel is called a toe burst panel. This prevents the big toenail from wearing through the vamp mesh. The heel lining is the pattern for collar foam. The collar lining is made from Visa terry fabric. The shoe has a perforated eyestay, to prevent “tear out” reinforcement material is added. The insole pattern is the strobal sock, this is made from a tough non-stretch material.
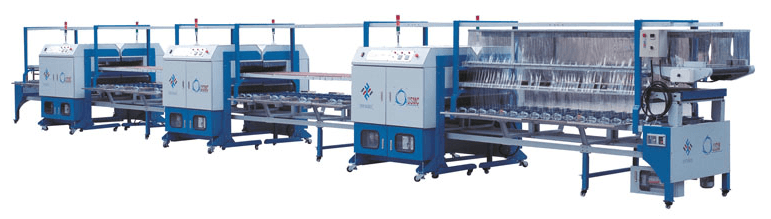
What shoe factory equipment do I need to open a real shoe factory? I’m going to walk you through a mass production shoe factory and detail all the shoe factory equipment you will need to do it right. If you are looking for hand tools for shoemaking click here.
I’m going to show you what you need to make a standard die-cut cold cemented sneaker. This is a simple shoe made with only die-cut parts. The outsole is a one-piece rubber cupsole with a die-cut midsole inside and channel stitching.
First, modern shoe manufacturing relies heavily on sub-contracted factories for many specialized operations. For example, the shoe factory technicians developed the outsole designs, but the outsole tooling is produced elsewhere, with the rubber parts also purchased somewhere else from a company that specializes in rubber pressing. The shoe factory then controls the components to ensure the uppers and outsoles all fit together correctly.
Shoe Material Cutting and Marking
Inside the shoe factory, the first operations in the manufacturing process are the cutting and marking operations. The factory uses cutting presses, also called clicker cutting machines. The clicker press is one of the standard pieces you will see in every shoe factory, and they require cutting dies for each shoe pattern part.
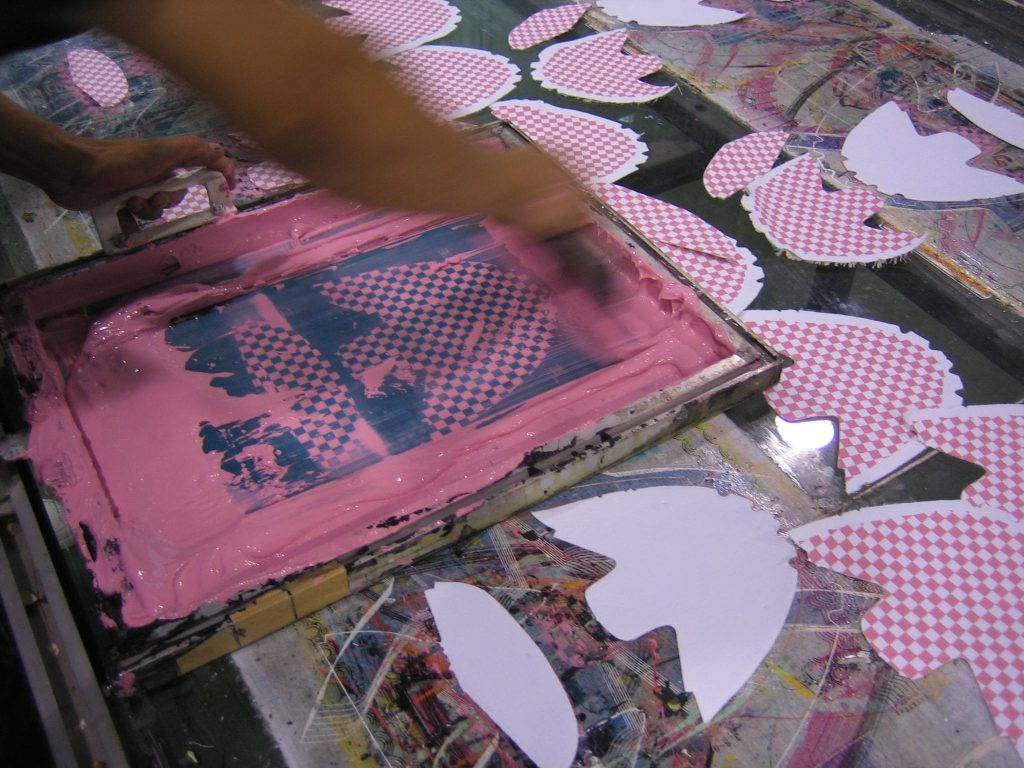
New technology for cutting is the computer-controlled drag knife cutter. These machines use a vacuum table to hold materials in place while the blade cuts all the pattern parts. This technology is critical for custom mass production. Once the shoe parts are cut they get processed, with alignment marks screen printed on the parts and any logos added. Logos can be silkscreen printed, radio frequency welded or embroidered on the cut parts.
Footwear logo application
After the shoe parts are cut and marked for assembly, they may need to have logos added. Logos are added by silk screen printings, embroidery, or heat welding.
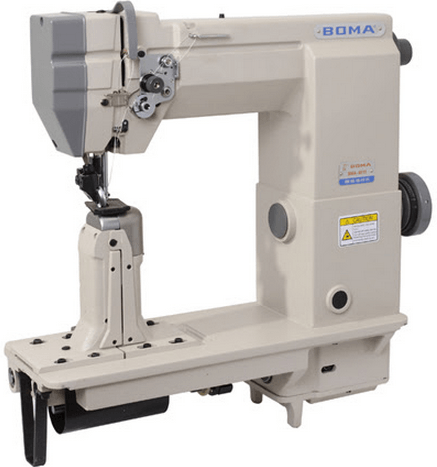
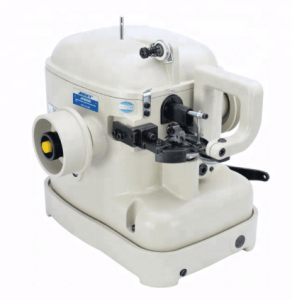
The sewing machines come in many types: post, long arm, short arm, etc. The stitching line will have hundreds of these machines, the amount depending on the complexity of the shoe design. The style of the machine will also change to fit the specific operations required to make each shoe design.
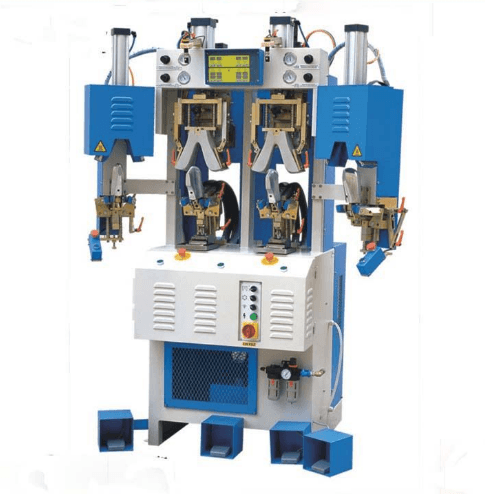
Once the stitching is finished, it is time to set the shape of the toe box and heel counters. These machines heat the thermoplastic counters inside the toe and heel, then clamp the shoe to set the shape.
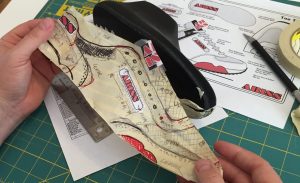
With the upper almost complete, we will need a special sewing machine to finish it. The Strobel sewing machine was invented by a guy named…you guessed it… Strobel! This machine is used to sew the bottom fabric onto the upper, closing it. The fabric bottom or “sock” is marked with alignment lines to ensure the upper is straight and not twisted. Now the upper is ready for lasting and assembly.
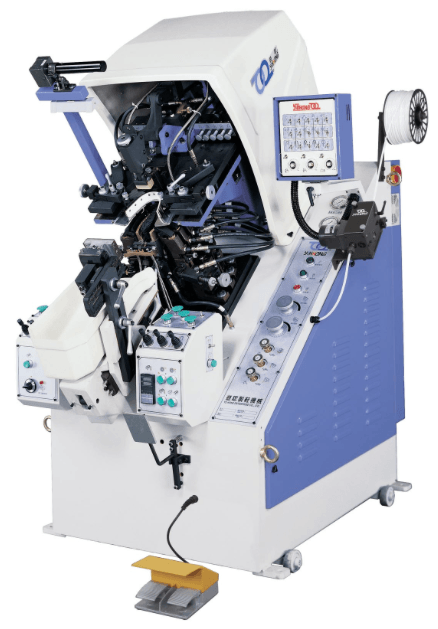
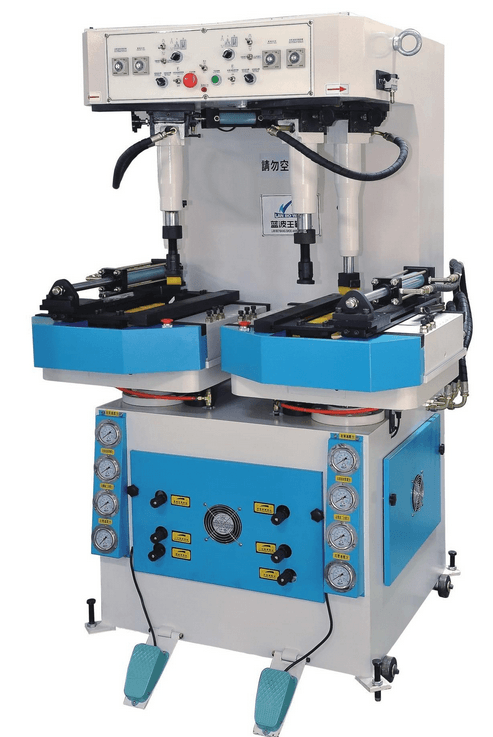
With the shoe ready for assembly, it’s time to bring out the heavy equipment. The basic assembly line is about 100 yards long. On the front of the line, you will find a steamer to soften the shoe uppers, preparing them for lasting. The lasting machines are used to get the uppers pulled down tight onto the shoe lasts.
The toe-lasting machine is the centerpiece of the lasting equipment. This machine takes hold of the upper and physically pulls it down around the last. The machine simultaneously pulls the upper into place while injecting hot glue to fix the uppers into place on the last. Once the toe lasting is complete, the waist and heel of the shoe may also be pulled into place by either hand operation or machine processes. Following the lasting operations, the lasted upper is placed into the first of the tunnels on the line. These tunnels are cooling tunnels that shrink the upper down to adhere to the last even tighter.
Footwear Primer and Cement
Now the lasted uppers and outsoles are on the conveyor line together, each receiving two coats each of primer and cement. After each application, the parts are placed back on the line to travel through a heat tunnel to dry the parts.
Once the parts are fully primed and covered with cement it is time to join the parts together. A worker takes the upper and sole in hand, fitting them together. Once the parts are fit, a pressing operation ensures the bonding surfaces are completely in contact.
Outsole pressing
The pressing operation compresses the bottom, sides, and heel of the sole and upper together. To set the bond, the lasted upper with the bottom attached is often placed in a chiller unit. Once out of the chiller unit, the shoe is de-lasted by hand or by machine. Depending on the design of the shoe, there may be just a few operations left. A possible process is for a shoe to receive channel stitching from a special oversized sewing machine that can stitch through the rubber outsole and the entire upper.
Finally, the shoe may pass through a dryer oven and UV light tunnel to ensure there is no possibility of mold growth while the shoe is in transit.
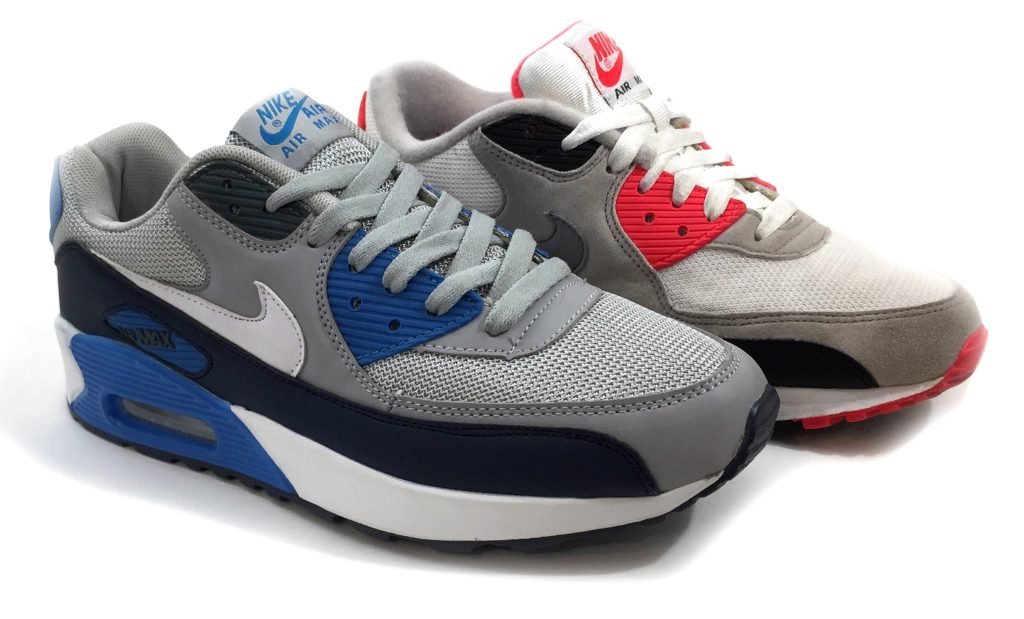
How can you tell if your Nike Air Max 90 shoes are real or fake? We are going to study two pairs of the classic style Air Max 90. One pair is real and made by Nike, the other is a Nike Air Max 90 counterfeit: 100% fake. How can you spot the fake Air Max? What are some of the differences in the real shoe vs. the fake shoe?
Let’s check out a Nike Air Max 90 Counterfeit
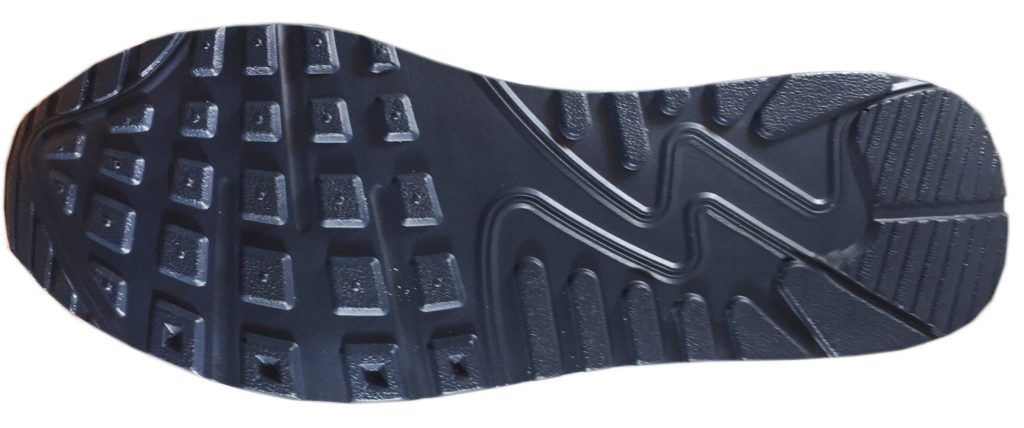
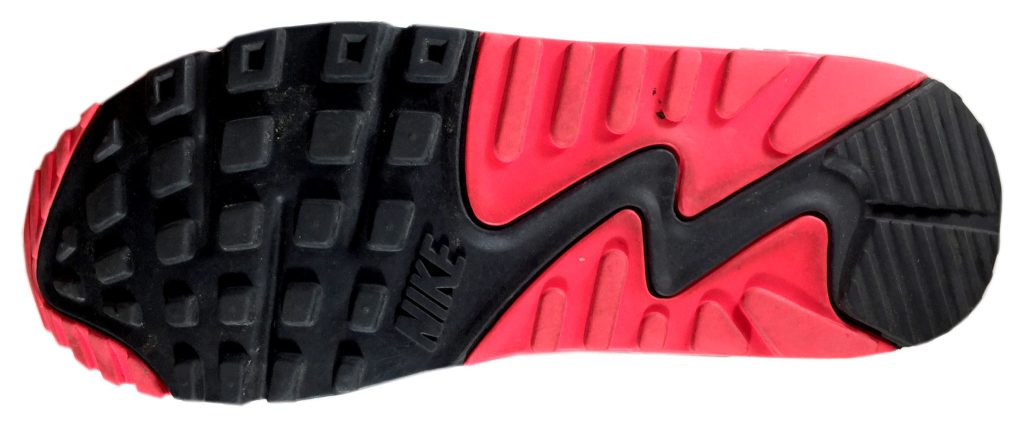
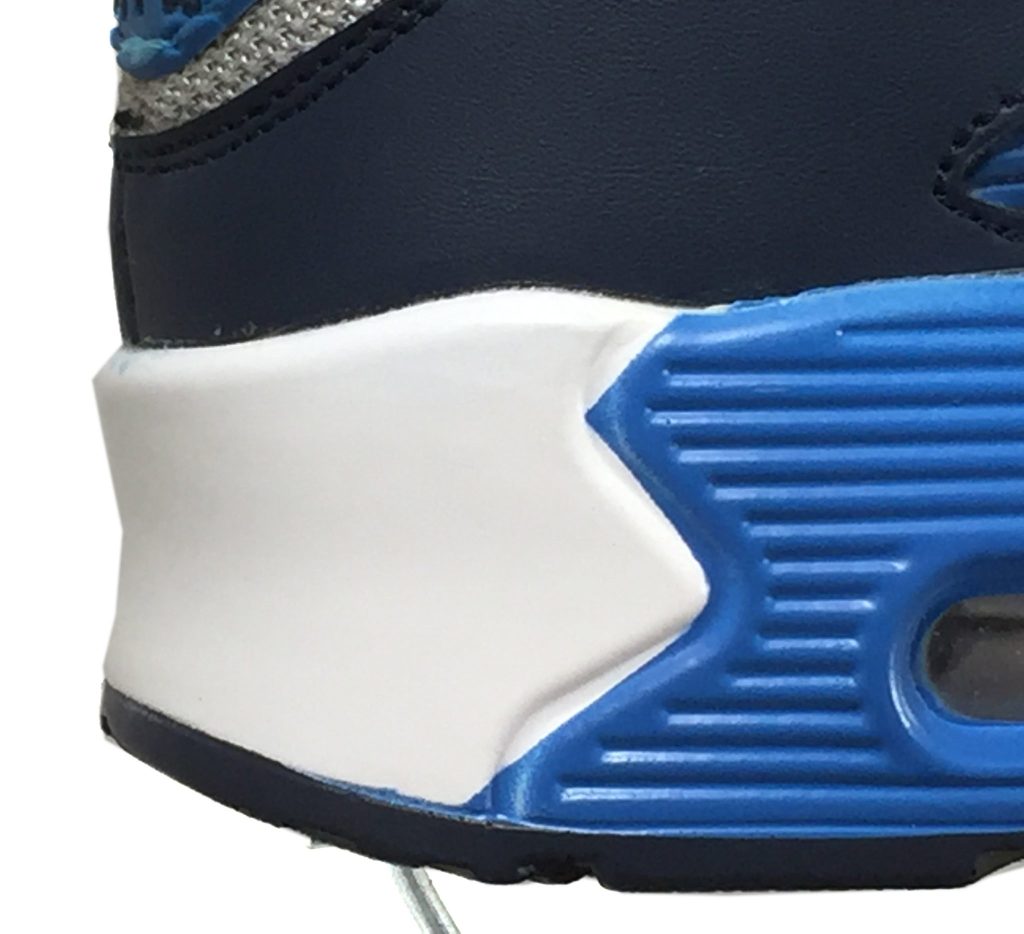
#1. Check out the shoe bottom. The outsole on the red pair of Air Max ’90s is made of rubber while the blue pair’s outsole is made of PU foam that has been painted! I also noticed the blue sneaker weighs much less than the red Nike sneaker. Look closely, the blue shoe is even missing the “Nike” logo. The blue must be the Nike Air Max 90 counterfeit!
That was just too easy! Fakes are made by many fraudulent companies, some are better imitators than others. Let’s look at a few other construction details that will help you tell the difference between the original Nike and the counterfeit Air Max 90.
Fake Painted PU bottom
Real rubber bottom with color breaks
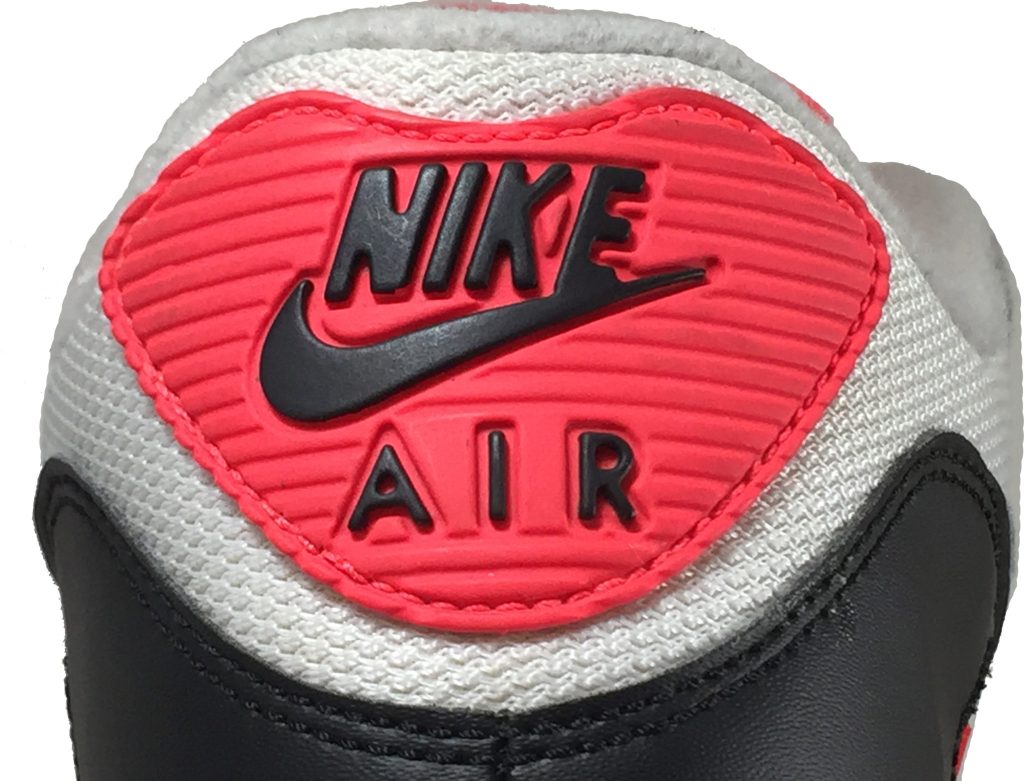
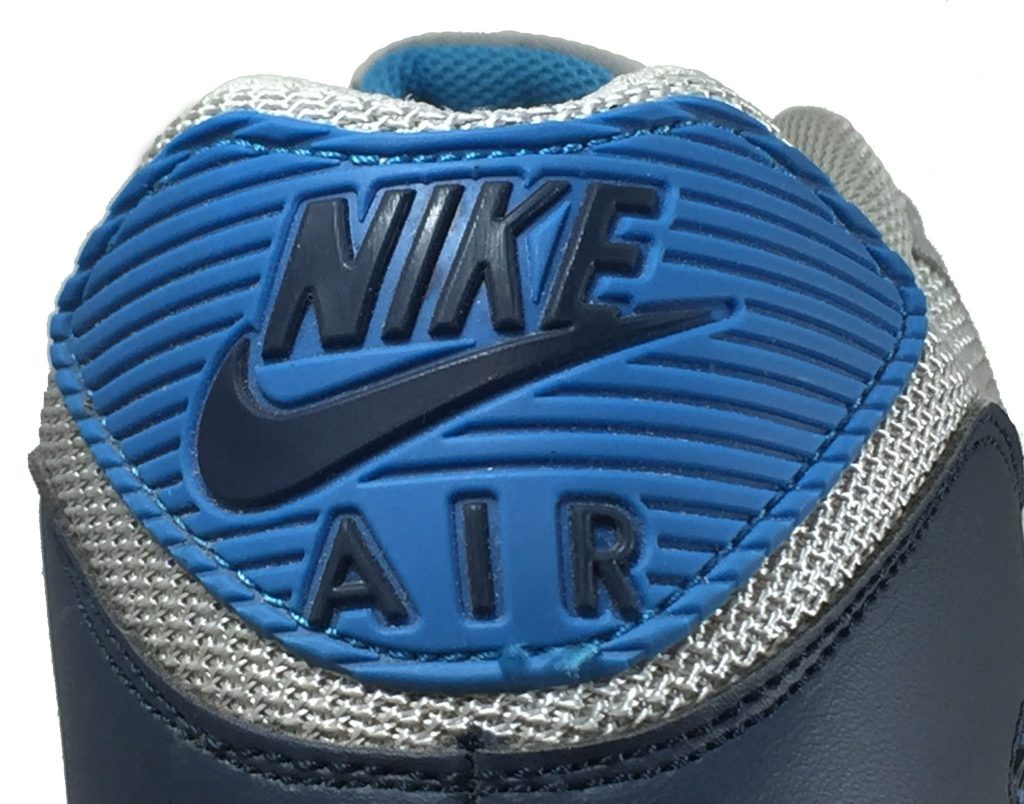
#2. Examine the tongue logo. Our real shoe has the “Nike+Swoosh” label sewn down on all four sides. The fake is turned and stitched into the tongue seam. While this is a nicer way to attach the tongue logo, it’s off from the original Nike construction. Take another look at the artwork. On the real patch, the tail of the swoosh overlaps the “E” of Nike and the head of the swoosh almost touches the “N”. Notice the fake label has the “Air” logo twice.
Fake Nike shoes will have the circle “R” mark on them so that is no evidence the shoe is real or fake. There is nothing to stop the fake shoe factory from adding the “™” logo also.
The Fake Air + Air Max
Nike Air Max real logo
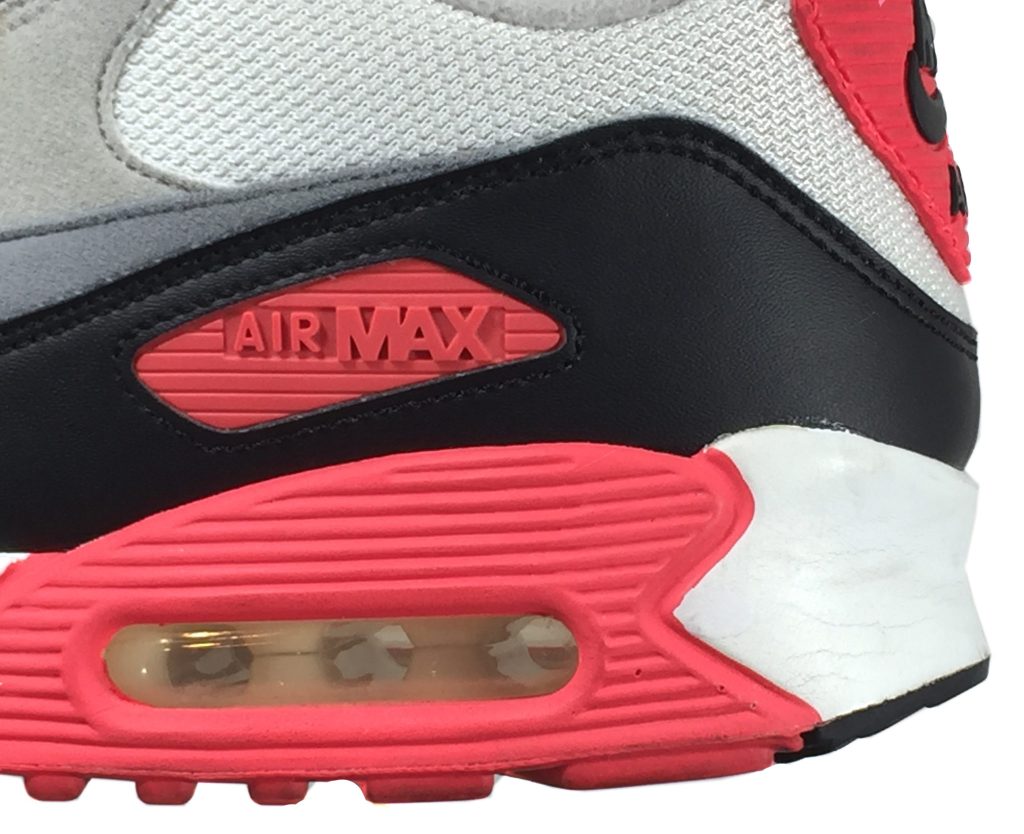
#3. Check out the heel logo. On our fake Air Max 90, the stitching groove interferes with the “A” and the “R” of the Nike Air logo. Also, the counterfeit shoe “Air” logo is missing the molded ribs below the letters. Additionally, the top shape of the OG Nike patch has a significant dip in the middle.
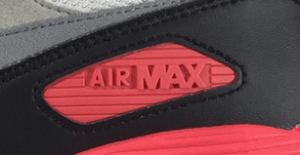
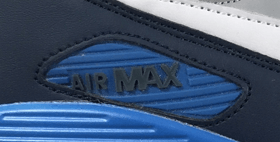
#4. Let’s examine the side “AIR MAX” logo. Our counterfeit Nike has a two-tone logo, while the real deal Nike has a single color. When you feel the logo, the OG Nike Air Max logo is made of stiff plastic, due to its location on the shoe being just above the outsole. The fake logo is a softer material that was distorted during the shoe assembly process. The original logo is made by plastic injection in comparison to the soft PVC logo on the fake shoe.
The real single color logo injection
The fake rubber two color logo
#5. Check out the paint around the airbag in the heel. While the Air Max original paintwork isn’t perfect, the fake Nike paintwork is a mess with paint outside the lines.
Messing paint on the fake
The real Nike’s paint is just okay…
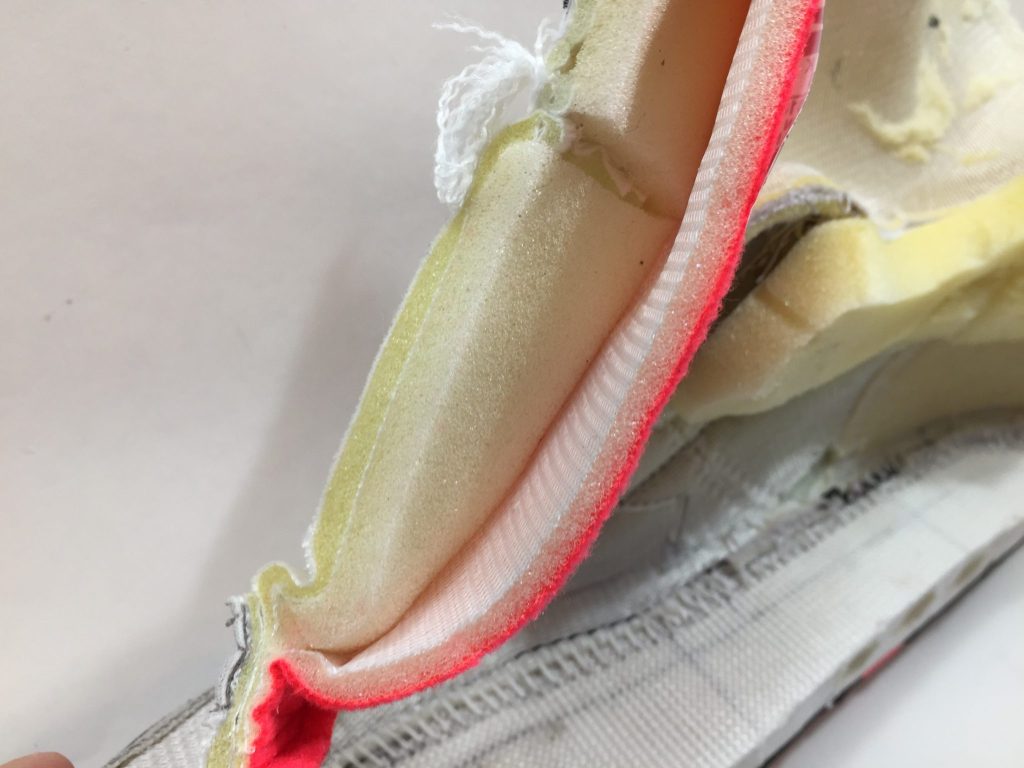
#6. Look inside at the footbed. The original Nike shoe has a 3D compression molded EVA footbed with the outsole design pattern and printed logo. The counterfeit Air Max 90 has a super cheap die-cut foam sheet.
Let’s look inside a Nike Air Max 90 Counterfeit
Real Nike PU midsole
Fake Nike PU midsole
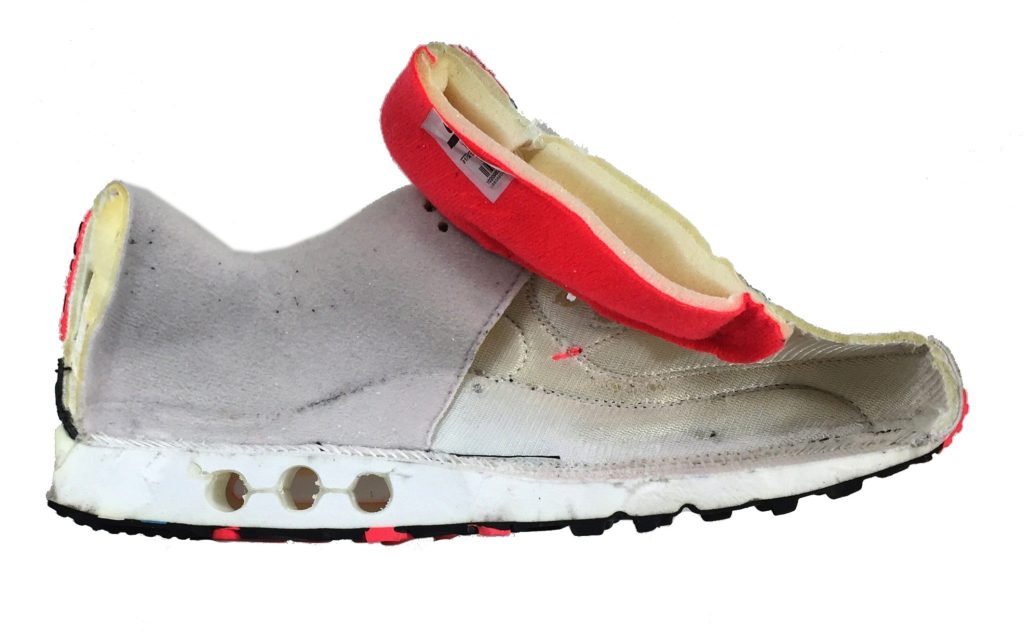
Some of you may be saddened by this next step, this is when we get out the knives and take a look inside the real Nike vs. the counterfeit Nike Air Max 90. This is a good time to look at the Bar code and SKU numbers. Every pair of real Nike shoes has an SKU (SKU (pronounced “skew”), short for Stock Keeping Number) that is identical to the SKU number on their box. If the numbers are missing or do not match, you may have a fake shoe. Check the tongue label. Often, the counterfeiting shoe factory will put outdated sizing labels on the inside of the shoe.
Real Nike with padded tongue
Fake Nike
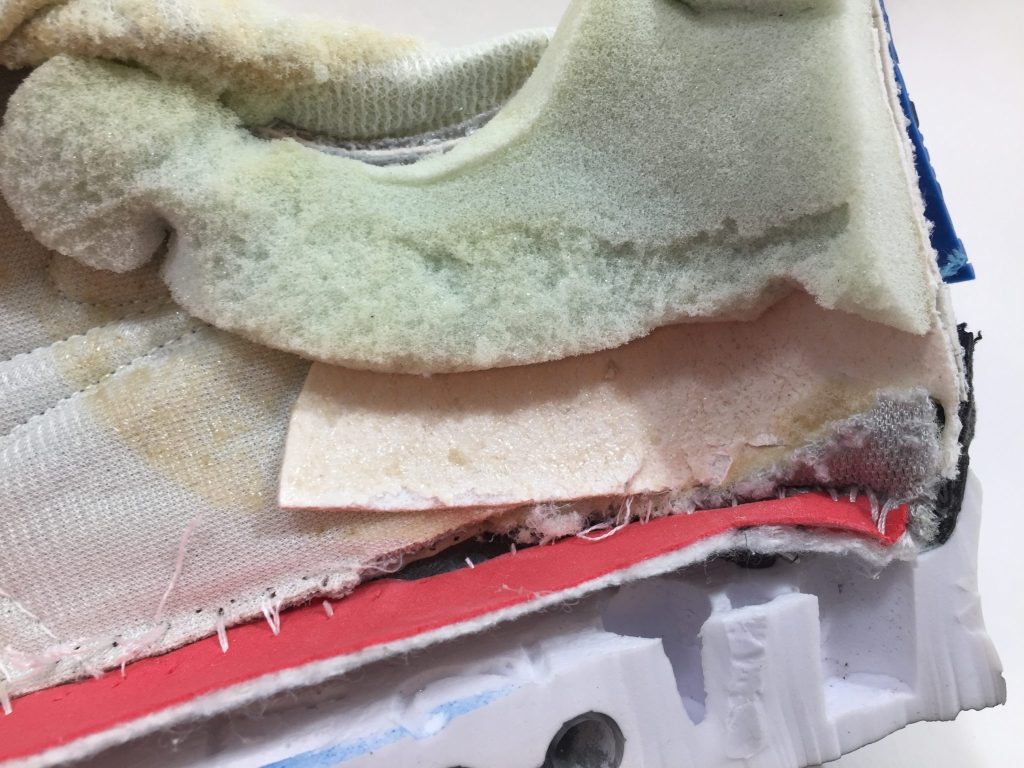
#7. Let’s feel the tongue of the shoe. Inside the OG Nike, you find an extra layer of foam that’s missing from the fake shoe.
Real Nike
Counterfeit Nike
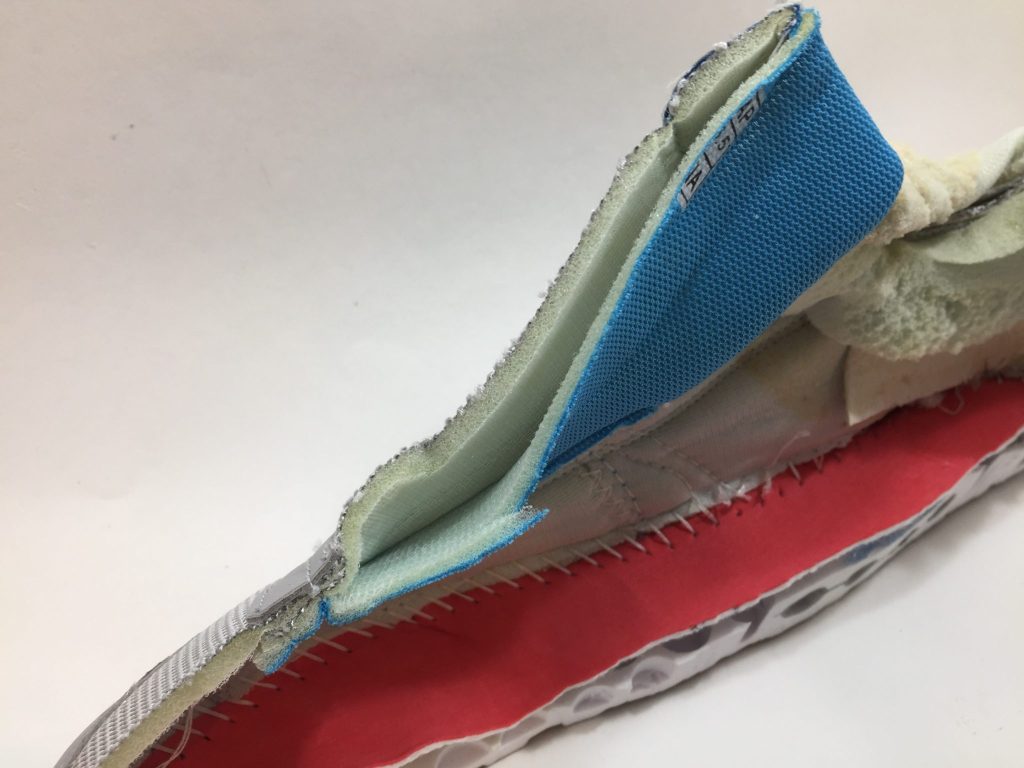
#8. Let’s look at the upper reinforcements. The authentic Nike has grey non-woven “super tuff” fabric backing the top eyelet holes. The fake Nike does not have any reinforcement.
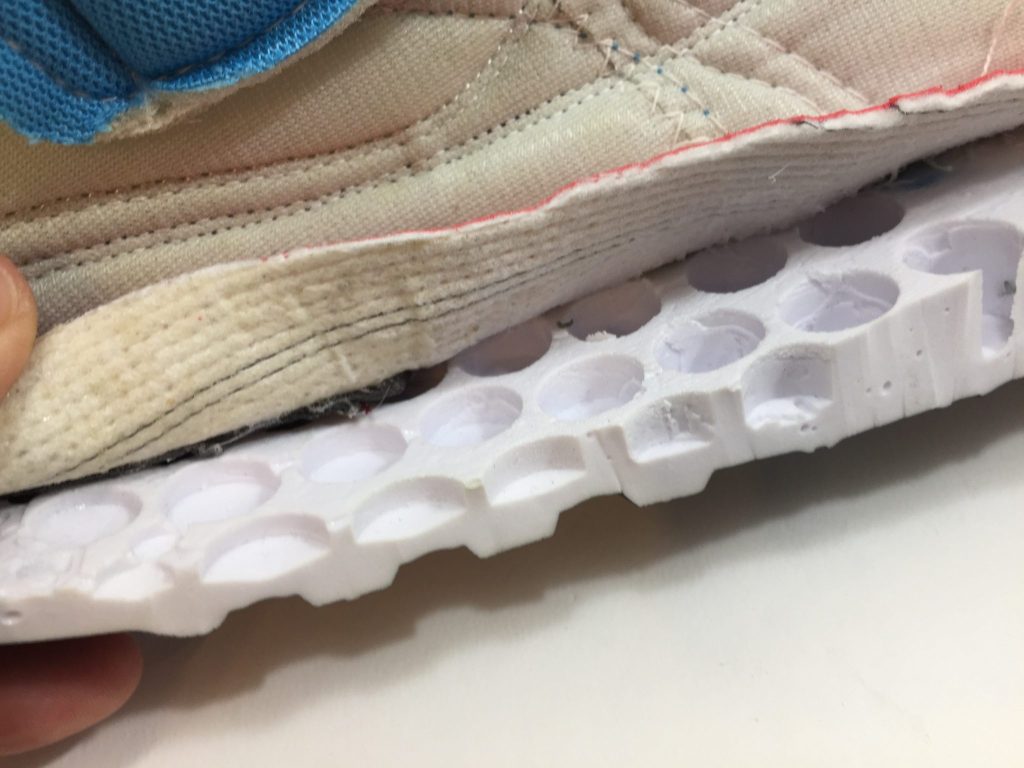
#9. Let’s compare the midsole construction of the two shoes.
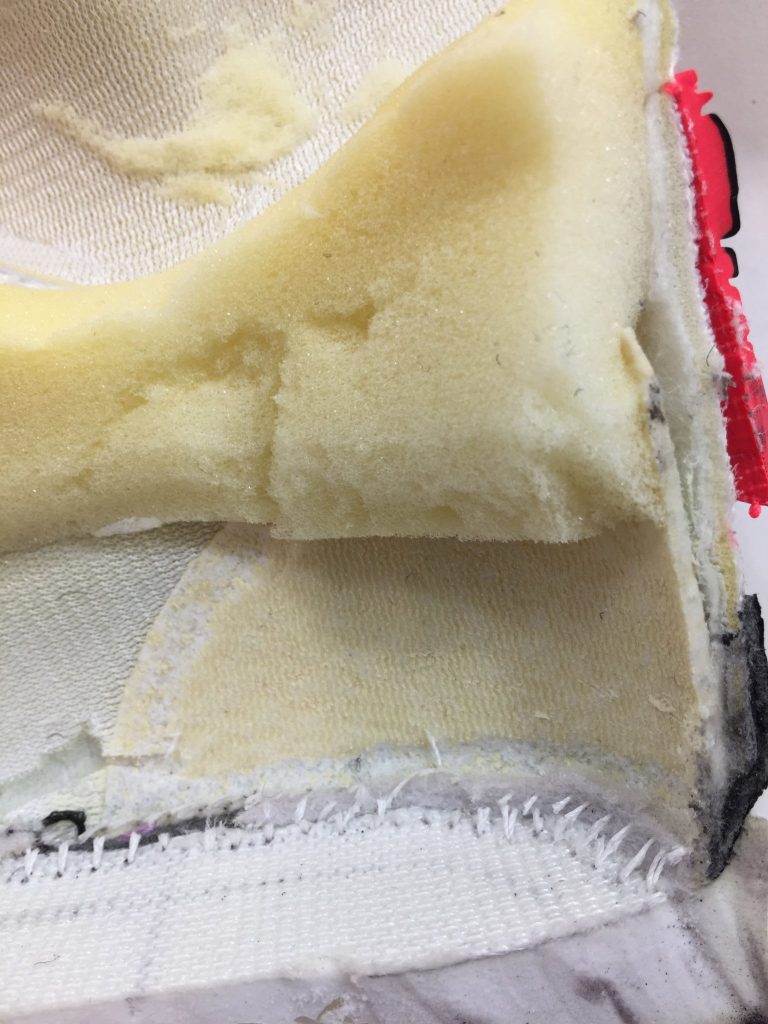
“Nike” PU foam Midsole (fake)
The real Nike midsole is made of supple, solid, but flexible PU foam. The fake Nike is cored out to save material and allow the cheap, stiff PU to bend. Look at the Strobel bottoms. The official Nike Strobel sock is well bonded to the midsole while the fake is barely glued at all!
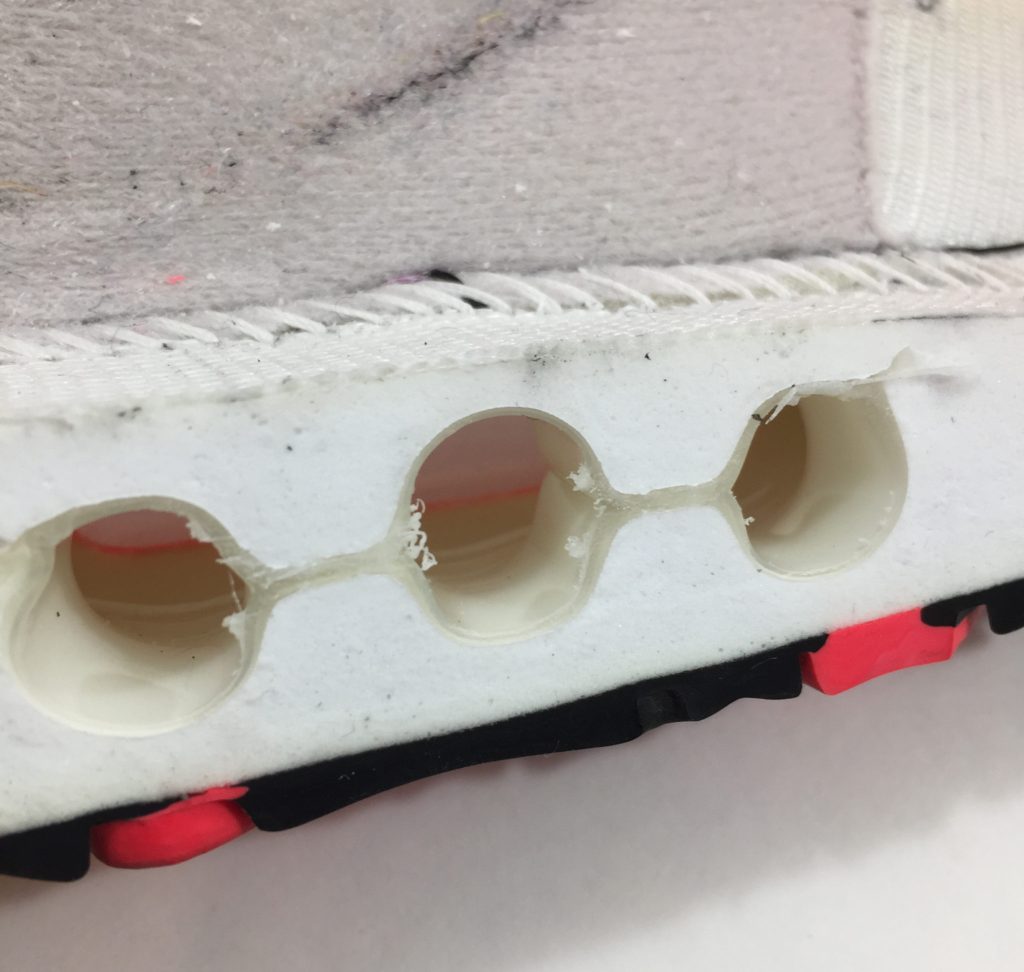
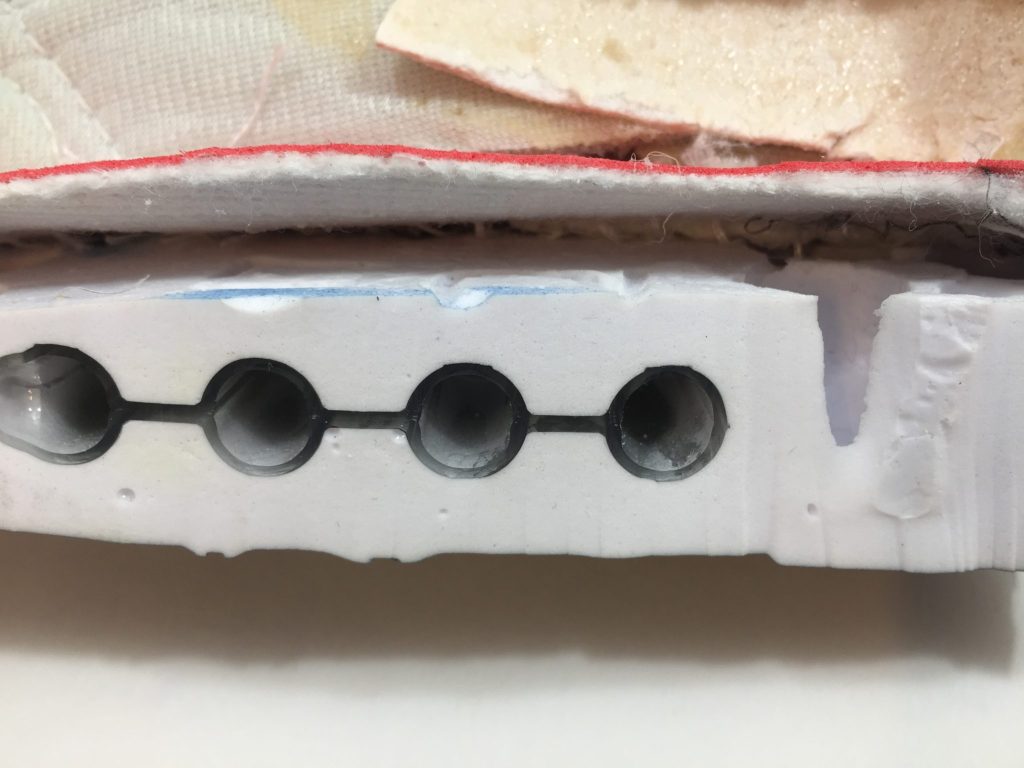
Real TPU Air Bag
Fake PVC air Bag
#10. While we are looking at the midsole, let’s examine the airbag. The OG Nike shoe has a thin film blow molded airbag with 3 cells. The fake Nike has a thicker walled, stiffer airbag. Notice the different colors of the airbag materials. Nike uses a special formula to help hold the air in, which creates a yellow tint. The fake is made of clear PVC plastic.
Real
Fake
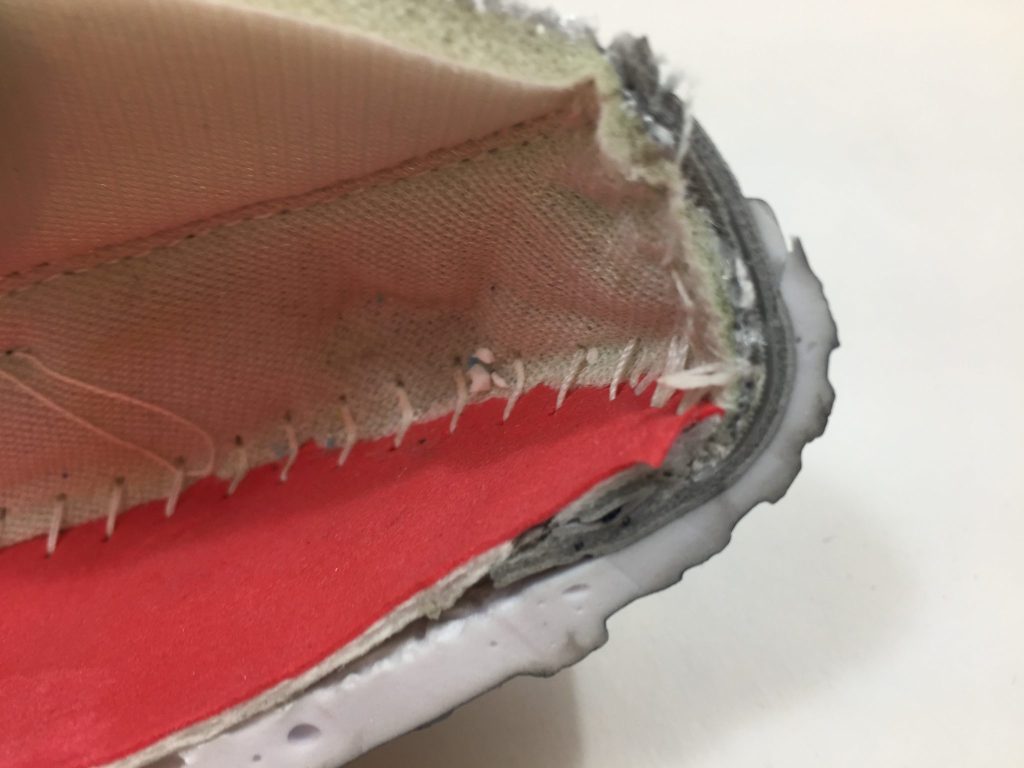
#11. Now, peel back the lining to reveal a few more differences between the real and fake shoe. While both shoes use a similar plastic infused paperboard for the heel counter, you can see the fake one does not fit well and the edges have not been skived down. Look at the midsole heel of the fake – what a mess!
#12. Look at the toe tip area inside the shoe.
The fake shoe was not carefully made and the toe lasting operation has left a junk show inside. Look at the spacing of the Strobel stitches that hold the upper to the bottom. The original Nike shoe has even, closely spaced stitches, while the copy has loose, uneven, and widely spaced stitches.
In this case, our Nike Air Max 90 counterfeit is really a rotten shoe, you can see that not only are the design details of the fake incorrect, the internal construction is really terrible. So, while the fake shoe may look pretty good on the outside, the inside is a horror show of low-quality shoemaking.
When shopping for shoes, especially classic Nike sneakers, do your research. If the price looks too good to be true, or the store looks suspect, then you may be looking at counterfeit shoes.
Nike Air Jordan Counterfeit vs. Real
Next, we have two pairs of the Air Jordan 1 and are going to spend time dissecting and researching what is behind the real Nike model, to contrast with a fake shoe imported from Southern China. This fake is of much higher quality than the Air Max 90 we found here, and can be used to teach about many more aspects of well designed Nike shoes that can be looked for to spot the difference between real and fake shoes.
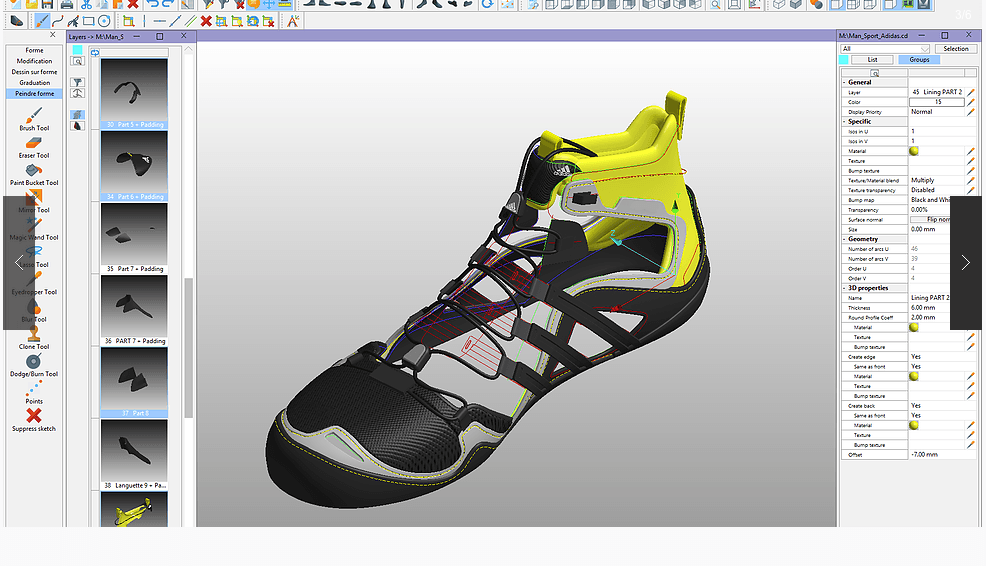
For shoe designers and developers, the future of footwear development will be driven by F.I.T., Footwear Information Technology. The next generation of shoe design and development software is taking shape in the newest version of RCS, Romans CAD software. Advanced Footwear Information Technology is the very heart of the Romans CAD software.
What is Footwear Information Technology?
Footwear Information Technology, or FIT, is a suite of design and development tools that allow the entire process of footwear creation to flow seamlessly from pen to production as quickly as possible. The Romans CAD software tools create an environment where the designers’ 3D creative work feeds directly into 2D pattern cutting, costing, and production management modules. This system presents the 3D last, 2D pattern, and pre-costing information directly to the production partner.
With the Romans CAD 3D design spaces and unique material library technology, the designer can see the product rendering and cost change in real time. The principle of FAST FASHION is the key to success in the modern footwear marketplace.
FAST FASHION will revolutionize footwear development
The traditional design, development, pre-production, sales, and production cycle can take 22 months! With a modern CAD system like RCS equipped with Footwear Information Technology tools, this 22-month cycle can be drastically reduced. The designer can create a shoe, estimate the cost, and show a full-color 3D printed model in days instead of weeks. The entire cycle can be cut from 22 months to 6 months or less!
How does it work?
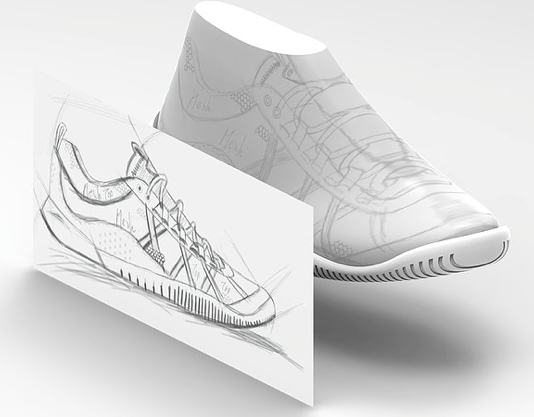
The Romans CAD software suite of tools starts with the RCS 3D last development tool. This 3D last data allows the designer’s simple sketch to be converted directly into useful pattern data. RCS 3D last development tools support 3D last creation, scanned 3D and 2D data imports, and most critically, accurate computer grading.
3D Design Tools
The Romans CAD 3D design tools allow designers to work quickly and create designs in real time in a 3D environment. Importing tools allow hand sketches to be built in 3D without years of CAD training. These powerful tools allow the designer to create full-color 3D renderings and 3D prints for internal samples review or sales calls.
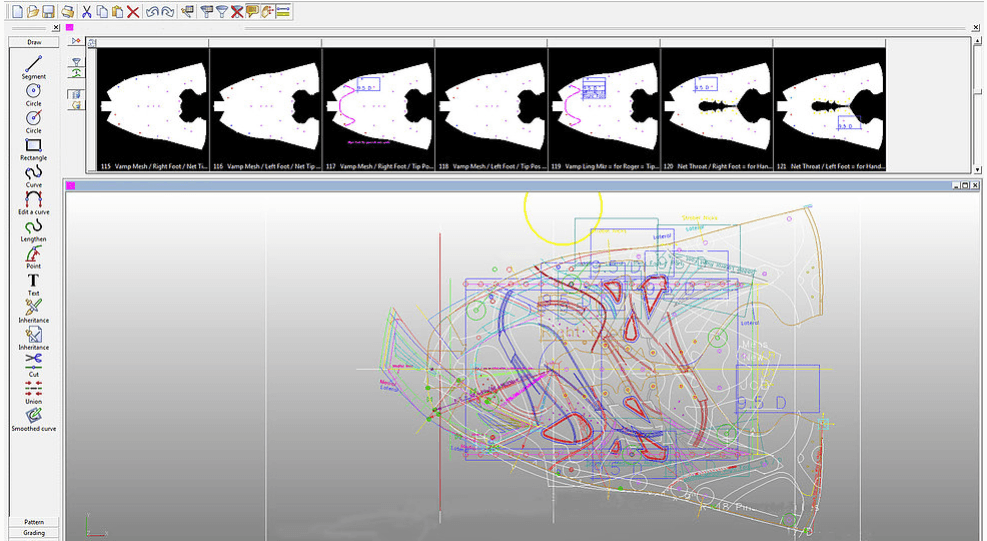
2D Design Tools
The Romans CAD 2D design system pulls the 3D design data directly into a suite of costing and production cutting tools. Costing, grading, and cutting can be completed in hours instead of days.
RCS Data Management
The RCS data management PDM tool is where FAST FASHION becomes a reality. These product line management tools store all the design and product data in one system. This data is organized and accessible to the designer, developer, product line manager, business managers, and even overseas production staff.
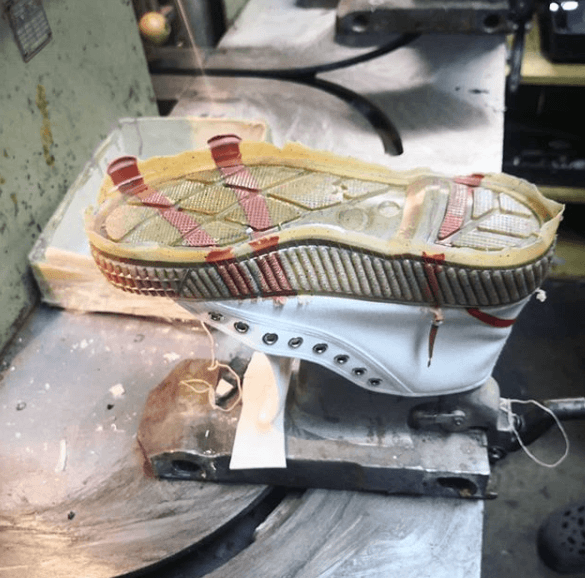
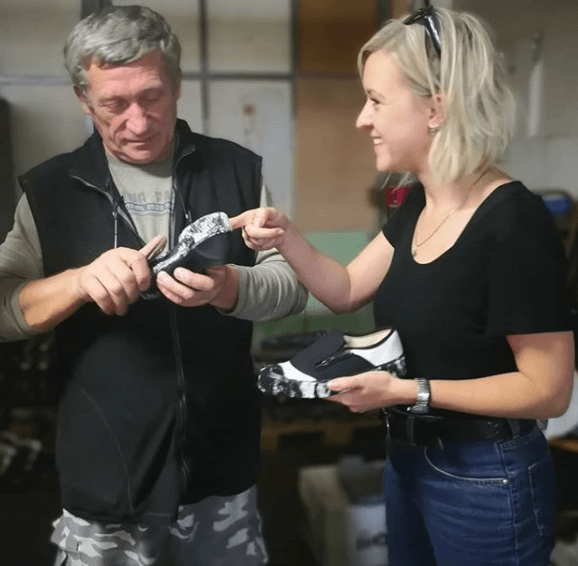
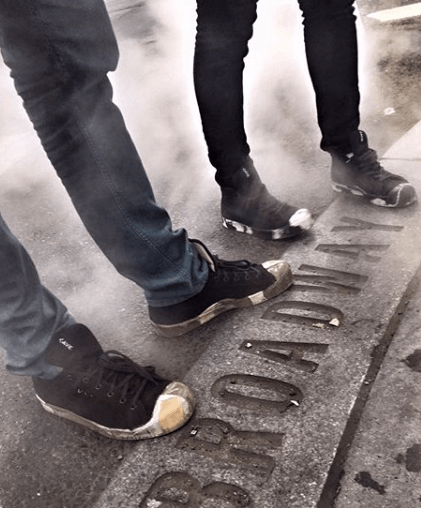
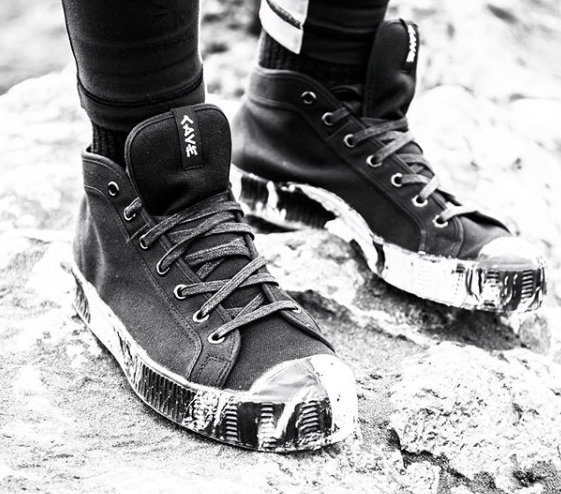
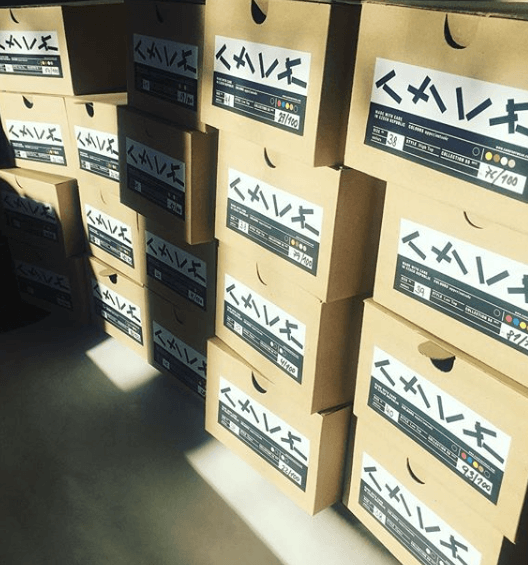
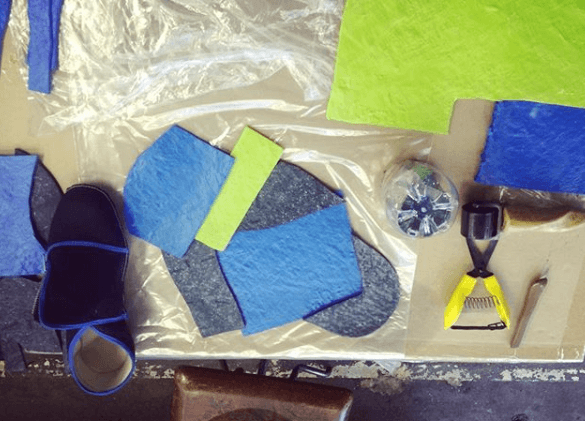
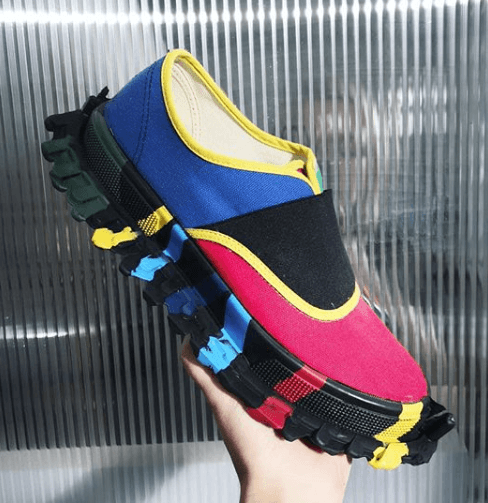
Today I want to introduce you to my friend Eva from the Czech Republic. She has created a remarkable new footwear brand that combines vintage shoe mass production technology with modern styling and adds a new twist to the eco friendly sustainability movement. Her brand is called Kave. The shoes are awesome, the classic vulcanized styles are retro cool, and Eva’s marketing reveals her unique and creative shoemaking personality! Check out Kave Footwear!
About Kave Footwear
KAVE is a new creative platform that aims to change the footwear industry from the inside out by using only existing materials, tools and machinery to create fabulously surprising, yet wearable designs that have a much smaller ecological footprint.
Our world is filled with products that we don’t need but nevertheless we are still producing more and more. This is causing problems in society and nature. The start of new production requires a lot of energy, material and time. Lots of items are transported from various parts of the world and ecological footprint is growing. There are fully equipped factories all around the world so why create new equipment? Let’s use what we have in an innovative way. It is time to start thinking about design differently.
Vulcanized Construction
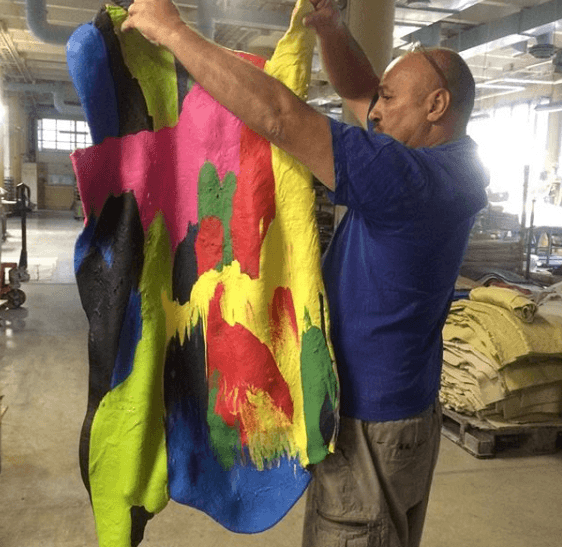
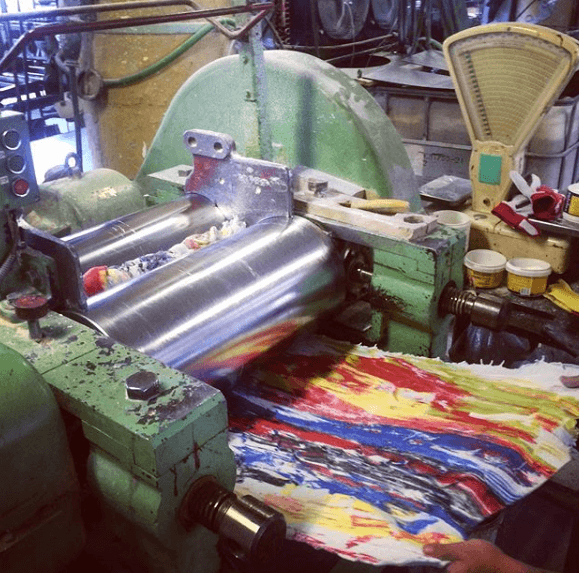
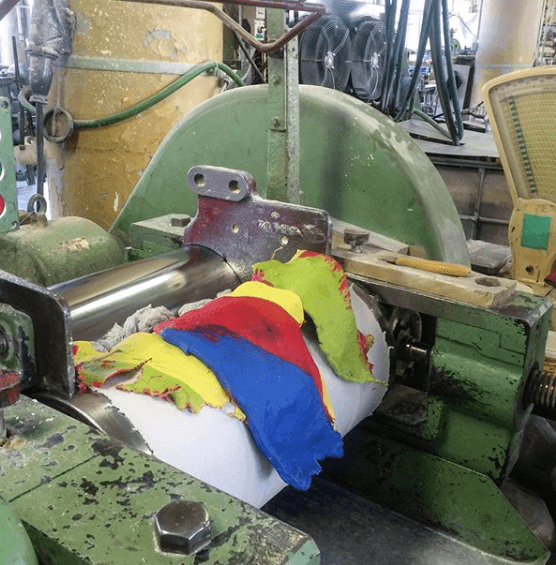
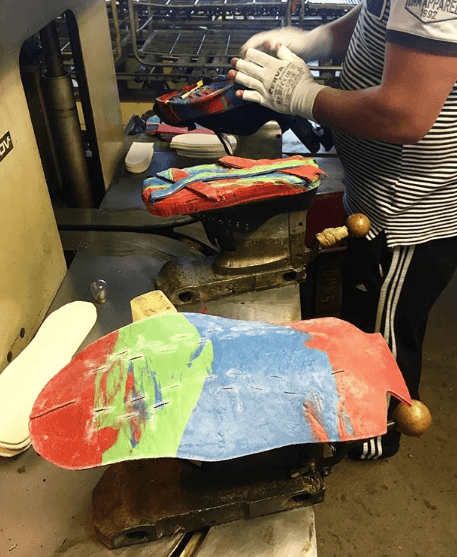
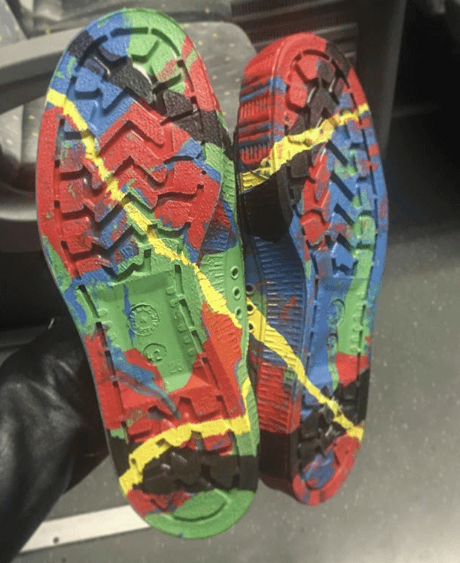
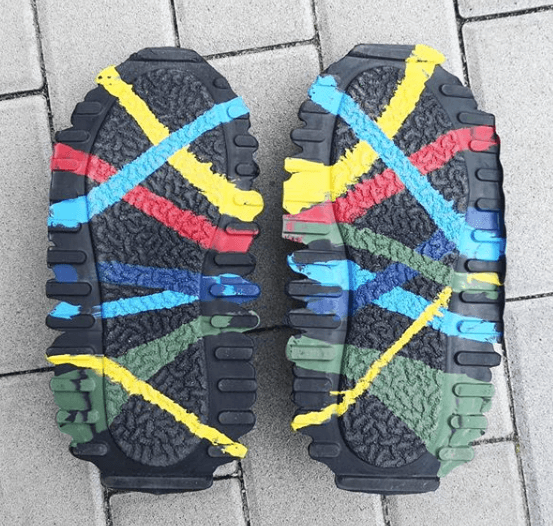
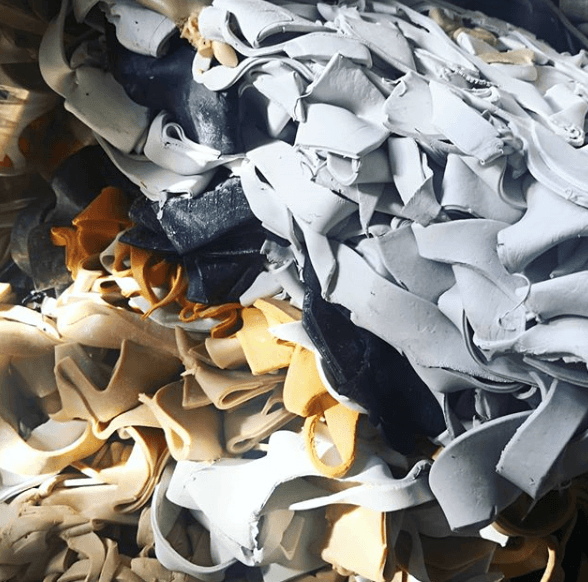
Kave shoes are made in small runs 100 pairs of each design. Each run is unique, based on the materials available in the factory when Eva arrives. The upper designs and colors are created on the fly with extra materials that would have normally been sent to a landfill. Kave is putting useless material leftovers to work by making functional fashionable footwear!
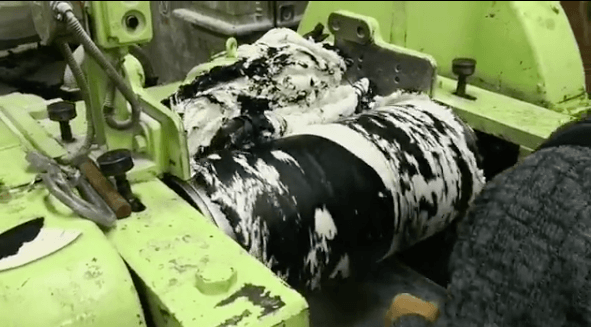
Kave footwear is made using a direct attach vulcanizing process. The uppers are prepared on a sturdy metal last, bottom up. The rubber sidewalls and bottom are laid on, then clamped in place with a three piece Metal mold. The mold is heated melting the rubber parts together. This is vulcanizing. The extra rubber is then trimmed away.
About Eva
Eva at work
Eva was born in Zlin in Czech Republic. Zlin is the town where the shoe making legend Tomas Bata built in those times the biggest shoe factory in Europe.
Eva’s grandparents worked in this factory their whole lives. She started studying design from tender age of 15. Out of all different sides of design, she found passion in shoes. She learned about their production when she worked as an intern in one of the companies within the Bata factory.
Later when Eva started studying and traveling abroad, with her experience from production in mind she realized the stark contrast between the senseless global movement of goods and the forgotten local production possibilities.
She decided to change this. Today she combines unusual design and traditional technology to create great quality shoes which challenge the view on global shoe production. Visit KaveFootwear.com
The Shoemakers Academy.com is pleased to announce reduced book and pro-pack shipping to Europe and the UK. Our publisher is now offering direct shipping from printing plants in Europe! At the Shoemakers Academy.com our goal is help educate shoemakers not profit off shipping charges. We are passing the shipping reduction directly to you!
Shipping cut from $22.50 to $12.00
Order directly from Shoemakers Academy.com or Amazon
The outsole design for a shoe plays a major factor in shoe performance. The outsoles for running shoes, biker boots, and football cleats all have very different performance requirements and manufacturing methods. The shoe outsole is also one of the most expensive parts of the shoe. For low-cost shoes, the cost of an outsole for a shoe can be 10% of the total cost, second only to the leather cost. For high-end basketball, running, or soccer shoes the outsole can be 25% to 35% of the shoe’s factory price. A simple cupsole may cost $2.00, while a multi-part running sole with carbon shank could cost $8.00 to $10.00.
How are the soles of shoes made?
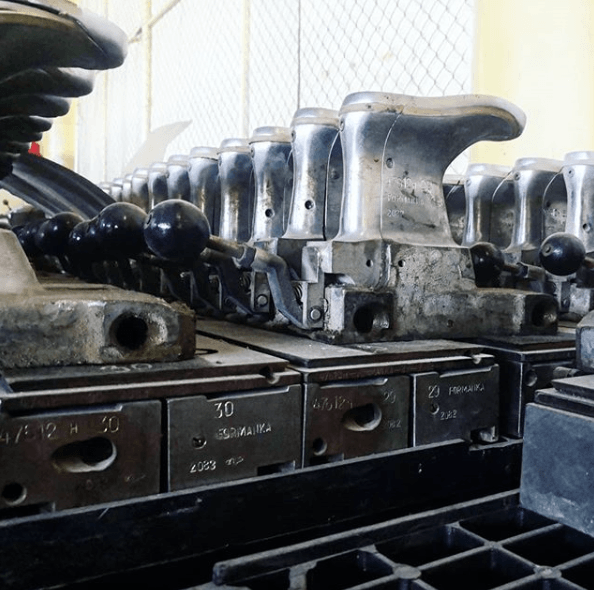
A set of outsole tooling is by far the most expensive equipment needed to produce a shoe. While the cutting dies required to produce a shoe upper may cost $1,000 for a complete size run, a single size of outsole tooling is a minimum of $1,400. Now, multiply that by 14 sizes, and you get $19,600! This is the cost for a simple rubber cupsole.
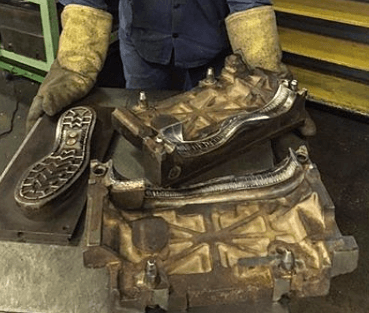
Here is a hot press rubber outsole mold before and after Teflon coating
Shoe Sole Tooling Costs
The cost for a complicated multi-part outsole with a rubber bottom, EVA midsole, and plastic shank plate may cost $100,000! Shoe companies must take great care in designing and developing new outsole tooling. Many shoe companies will only make one size for testing and sales samples. Only after their salesmen collect orders for the new model will the balance of the tooling be made.
I have seen designers and developers work for months to create a new design only to see production canceled before it even begins. When a weak sales report arrives, product managers have difficult choices to make.
Can you risk $100,000 in tooling for a model with just a hope that it will “catch on”? Small shoe companies may be forced to use old tooling on new models until they can afford the cost of new equipment. Outsole design is critically important! The design should know the outsole mold price when thinking about a new outsole design.
The Ultimate Shoe Material Textbook
Start with an in-depth study of material types available for modern shoemaking. Learn the technical details of material specifications. 195 pages and 300 color photos.
Buy Now
on sale $39.99
Outsole Design Performance factors
Performance factors for footwear outsole design includes traction, support, flexibility, weight, slip resistance, and durability. These features are a function of the design geometry and materials.
Shoe Traction
Sole Traction
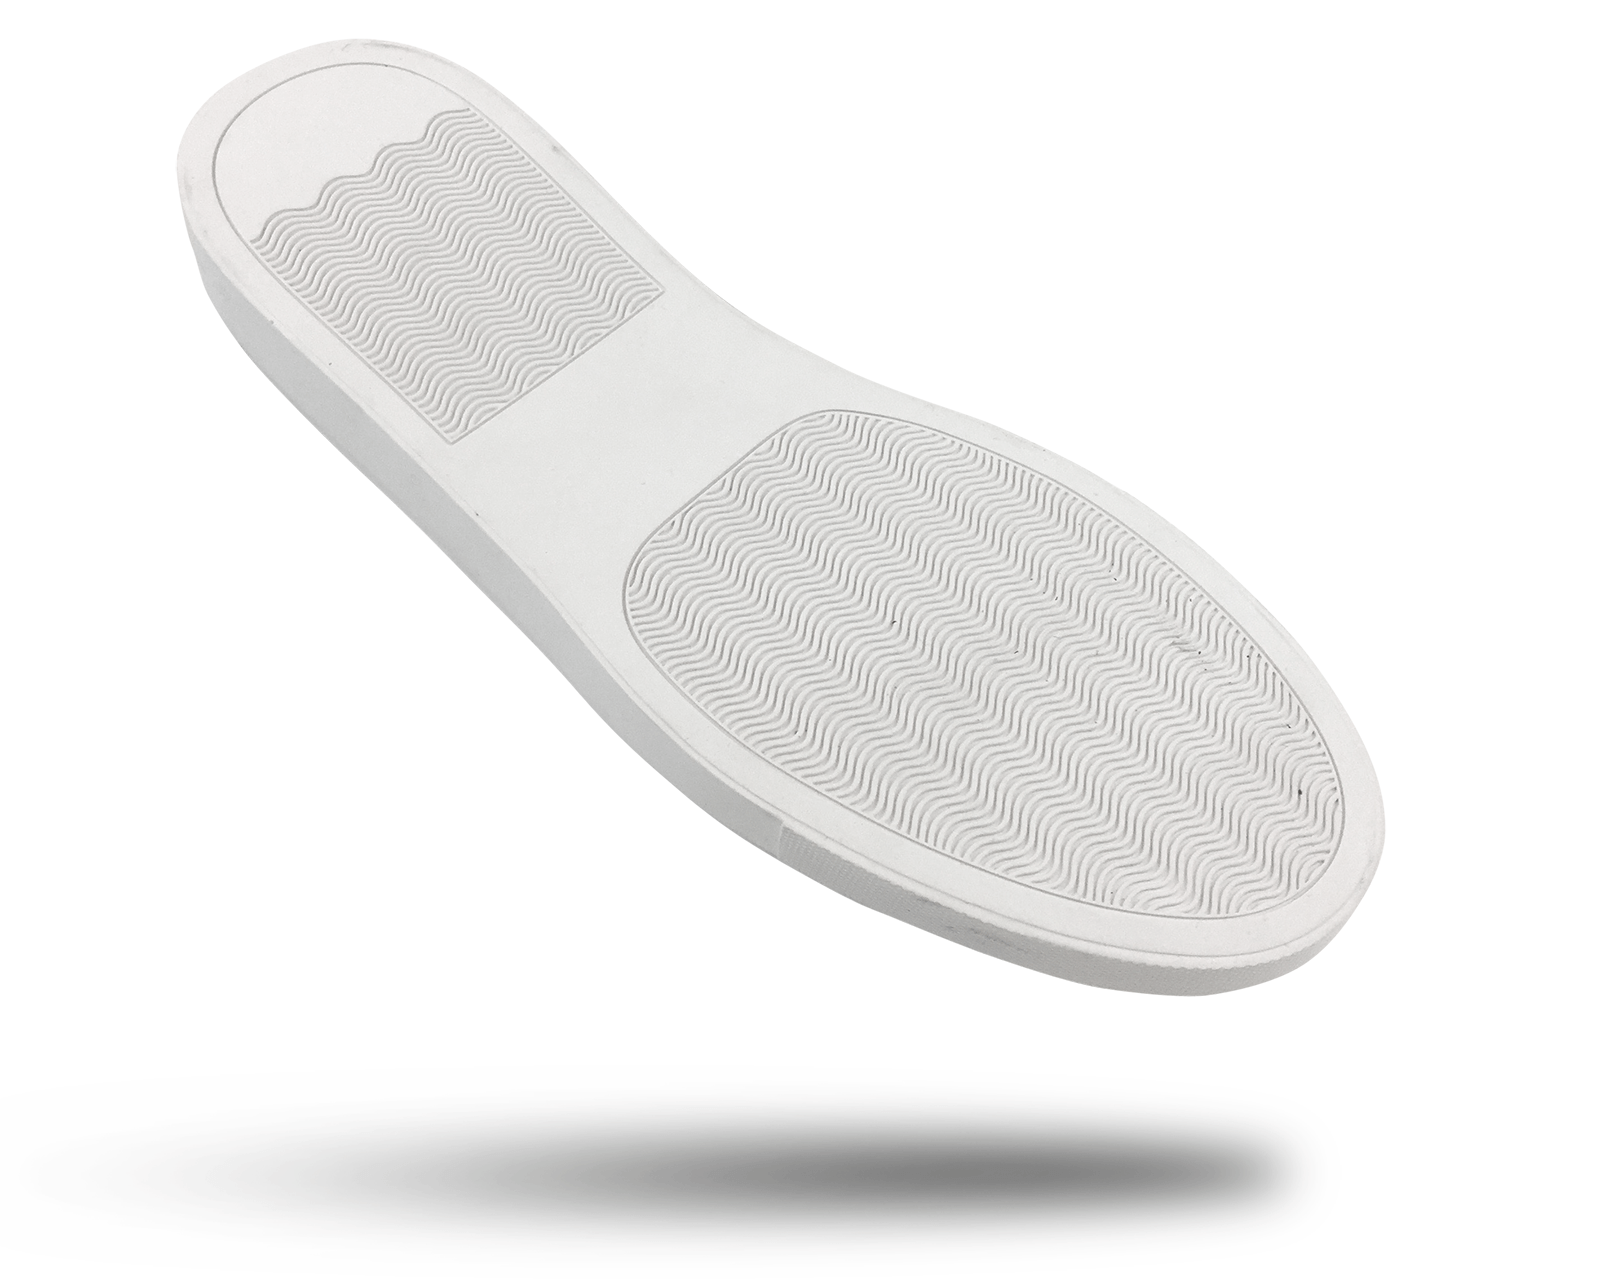
Outsole traction is an important feature of any shoe outsole. The design of the outsole pattern and selection of materials controls the amount of traction. The traction requirements for hiking boots, of office shoes, boat, and bowling shoes are all radically different. When designing an outsole, it is important to understand the environment and surfaces the outsole will encounter. Traction is also directional. A mountaineering boot will require lateral traction on rough terrain, while a basketball sole needs to support quick stops on a smooth wood surface and allow spins with the foot planted.
Foot Support
An outsole design must have some supportive feature to ensure users can walk or run safely. Support can come from wider bases or added components such as molded plastic counters or rubber cup soles. A fast, lightweight running shoe designed for speed may have little support, while a mountaineering boot will have a metal shank to carry the weight of a heavy pack in rough terrain.
Outsole Flexibility
Depending on the intended purpose of the shoe, the midsole will require more or less flexibility. A tennis shoe or running shoe must be flexible, while a cowboy boot will have a steel shank to spread the load of the stirrups without bending at all. While more flexibility is usually a good thing, too much flexibility can cause instability and lead to foot fatigue. The general rule is, the heavier the load and the rougher the terrain, the stiffer the outsole.
Outsole Weight
Again, depending on the intended purpose of the shoe, the weight of the outsole may be a key feature. For a long distance racing shoe or track spike, every gram is critical. For a driving shoe or biker boot, a heavy outsole is not a problem.
Sole Durability
The durability requirements of an outsole will depend on the environment and tasks selected for the particular shoe. The fine leather soles of women’s dress shoes and men’s office shoes are perfect for smooth stone hallways and carpeted of offices, but would last only a few steps on a rainy construction site or mountain trail. Durability can be a selling feature for a shoe but may come at the expense of added weight or reduced flexibility.
Outsole Slip-resistance
Slip resistance is a key feature for many service shoes. Restaurant, hospital, maintenance, and warehouse staff members are required to wear shoes with certified slip-resistant rubber compounds and tread patterns. Oil resistant rubber compounds may also be a requirement for industrial footwear.
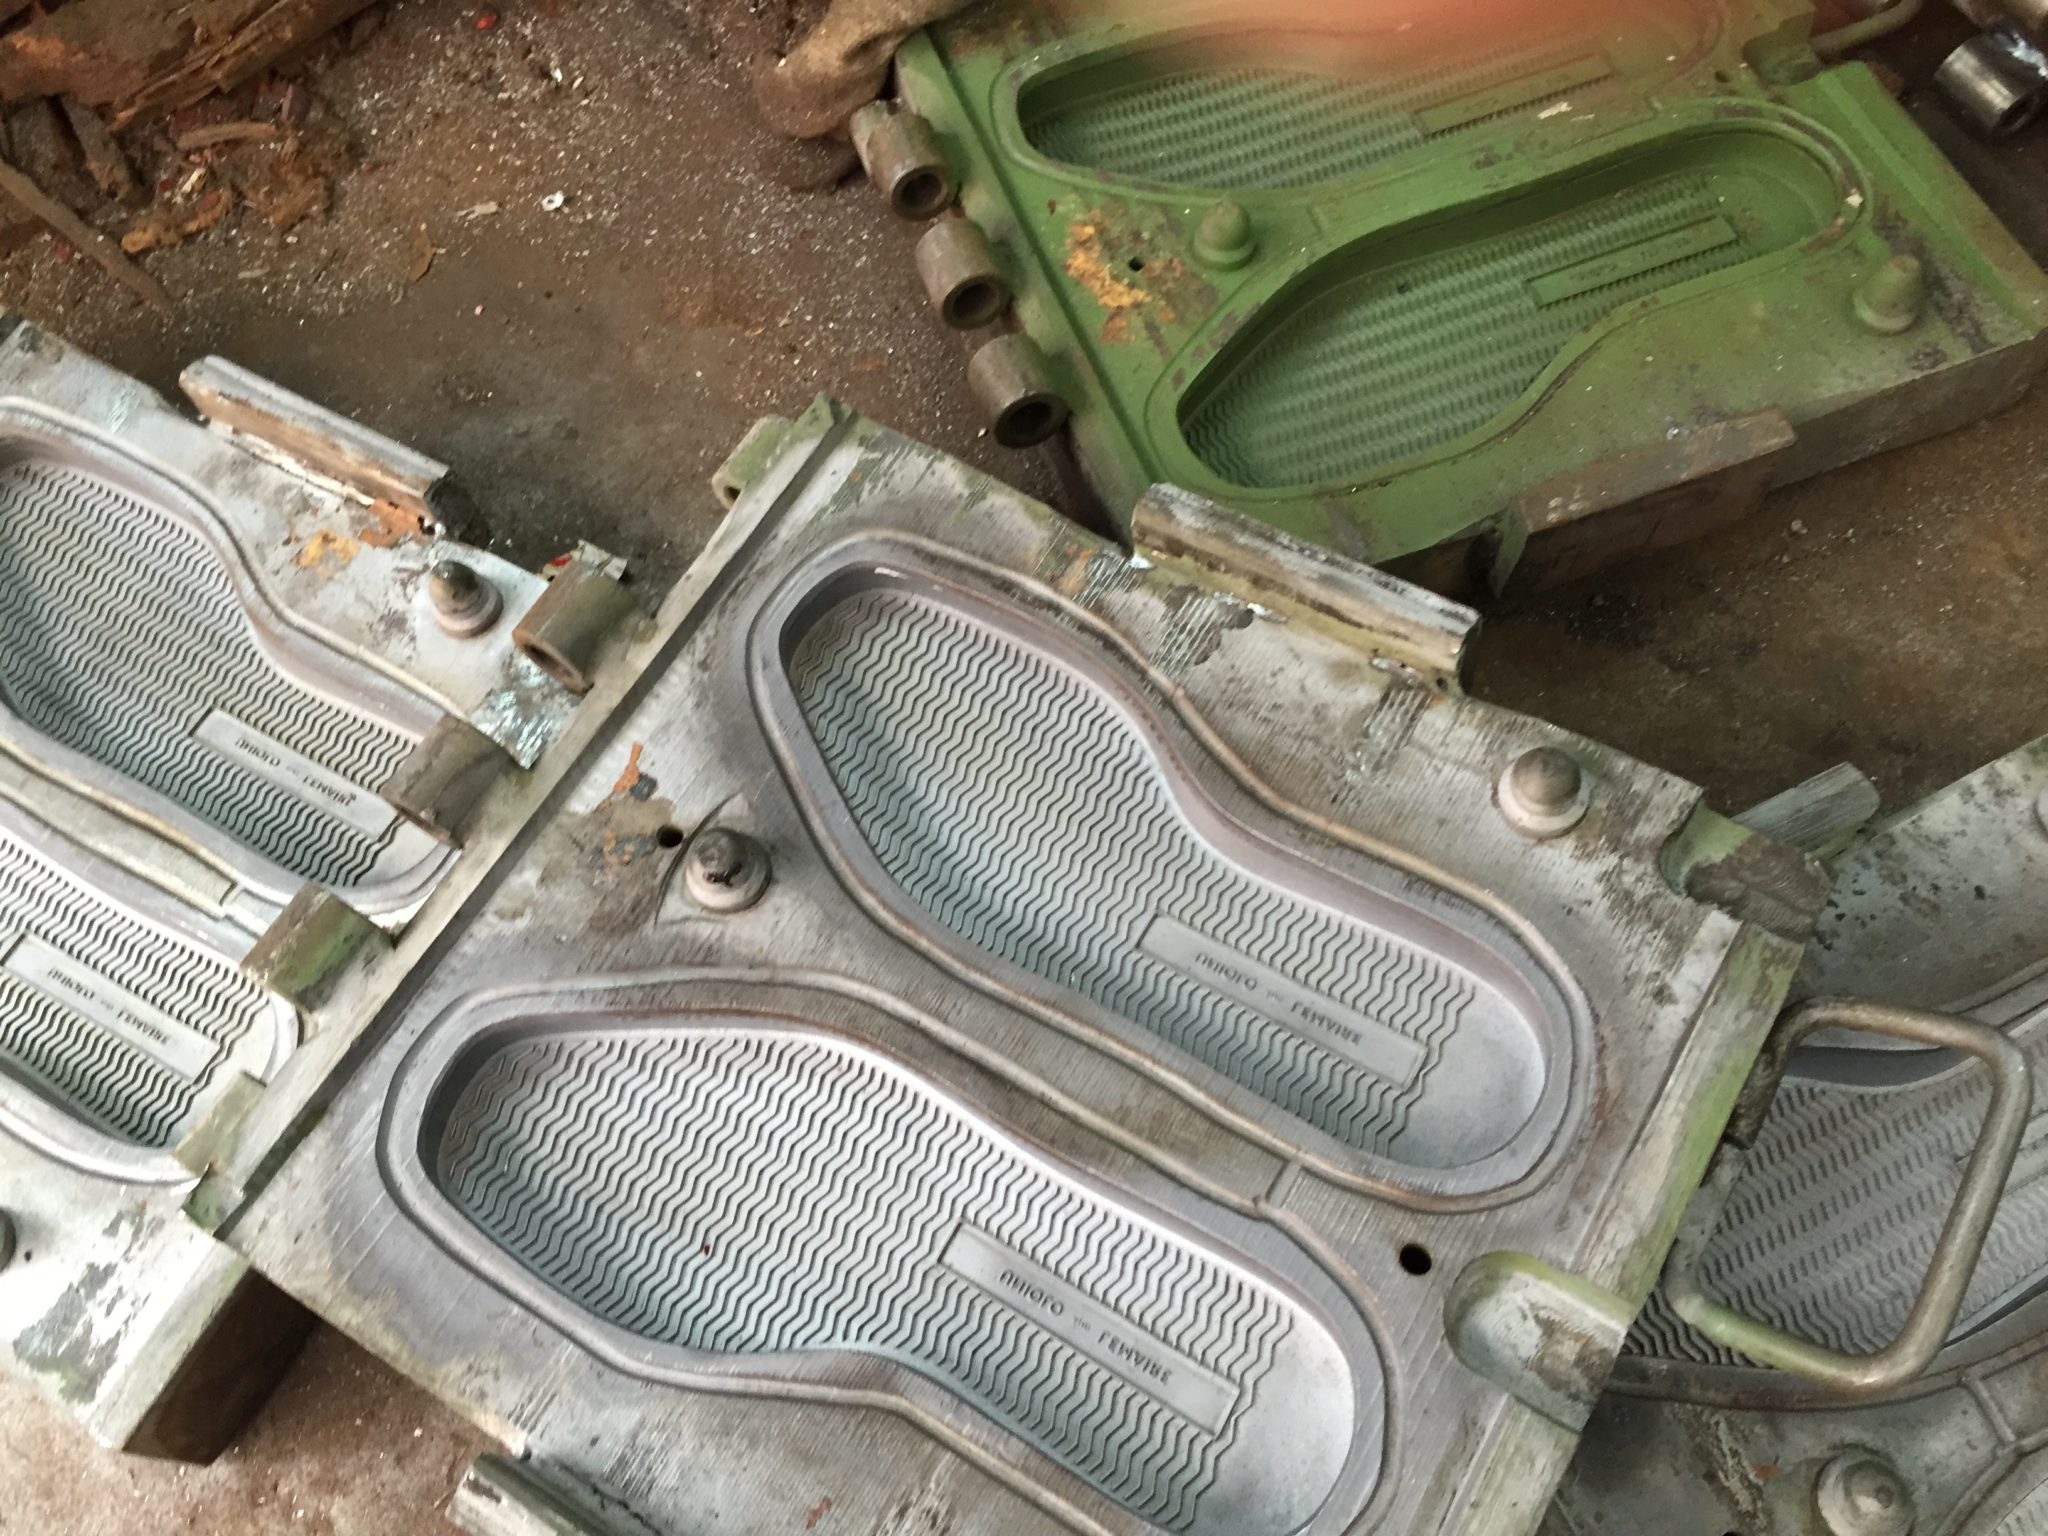
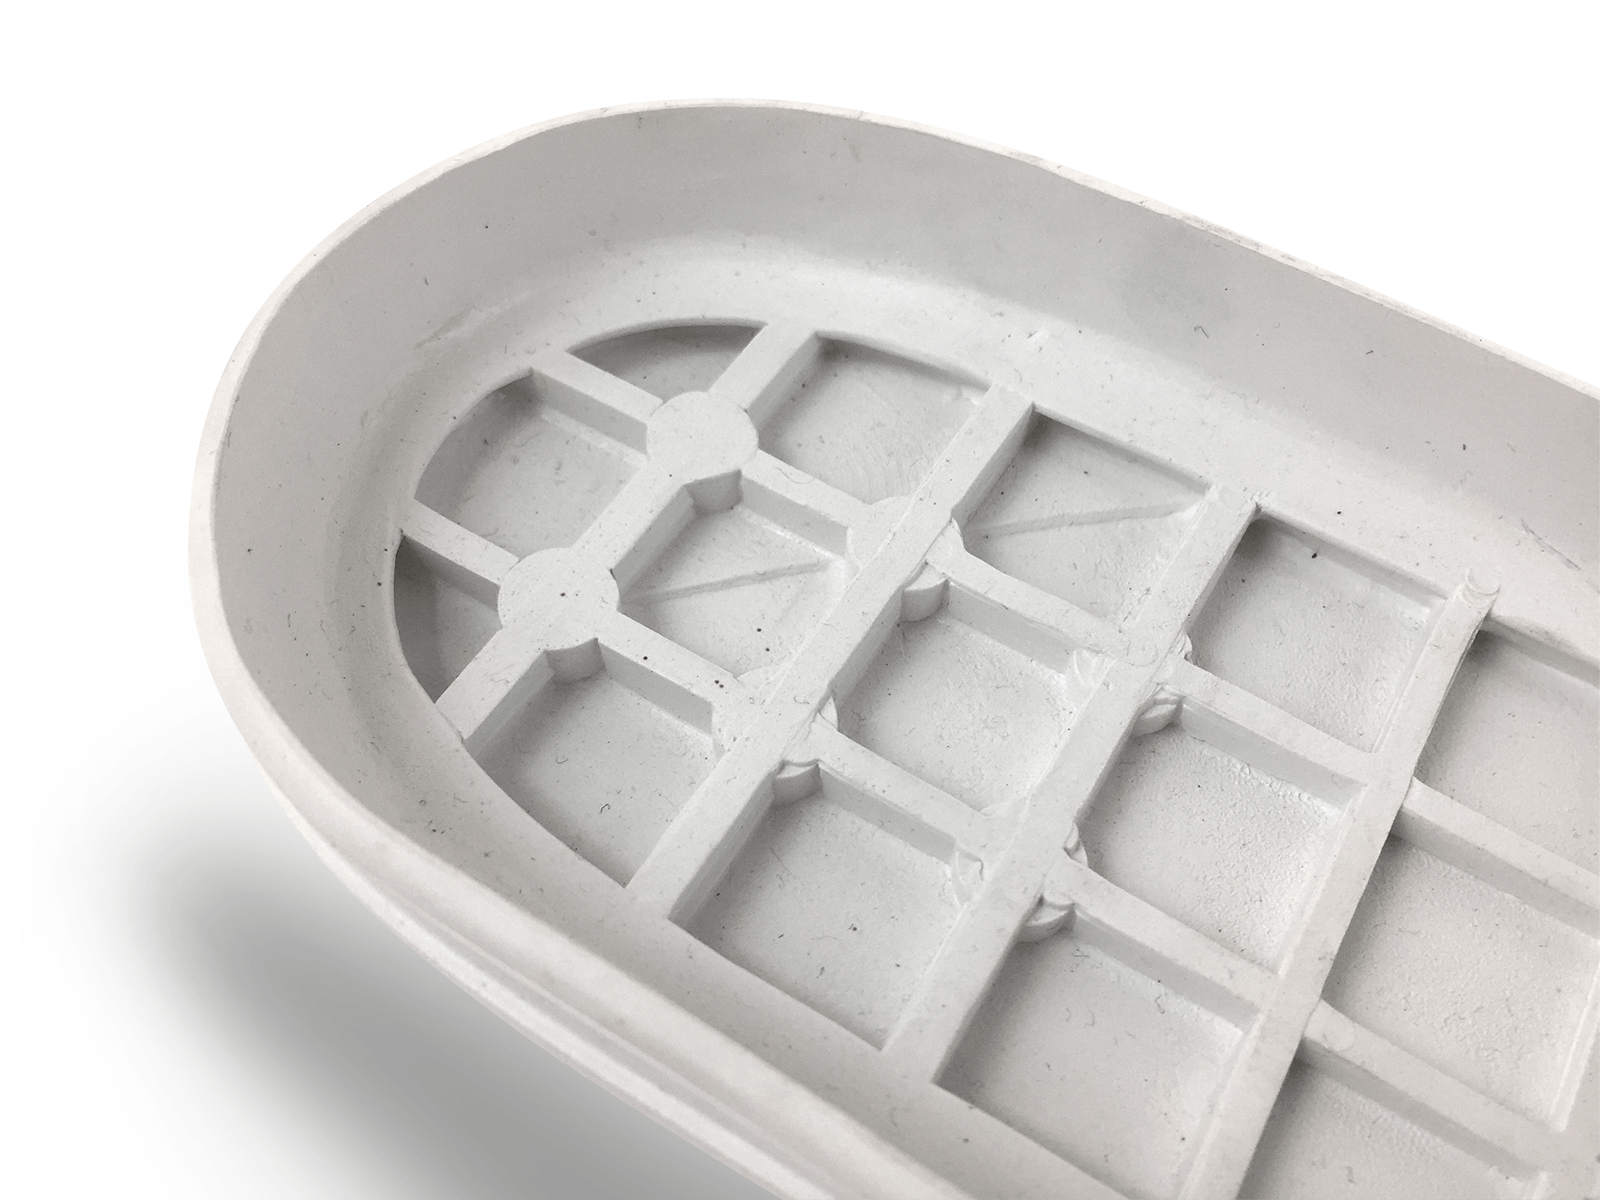
The rubber cupsole is the standard for inexpensive and durable footwear. This style is called a “cup” sole because it “cups” the upper of the shoe. The cupsole is very common and can be found in many styles of footwear. Hiking boots, casual shoes, army boots, skate shoes, court shoes, and sometimes a stylized cupsole can be found on inexpensive running shoes. A cupsole may have a “drop-in” midsole made of EVA blocks or an “egg crate” midsole molded inside the outsole. A cupsole is made by compression molding uncured rubber into a mold, much like making waffles. Cupsole tooling can cost from $1,500 to $2,500 per size.
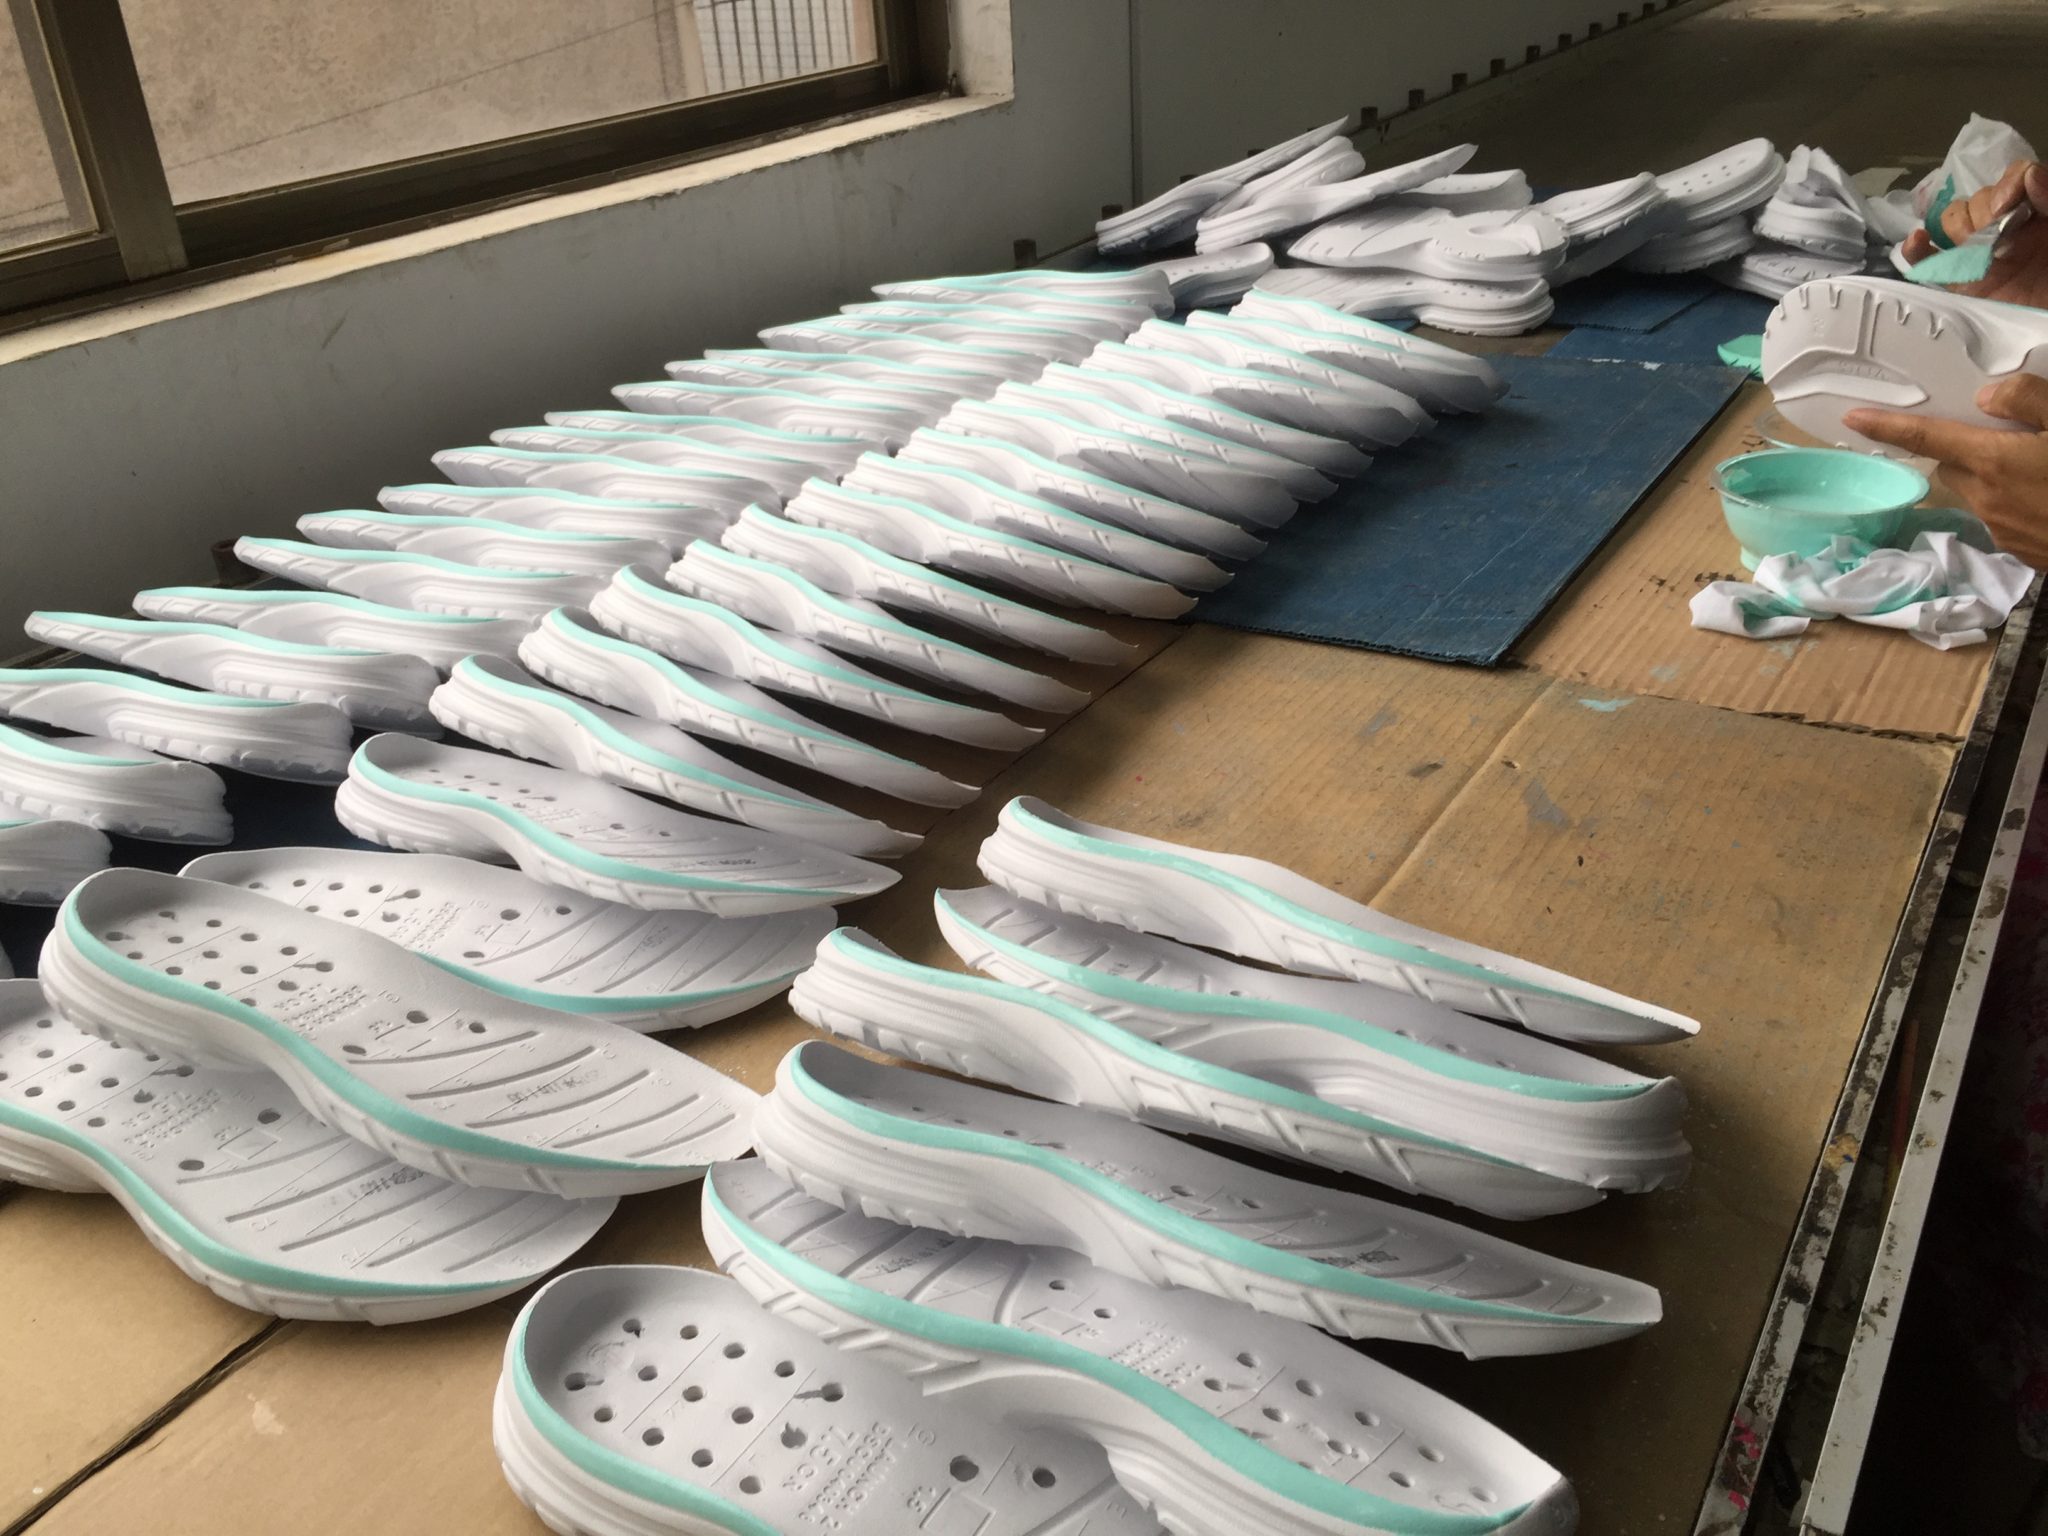
Compression molded EVA sole
EVA midsoles ready for assembly
This running shoe uses a dual density compression molded EVA midsole with rubber inserts and a carbon fiber shank. This is an expensive outsole to make as it requires molds for the EVA, rubber, and shank parts. The EVA midsole is made by first bonding two EVA preforms with the molded shank in between. The final shape is made by compression molding. The compression molded rubber parts are glued on in a separate operation. The tooling to make sole unit will cost approximately $6,000 size.
Injection molded outsole
This baseball cleat outsole is made by the injection molding process. Cleated shoes for soccer, football, and baseball require stiff supportive bottoms. This outsole requires a plastic injection mold. Complicated designs with several over molded colors require an expensive mold. Simple designs require a less expensive mold. Cleats with metal spikes or inserts require over molding or insert molding processes. This type of plastic injection requires a specialized molding machine and is done outside of the shoe factory by a subcontractor. Tooling cost can be $3,500 to $5,500 per size.
To be a shoe designer for Nike or any other shoes company you must know how to draw shoes! There is no right way or wrong way to draw shoe designs. Every shoe designer will have a different way to put the shoe design down on paper. The goal of a shoe drawing is to communicate your idea for how the shoe will look or work. As a shoe designer, your drawings can fulfill different purposes. Is it a styling drawing for a high fashion shoe? This drawing would be all about the colors and material with little attention to the exact proportion or construction details. If you are working on a high-tech running shoe, outdoor shoe, sneaker or skate shoe, your drawing will need to be more accurate to describe the technical details. An accurate, well-proportioned shoe drawing, can save you and your pattern maker some future headaches.
Learn how to design shoes!
We are in the modern computer age but even today most shoe designers will start with a pen and pencil. I have found a small stack of thin 8.5″ by 11″ paper is a great place to start. Thin paper, so you can see your underlay and a small metal clip to hold the sheets together as you sketch. Whatever pencil you like, I like to use both wooden and mechanical depending on what I’m doing. I will often start with the mechanical pencil to draw lighter lines, then darken in the shoe design with the fat, wooden pencil, once I’m more confident with the design.
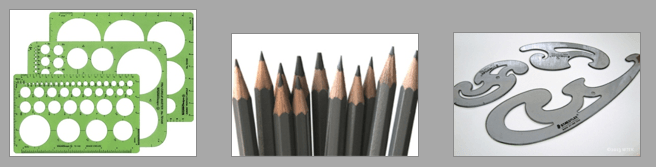
You may also want a set of French curves to make flowing smooth lines, and a circle or oval template for other details such as eyelets or logos. You can make a template of your company’s logo to speed up sketching.
The basic tools to help speed up your shoe drawing work
How to design sneakers
Setting aside the fashion shoe drawing style, I want to show you how to draw a more technical shoe. First, you need to start with a well-proportioned side profile. Go online, grab a magazine or catalog, measure or eyeball a shoe you have on hand. Use your phone camera or whatever camera you have to get a good side profile. Many times I’ve seen a young designer show a great looking, dynamic drawing, that looks nothing like a real shoe. How sad they are when the samples come back and they look nothing like that fantastic drawing.
How to sketch shoes
I take my side profile and clip it into my drawing pad under the first page then go to work. At this point, go fast, break the design down into parts if it helps you: toe cap, side panel, eyestay, heel counter. Each page should take just 5 minutes. I will darken in the parts I like, then pull a page from the bottom of the stack and draw in new ideas for the parts I do not like. In an hour you can make 10 pages, lay them out, then recombine the elements you like again.
How to draw shoes
How to sketch shoes learn how to design shoes
how to design shoes and sell them
How to draw shoes – a hand rendering can be done in just a few minutes
How to draw shoes – a hand rendering can be done in just a few minutes
How to draw shoes – a hand rendering can be done in just a few minutes
Try a few options
Get a shoe sketch you like
Photograph and import into a drawing program
How to draw shoes – Clean up your lines add some color
How to draw shoes -how to design shoes for Nike
How to draw shoes – Quickly create options
Add color to your shoe drawing.
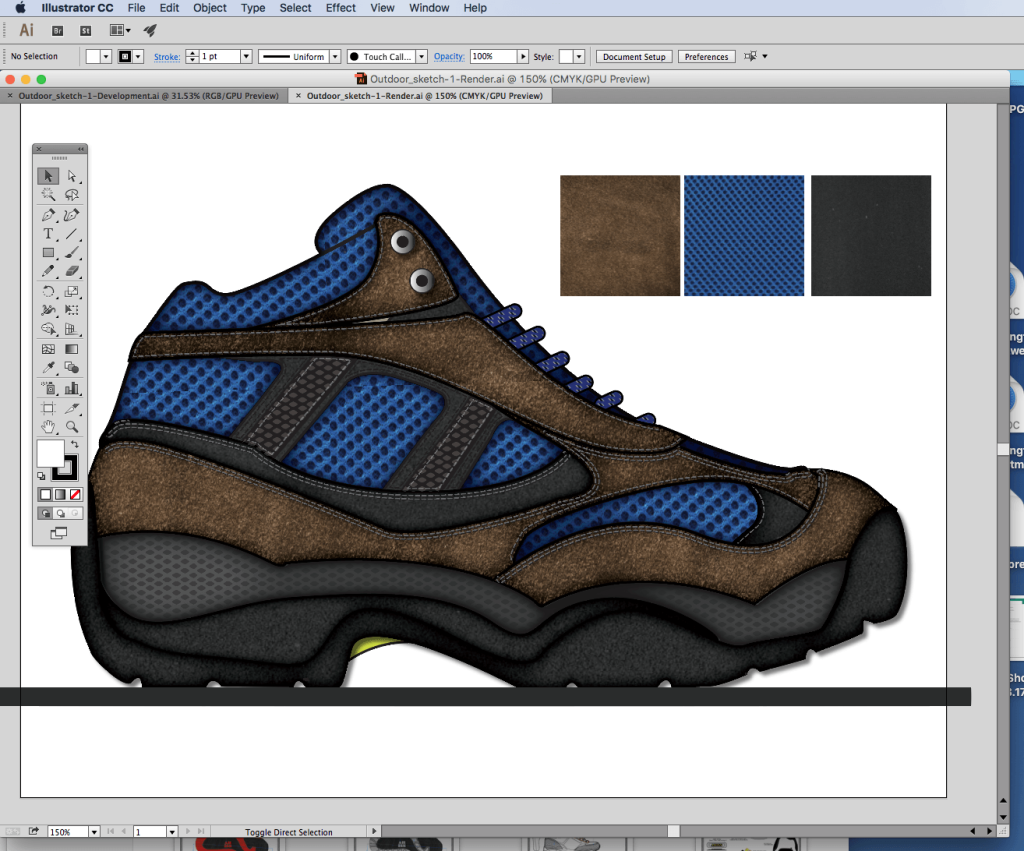
From here I will make one drawing, darken the lines, then take a photo or scan it to pull the lines into Adobe Illustrator. Adobe Illustrator is the drawing program of choice. Once you have the drawing converted into a live vector format it’s easy to adjust lines, pull, bend, and tweak outsole lines.
Add colors, textures, and logo details to make your shoes come to life.
Do you want to learn how to design shoes like Nike? Do you want to design fashion shoes or tennis shoes? You can learn more shoe drawing tips and techniques in our book How Shoes are Made


 To make a new shoe pattern step-by-step you will first need to “tape” the last so you can “pull the shell” off the shoe pattern. The tape should be layered in two different directions so the pattern stays together when you are ready to peel it off the last. You will start on the lateral or outside of the shoe last. First, starting at the top, lay the tape lengthwise down the lateral side of the last. Next, run a strip of tape down the center of the last from the top of the instep down to the toe. Do the same on the heel of the last. Finally, run layers across the last from the bottom edge up the side of the last. Make this extra smooth, this will be your drawing surface when you start marking your shoe pattern.
 It’s fun to add a little color or paste on a logo. You can start to get a feel for what the design will look like in 3D. Go ahead and iterate upon your design, this is your time to be creative. If you don’t like your line, grab some tape, cover it up, and try again.


 Here is the pattern free of the last. You may find that it does not lay flat, don’t worry.
 Once the tape is peeled from the last and flattened you have the shoe pattern! The pattern with all the parts together is called the “shell” pattern. With the pattern attached to some paper, it’s time to “trim out” the pattern. Now the shoe pattern can be redrawn in a computer and cut out of heavy paper. The Pattern Cutter will add the overlaps and alignment marks.